Manual Chapter : Monitoring Ongoing DDoS Attacks

Applies To:

Show Versions Show Versions

BIG-IQ Centralized Management

  • 6.1.0
Manual Chapter

Monitoring Ongoing DDoS Attacks

Detecting the impact of DDoS attacks on protected objects

The DoS profiles configured in Shared Security help prevent DoS (Denial of Service) attacks aimed at the resources that are used for serving the application (the web server, web framework, and the application logic). Ensure that your Network Security, Application Security, and DNS Security are mitigating distributed DoS (DDoS) attacks.
Note: The following data view is only avaialble for managed BIG-IP devices v13.1.0.8 or earlier. To view Network Firewall reports for BIG-IP devices v13.0 or earlier, go to Monitoring > REPORTS > Security > Network Security > Reporting .
By isolating attacks, you can investigate whether you need to:
  • Adjust the protection mode of your DoS profile (mitigating as opposed to monitoring)

  • Edit or reassign a DoS profile

  • Configure additional resources for your BIG-IP devices to maintain their protection services

Isolate ongoing DDoS attacks

Before you can display statistics and protected objects in the Protection Summary screen, you must have:
  • A BIG-IQ data collection device configured for the BIG-IQ device
  • The BIG-IP device located in your network and running a compatible software version
  • Statistics collection enabled for managed BIG-IP devices
You isolate the recent and ongoing distributed denial of service (DDoS) attacks based on the target protocol and protection mode. You can use the filters on this screen to identify attacks that might impact your protected objects or BIG-IP devices. Once you isolate an attack that impacts your system objects, you further can evaluate whether mitigation is necessary.
  1. At the top of the screen, click Monitoring.
  2. Click DASHBOARDS > DDoS > Protection Summary .
  3. Locate the ATTACKS area at the top left side of the screen to view a summary of all ongoing DDoS attacks.
  4. To filter DDoS attacks by the targeted protocol, select HTTP, Network, or DNS.
    Note: The attack information that is displayed varies according to your security provisioning and the BIG-IP software version reporting the attack's data.
  5. To isolate attacks by severity, select one of the severity levels from ATTACK SEVERITY.
    • The Warning alert. The attack's details indicate that an non-mitigated attack would have a moderate impact on your protected objects.
    • The Critical alert. The attack's details indicate that a non-mitigated attack would have a critical impact on your protected objects
  6. To filter attacks by protection mode, specify how to view them:
    • Click Mitigated to view attacks detected by a DoS profile that is configured to mitigate or block traffic recognized at an attack.
    • Click Not Mitigated to view attacks detected by a DoS profile that is configured to monitor traffic recognized as an attack.
Next, you can identify the status of protected objects and BIG-IP devices that have reported DoS attacks. With this information, you can evaluate the performance impact of the attack, and whether you need to edit your DoS profile's security configuration.

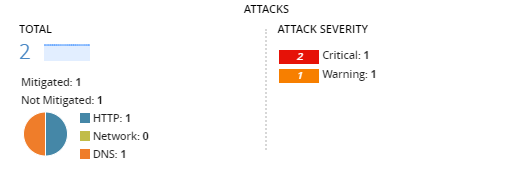
Protection modes against DDoS attacks

The attack protection mode indicates whether your DoS profile's configuration mitigates or monitors detected attacks based on the security services provisioned on your BIG-IP devices (ASM, DNS, and AFM).

Mitigated

The DoS profile that reported the attack has at least one mitigating element:

  • HTTP protocol (Application Security): One or more operation modes is configured to Blocking.
  • DNS protocol or Network protocol: One or more attack type states is configured to Mitigate.

Not Mitigated

The DoS profile that reported the attack has at least one monitoring element, and no mitigating elements:

  • HTTP protocol (Application Security): One or more operation modes is configured to Transparent.
  • DNS protocol or Network protocol: One or more attack type states is configured to Detect Only or Learn Only.

DDoS attack severity

The severity assigned to the DDoS attacks displayed in the Protection Summary screen ( Monitoring > DASHBOARDS > DDoS > Protection Summary ) have either a Critical (2) or Warning (1) attack score. The score reflects the recently reported correlated attack with the highest attack severity. Severity is based on the following criteria.

Detection Mode

The attack's detection mode (trigger) influences the weight of the attack severity.

IP Ratio

The ratio of different attacking client IP addresses, out of all client IP addresses processed. An increased number of IP addresses attacking indicates a broader attack distribution.

Mitigated traffic

The ratio of mitigated traffic out of all traffic processed.

Identifying ongoing HTTP DDoS attacks

A DoS profile can actively mitigate or monitor an HTTP DDoS attack according to your profile's configuration. Once you have isolated a recently detected, or ongoing, HTTP attack, you can further isolate details of the attack. You can view additional details about a specific attack, or set of correlated attacks, to ensure that your current DoS profile configuration meets your Application Security requirements.

The Protection Summary screen ( Monitoring > DASHBOARDS > DDoS > Protection Summary ) details DDoS attacks for the DNS protocol. To display attack information on this screen, your configuration must include the following items:
  • BIG-IQ data collection device configured for the BIG-IQ device.
  • The BIG-IP device is located in your network and running the compatible software versions of 13.1.1.4, 14.0.0.3, or 14.1.
  • BIG-IP Web Application Security (ASM) services is discovered on BIG-IQ.
  • Statistics collection enabled for managed BIG-IP devices.
  • A DoS profile with Application Security enabled.

Identify DDoS attacks that can impact application security

To view attack details, you must first have a DoS Profile with application security enabled.
You can view details of a single DDoS attack to understand whether your protected object is secure under the current DoS profile.
  1. At the top of the screen, click Monitoring.
  2. Click DASHBOARDS > DDoS > Protection Summary .
  3. To display the attacks list, select ATTACKS at the top left of the screen.
  4. Select an attack from the Attack ID column.
    The screen displays attack details and statistics about the attack vectors, BIG-IP devices, and protected objects. By default, the statistics at the bottom of the screen display transaction data from the virtual server(s) that reported the attack.
  5. In the Transaction Outcomes chart, note the volume of incomplete transactions to the virtual servers that reported the ongoing attack.
    Incomplete transactions indicate issues that affect your virtual server's performance.
  6. To view detailed information about the virtual server transactions, use the dimension pane to the left of the chart.
    You can expand these dimensions and select objects to filter displayed data.
  7. To view the reported status of your application's servers, select Pool Members from the ATTACKED SERVICES area.
    In the Top 5 Pool Members by Server Latency chart, note the latency of your pool members to evaluate whether the attack affects application server performance. To display the full list of pool members, expand the Pool Members Address dimension to display a list of the pool members and corresponding transaction latency data.
  8. To further review the reported traffic responses from your application servers, you can select Response Codes from the ATTACKED SERVICES area.
  9. To view statistics of behavioral DoS attack mitigation, select Stress Level from the ATTACKED SERVICES area.
    Note: This data is only available for BIG-IP version 14.1 or later. The following BIG-IQ configuration is required:
    • DoS profile with Behavioral & Stress-based Detection enabled.
    • An HTTP profile enabled
If the attack is affecting your virtual server, or application server performance, you can now modify your Layer 7 security. To display HTTP data for all your managed applications, go to Monitoring > DASHBOARDS > DDoS > HTTP Analysis .

Modifying a DoS profile to improve application protection

A DoS profile configured on the BIG-IQ Centralized Management system prevents or monitors denial of service (DoS) attacks on web applications. Depending on your configuration, the system detects DoS attacks based on transactions per second (TPS) on the client side, stress-based server latency, heavy URLs, source location, suspicious browsers, and failed CAPTCHA responses. Behavioral DoS (BADoS), a part of stress-based detection, automatically discovers and mitigates DoS attacks using behavioral data.

Changes in your application's traffic might reduce the effectiveness of your existing DoS profile. You can edit DoS profiles that protect your application's security to add or remove attack detection and mitigation measures.

Edit DoS profile for application security

Your virtual server must include an HTTP profile before you can use the DoS profile Application Security feature.
You can configure the conditions under which the system determines that your application is under a DoS attack, and how the system reacts to a suspected attack.
  1. At the top of the screen, click Monitoring.
  2. Click DASHBOARDS > L7 Security .
    This displays all monitored objects.
  3. Click the DoS Profile column header to sort objects by DoS profile.
  4. Click the name of the DoS profile you want to edit.
    The DoS Profile Properties screen opens.
  5. On the left, click Application Security to expand the list.
  6. Click Properties to display the General Settings screen and configure the application security general settings.
    1. In the Application Security setting, select Enabled to use application security protection and display additional properties.
    2. In the IP Address Whitelist setting, specify the IP addresses that the system considers legitimate and does not examine when performing DoS prevention.
      • To add an IP address to the whitelist, type it in the upper field, and click Add. The IP address is added to the whitelist in the lower field.
      • To delete an IP address from the whitelist, select the IP address from the whitelist in the lower field, and click Remove.
      Apply this setting only to BIG-IP devices earlier than version 13.0.
    3. In the Geolocations setting, specify that you want to override the DoS profile's geolocation detection criteria threshold settings by selecting countries from which to allow or block traffic during a DoS attack.
      • To allow traffic from a country, select the country and move it to the Geolocation Whitelist.
      • To block traffic from a country, select the country and move it to the Geolocation Blacklist.
    4. Enable the Trigger iRule setting if you have an iRule that manages DoS events in a customized manner.
    5. Enable the Single Page Application setting if your website is a single page application.
    6. Configure the URL Patterns to use. Each URL pattern defines a set of URLs which are logically the same URL with the varying part of the pattern acting as a parameter, such as /product/*php.
      • To add the URL pattern to the list, type the URL pattern and click Add.
      • To remove the URL pattern from the list, select the pattern from the URL Patterns list, and click Remove.
    7. Enable the Traffic Scrubbing setting if you want traffic scrubbing enabled during attacks by advertising BGP routes. This feature requires configuration of a scrubber profile. Change the Advertisement Duration value if needed.
    8. Enable the RTBH setting if you want to have remotely triggered black hole (RTBH) filtering of attacking BGP IP addresses by advertising the BGP routes. This feature requires configuration of the blacklist publisher. Change the Advertisement Duration value if needed.
    9. Configure whether Performance Acceleration should be used.
      • To forgo performance acceleration, select None.
      • To use performance acceleration, select the TCP fastL4 profile to use as the fast-path for acceleration.
  7. To configure the Proactive Bot Defense settings, click Proactive Bot Defense.
    Property Description
    Operation Mode Specifies the conditions under which the system detects and blocks bots. Select Off, During Attacks, or Always. If Off is selected, no other settings are shown on this tab.
    Block requests from suspicious browsers Strengthens the bot defense by blocking suspicious browsers. By default, the system completely blocks highly suspicious browsers and uses CAPTCHA challenges for moderately suspicious browsers.
    • Select the Block Suspicious Browsers check box to enable or disable blocking of suspicious browsers.
    • Select the CAPTCHA Challenge check box to enable or disable issuing a challenge. Click CAPTCHA Response Settings to select the responses to use.
    Grace Period Specifies time in seconds for the system to validate that browsers are not bots. During this period, the system does not block requests that were not validated. Modify the number or click Reset to Default to reset the value.
    Cross-Domain Requests You can add additional security by allowing only configured domains to reference resources of the site. From the list, select an option. You can also configure domains after selecting one of the Cross-Domain Requests options.
    Related Site Domains Specifies the domains that are part of the web site and protected by Proactive Bot Defense. Add domains by typing a domain in the text box and clicking Add. Remove a domain by selecting it and clicking Remove.
    Related External Domains Specifies the external domains (those not part of your web site) that are allowed to reference resources in your website. Add domains by typing a domain in the field and clicking Add. Remove a domain by selecting it in the text box and clicking Remove.
    URL Whitelist Specifies URLs that are not blocked by Proactive Bot Defense. Requests may still be blocked by the TPS-based / Stress-based attack mitigation. Add URLs to the whitelist by typing a URL in the text box and clicking Add. Remove a URL by selecting it and clicking Remove.
  8. To configure the Bot Signatures settings, click Bot Signatures.
    Property Description
    Bot Signature Check Select Enabled to display settings. You cannot disable the Bot Signature Check property while Proactive Bot Detection, TPS-based Detection with By Device ID selected, or Stress-based Detection with By Device ID selected, is enabled. To disable the Bot Signature Check property, you must first disable the previously listed properties. Alternatively, rather than disabling all bot signature checking by disabling Bot Signature Check, you can disable categories of bot signatures individually.
    Malicious Categories and Benign Categories These two category lists are handled similarly.

    For either category, select None, Report, or Block. That setting is then applied to all the listed items in the category. The categories can also be individually changed to another value. If you change them individually, the value for the Malicious Categories or Benign Categories changes to Custom Configuration. A user cannot set all categories to None and keep Proactive Bot Defense enabled.

    Disabled Bot Signatures Specifies bot signatures that are available and disabled. To specify, move the bot signatures between the Available Signatures list and the Disabled Signatures list.
  9. To configure how mobile applications built with the Anti-Bot Mobile SDK are detected, and to define how requests from mobile application clients are handled, click Mobile Applications.
    Property Description
    Mobile App Protection Specify whether to use mobile application DoS protection.
    • Select Enabled to use configuration of mobile application DoS protection. When this is enabled, requests from mobile applications built with the Anti-Bot Mobile SDK are detected and handled according to the settings.
    • Clear the Enabled check box to have mobile application requests handled without DoS protection.
    iOS Specify the settings for iOS mobile applications.
    • To allow traffic on any iOS package, select Allow Any Package Name. A package name is the unique identifier of the mobile application, such as com.f5.app1.
    • To allow traffic from jailbroken iOS devices, select Allow Jailbroken Devices.
    • To allow traffic on specified packages, type the iOS package names to allow, and click Add. To remove a package from the list, select the package and click Remove. This option is not available if you have chosen Allow Any Package Name. When this is set, all other packages are blocked with the mobile application response page text.
    Android Specify the settings for Android mobile applications.
    • To allow any application publisher, select Allow Any Publisher. A publisher is identified by the certificate used to sign the application.
    • To allow traffic from rooted Android devices, select Allow Rooted Devices.
    • To allow traffic on specified packages, select publisher certificates from the Available publisher certificate list, and move them to the Assigned publisher certificates list. All other certificates are blocked with the mobile application response page text. This option is not available if you have chosen Allow Any Publisher.
    Advanced Specify advanced handling of requests from mobile applications.
    • When a CAPTCHA or client side integrity challenge needs to be presented, select the action to take.
      • To have the traffic passed without incident, select Always passed.
      • To have the traffic challenged for human behavior, select Challenged for human behavior. When this is selected, the SDK checks for human interactions with the screen in the last few seconds. If none are detected, the traffic is blocked.
    • To allow traffic from applications that are run on emulators, select Allow Emulators.
  10. To configure settings for the detection of DoS attacks based on a high volume of incoming traffic, click TPS-based Detection.
    Property Description
    Operation Mode Specifies how the system reacts when it detects an attack, and can be Off, Transparent, or Blocking. If it is set to Off, no other properties are shown.
    Thresholds Mode Specifies how thresholds are configured.
    • To configure each mitigation behavior threshold manually, select Manual.
    • To use the system default mitigation threshold settings, select Automatic.
    Your Thresholds Mode selection affects which threshold options are available in the other sections on this screen.
    By Source IP Specifies the criteria that determine when the system treats the IP address as an attacker, and the mitigation method to be used for the attacking IP address.
    By Device ID Specifies the criteria that determine when the system treats the device ID as an attacker, and the mitigation method to be used for the attacking device.
    By Geolocation Specifies the criteria that determine when the system treats the geolocation as an attacker, and the mitigation method to be used for the attacking geolocation. The settings exclude blacklisted and whitelisted geolocations.
    By URL Specifies the criteria that determine when the system treats the URL as an attacker, and the mitigation method to be used for the attacking URL. Heavy URL Protection can also be enabled, but needs to be configured. Click the Click to configure link next to the option to do so.
    Site Wide Specifies the criteria that determine when the system determines an entire website is under attack, and the mitigation method to be used.
    Prevention Duration Specifies the time spent in each mitigation step before moving (escalating or de-escalating) to the next mitigation step.
  11. To configure settings for the detection of DoS attacks based on server stress, click Behavioral and Stress-based Detection.
    Property Description
    Operation Mode Specifies how the system reacts when it detects a stress-based attack, and can be Off, Transparent, or Blocking. If it is set to Off, no other properties are shown.
    Thresholds Mode Specifies how thresholds are configured.
    • To configure each mitigation behavior threshold manually, select Manual.
    • To use the system default mitigation threshold settings, select Automatic.
    Your Thresholds Mode selection affects which threshold options are available in the other sections on this screen.
    By Source IP Specifies the criteria that determine when the system treats the IP address as an attacker, and the mitigation method to be used for the attacking IP address.
    By Device ID Specifies the criteria that determine when the system treats the device ID as an attacker, and the mitigation method to be used for the attacking device.
    By Geolocation Specifies the criteria that determine when the system treats the geolocation as an attacker, and the mitigation method to be used for the attacking geolocation. The settings exclude blacklisted and whitelisted geolocations.
    By URL Specifies the criteria that determine when the system treats the URL as an attacker, and the mitigation method to be used for the attacking URL. Heavy URL Protection can also be enabled, but needs to be configured. Click the Click to configure link next to the option to do so.
    Site Wide Specifies the criteria that determine when the system determines an entire website is under attack, and the mitigation method to be used.
    Behavioral Detection and Mitigation Specifies the mitigation behavior, and when enabled, the selected level of mitigation to use.
    • For the Bad Actor Detection setting, select Enabled to perform traffic behavior, server capacity learning, and anomaly detection.
    • For the Signature Detection setting, select Enabled to perform signature detection. Select Use approved signatures only to use only approved signatures.
    • For Mitigation, select the type of mitigation to be used. Review the description of each mitigation type to select the best one for your environment,
    Prevention Duration Specifies the time spent in each mitigation step before moving (escalating or de-escalating) to the next mitigation step.
  12. To configure settings for protecting heavy URLs during DoS attacks, click Heavy URL Protection.
    Heavy URLs are those that have the potential to cause stress on the server, even with a low TPS count.
    Property Description
    Automatic Detection Select Enabled to automatically detect heavy URLs of the application, in addition to the URLs entered manually.
    Heavy URLs You can configure a list of heavy URLs to protect, in addition to the automatically detected ones. Type a URL in the top field, and click Add. Optionally, for a BIG-IP device version 13.0 or later, enter a threshold value. To remove a URL from the list, select the URL from the text box, and click Remove
    Ignored URLs You can configure a list of URLs that are excluded from automatic detection as heavy URLs. The system supports wildcards. Type a URL in the top field, and click Add. To remove a URL from the list, select the URL from the text box, and click Remove
    Latency Threshold If Automatic Detection is enabled, set the Latency Threshold setting to be the number of milliseconds for the system to use as the threshold for automatically detecting heavy URLs. The default value is 1000 milliseconds. Click Reset to Default to reset the value to 1000.
  13. To define the responses to use when issuing a challenge, click CAPTCHA Response Settings.
    Note: The exact format of a response body differs, depending on the version of the BIG-IP device. Test and verify that any custom response you create works with your installed BIG-IP version.
    1. For the First Response Type, select Default to use the default response, or select Custom to create your own first response body by entering it into the First Response Body area.
      Here is an example first response body:
      This question is for testing whether you are a human visitor and to prevent automated spam submission.
      <br>
      %DOSL7.captcha.image% %DOSL7.captcha.change%
      <br>
      <b>What code is in the image?</b>
      %DOSL7.captcha.solution%
      <br>
      %DOSL7.captcha.submit%
      <br>
      <br>
      Your support ID is: %DOSL7.captcha.support_id% 
    2. For the Failure Response Type, select Default to use the default response, or select Custom to create your own failure response body by entering it into the Failure Response Body area.
      Here is an example failure response body:
      You have entered an invalid answer for the question. Please, try again.
      <br>
      %DOSL7.captcha.image% %DOSL7.captcha.change%
      <br>
      <b>What code is in the image?</b>
      %DOSL7.captcha.solution%
      <br>
      %DOSL7.captcha.submit%
      <br>
      <br>
      Your support ID is: %DOSL7.captcha.support_id% 
  14. Click Record Traffic to configure settings for the recording of traffic (by performing a TCP dump) when a DoS attack is underway, to diagnose the attack vectors and attackers, observe whether and how it was mitigated, and draw conclusions for changing the DoS profile configuration.
    You can record traffic and collect the TCP dump files into the QuickView file so that F5 Support can use it for solving customer cases. The files have a pcap extension and are located in this path on the BIG-IP device: /shared/dosl7/tcpdumps.
    Property Description
    Record Traffic During Attacks Controls whether traffic recording is used. The default is disabled and causes other properties to be hidden. Note that the system records SSL traffic encrypted. Select Enabled to specify that the system record traffic when a DoS attack is underway, and display settings.
    Maximum TCP Dump Duration Specifies the maximum time, in seconds, for one dump cycle. Legal values are between 1 and 300. The default is 30 seconds.
    Maximum TCP Dump Size Specifies the maximum size, in MB, for a dump cycle. Legal values are between 1 and 50. The default is 10 MB.
    TCP Dump Repetition Specifies whether the system performs one dump, or multiple dumps, for each DoS attack.
  15. Save your work.
The settings are incorporated into the DoS profile.
Next, you can view the attack details for an ongoing DDoS attack to monitor the impact of your edited DoS Profile.

Identifying ongoing network DDoS attacks

A DoS Profile can actively mitigate or monitor network DDoS attacks according to your profile's configuration. Once you have isolated recently detected, or ongoing network protocol attack, you can further isolate details of the attack. You can the view additional details about an ongoing attack detected by your BIG-IP environment, to ensure that your current DoS profile configuration meets your Network Security requirements.

The Protection Summary screen ( Monitoring > DASHBOARDS > DDoS > Protection Summary ) gives details of DDoS attacks for the network protocol. To display attack information on this screen, your configuration must have the following characteristics:

  • BIG-IQ data collection device configured for the BIG-IQ device.
  • BIG-IP device located in your network and running a compatible software version of 13.1.1.4 or later.
  • BIG-IP Network Security (AFM) services discovered on BIG-IQ.
  • Statistics collection enabled for managed BIG-IP devices.
  • A DoS profile with Network Security enabled.

Identify DDoS attacks that can impact network security

You can view details of a single DDoS attack to understand whether the your protected objects are secure under the current DoS profile.
  1. At the top of the screen, click Monitoring.
  2. Click DASHBOARDS > DDoS > Protection Summary .
  3. To display the attacks list, select ATTACKS at the top left of the screen.
  4. Select an attack from the Attack ID column.
    The screen displays attack details and statistics about the attack vectors, BIG-IP devices, and protected objects. By default, the statistics at the bottom of the screen display transaction data from the virtual server(s) that reported the attack.
  5. By default, the chart data at the bottom of the screen displays traffic statistics for the attacked virtual server(s). From the Actions chart, note the volume of accepted vs denied events reported by the virtual server(s) that during the ongoing attack.
    An elevated ratio of deny network events to accepted transactions indicates issues with your virtual server's performance.
  6. To view detailed information about the virtual server transactions, use the dimension pane to the left of the chart.
    You can expand these dimensions and select objects to filter displayed data.
  7. In the ATTACK SOURCE area at the center of the screen, select Attack Vectors to display the top attack types attacking your virtual servers.
    Note the attack types to ensure that the DoS profile's protection state is configured to mitigate this type of attack.
If the attack is affecting your virtual server's performance, you can modify the DoS profile's Network security. To display Network data for all monitored objects, go to Monitoring > DASHBOARDS > DDoS > Network Analysis .

Modifying a DoS profile to improve Network Security

A DoS profile configured on BIG-IQ Centralized Management prevents or monitors DoS attacks on your application. Changes in your traffic or new attack types might reduce a DoS profile's capability to protect your network. You can edit DoS profiles attached to the virtual servers that provide Network Security services.

Edit DoS profile for Network Security

You can configure the conditions under which the system determines that your server is under a network DoS attack.
  1. Click Configuration > SECURITY > Shared Security > DoS Protection > DoS Profiles .
  2. In the DoS Profiles screen, click the profile name you want to configure.
  3. On the left, click Network Security to display the Properties screen.
  4. On the Properties screen, select the check box for Network Protection.
    The screen displays an area for configuring dynamic signatures, and a list of commonly-known network attack types that the system can detect.
  5. In the Enforcement setting, select the Dynamic Signature Enforcement.
    This setting is available only for BIG-IP devices version 13.0 or later.
    • To enable enforcement of dynamic DoS vectors, select Enabled. When enforcement is enabled, all thresholds and threshold actions are applied. Enabling enforcement displaysadditional options.
    • To apply no action or thresholds to dynamic vectors, select Disabled.
    • To track dynamic vector statistics, without enforcing any thresholds or limits, select Learn-Only.
  6. For Mitigation Sensitivity , specify the mitigation sensitivity for dynamic signatures (None, Low, Medium, or High).
  7. For Redirection/Scrubbing , specify whether to enable redirection and scrubbing of IP addresses identified by dynamic vectors.
    This enables handling of the dynamic vector hits by an IP intelligence category. Enabling redirection and scrubbing causes additional options to be displayed.
  8. In the Scrubbing Category setting, select the IP intelligence blacklist category to which scrubbed IP addresses are sent.
  9. For Scrubbing Advertisement Time , type the duration in seconds for which an IP address is added to the blacklist category.
  10. In the lower partof the screen, review the Known Attack Types list that shows commonly known attack types that you want the system to detect in packets.
  11. Review the list of known attack types and their current settings in the summary table.
    • Threshold Mode specifies how thresholds are set for this vector.
      • Fully Automatic indicates that automatic thresholds are used to mitigate DDoS attacks based on server stress.
      • Manual Detection/Auto Mitigation indicates that you set thresholds manually. However, the system also automatically examines server stress, and mitigates the attack vector if the server is stressed.
      • Fully Manual indicates that you configure parameters for DoS vector detection and rate limiting manually. The system mitigates the attack vector based on the threshold values you set.
    • Detection Threshold EPS specifies how many packets per second the system must discover in traffic in order to detect this attack.
    • Detection Threshold Percent specifies the threshold percent the system must discover in traffic in order to detect this attack.
    • Mitigation Threshold EPS specifies the maximum number of this type of packet per second the system allows for a vector. The system drops packets once the traffic level exceeds the rate limit.
    • Bad Actor Detection specifies that Bad Actor detection is enabled. This appears only for non-error packets and non sweep/flood packets. Bad actor detection allows automatic detection, logging, and rate limiting of specific IP addresses that appear to be the source of an attack, based on criteria you configure.
    • Add Source Address to Category specifies that the source IP address be added to the blacklist category assigned to the DoS vector.
  12. Customize attack types individually, as needed:
    1. Click the name of the attack type to open the properties screen for it.
    2. On the attack type properties screen, select the State for how to enforce protection for the attack type.
      • Mitigate indicates watch, learn, alert, and mitigate protection is used.
      • Detect Only indicates watch, learn, and alert protection is used.
      • Learn Only indicates that stats should be collected with no mitigation.
      • Disabled indicates that there should be no stat collection and no mitigation.
      Selecting a state determines which detection settings are displayed.
    3. Supply values for the properties displayed to configure the protection for the attack type.
    4. Click OK.
    Refer to the BIG-IP system documentation, BIG-IP® Systems: DoS Protection and Protocol Firewall Implementations, for information on each attack type.
  13. Save your work.
The settings are incorporated into the DoS profile.
View the attack details for an ongoing DDoS attack to monitor the impact of your edited DoS Profile.

Identifying ongoing DNS DDoS attacks

A DoS profile can actively mitigate or monitor DNS DDoS attacks according to your profile's configuration. Once you have isolated a recently detected, or ongoing, DNS DDoS attack, you can further isolate details of the attack. You can view additional details about a specific attack, or set of correlated attacks, to ensure that your current DoS profile configuration meets your DNS Security requirements.

The Protection Summary screen ( Monitoring > DASHBOARDS > DDoS > Protection Summary ) gives details of DDoS attacks for the DNS protocol. To display attack information on this screen, your configuration must have the following characteristics:
  • BIG-IQ data collection device configured for the BIG-IQ device.
  • BIG-IP device located in your network and running a compatible software version 13.1.1.4 or later.
  • BIG-IP DNS services discovered on BIG-IQ.
  • Statistics collection enabled for managed BIG-IP devices.
  • A DoS profile with DNS Security enabled.

Identify DDoS attacks that can impact DNS security

You can view details of a single DDoS attack to understand whether your protected objects are secure under the current DoS profile.
  1. At the top of the screen, click Monitoring.
  2. Click DASHBOARDS > DDoS > Protection Summary .
  3. To display the attacks list, select ATTACKS at the top left of the screen.
  4. Select an attack from the Attack ID column.
    The screen displays attack details and statistics about the attack vectors, BIG-IP devices, and protected objects. By default, the statistics at the bottom of the screen display transaction data from the virtual server(s) that reported the attack.
  5. In the Transaction Outcomes chart, note the volume of valid to malicious transactions during the attack.
    An elevated volume of invalid DNS transactions can indicate virtual server performance issues.
  6. To view detailed information about the virtual server transactions, use the dimension pane to the left of the chart.
    You can expand these dimensions and select objects to filter displayed data.
  7. In the ATTACK SOURCE area at the center of the screen, select Attack Vectors to display the top query types attacking your virtual servers.
    Note the query types to ensure that the DoS profile's protection state is configured to mitigate this type of attack.
  8. To view additional source data, you can select one of the following options from the ATTACK SOURCE area:
    Note: Some information is only available when reporting settings are enabled on the managed BIG-IP device.
    1. Source Countries displays data about the geographic location of the attack vector, when available.
    2. Source IP Addresses displays data about the top attacking client IP addresses, when available
If the attack is affecting your virtual server's performance, you can modify the DoS profile's DNS security to protect your objects against specific attack types. To display DNS data for all monitored objects, go to Monitoring > DASHBOARDS > DDoS > DNS Analysis .

Modifying a DoS profile to improve DNS security

A DoS profile configured on BIG-IQ Centralized Management prevents or monitors DoS attacks on your application. Changes in your traffic or a new attack type (query) might reduce a DoS profile's capability to protect your DNS servers. You can edit DoS profiles attached to the virtual servers that provide DNS security.

Edit DoS profile for DNS security

You can edit the conditions under which the system determines that your DNS server is under a DoS attack, and so improve your system's DNS security.
  1. Click Configuration > SECURITY > Shared Security > DoS Protection > DoS Profiles .
  2. In the DoS Profiles screen, click the profile name you want to configure.
  3. On the left, click PROTOCOL DNS SECURITY and select the Enabled check box for DNS Protection.
    This displays the properties for the profile.
  4. To enable Protocol Errors Attack Detection and modify settings, select the Enabled check box.
    You can skip this setting when deploying to BIG-IP devices with version 13.0 or later.
  5. Specify the adjustable settings as necessary for your configuration.
    The system saves settings as you enter them.
    1. In the Rate increased by setting, specify that the system considers traffic to be an attack if the rate of requests increases above this number.
      By default, the system calculates this number every hour, and updates it every minute. The default is 500 percent.
    2. In the Rate threshold setting, specify the number of packets per second that must be exceeded to indicate to the system that there is an attack.
      The default is 250,000 packets per second.
    3. In the Rate limit setting, specify the limit in packets per second.
      The default is 2,500,000 packets per second.
  6. For Dynamic Signatures Enforcement, select the enforcement state for dynamic signatures. (This setting is only available for BIG-IP devices version 13.1 or later.)
    • To enable enforcement of dynamic DoS vectors, select Enabled. When enforcement is enabled, all thresholds and threshold actions are applied, and additional options display.
    • To apply no action or thresholds to dynamic vectors, select Disabled.
    • To track dynamic vector statistics, without enforcing any thresholds or limits, select Learn-Only.
  7. For Mitigation Sensitivity, specify the mitigation sensitivity for dynamic signatures (None, Low, Medium, or High).
  8. At the bottom of the screen, review the list of known attack types and their current settings.
    • Threshold Mode specifies how thresholds are set for this vector.
      • Fully Automatic indicates that automatic thresholds are used to mitigate DDoS attacks based on server stress.
      • Manual Detection/Auto Mitigation indicates that you set thresholds manually. However, the system also automatically examines server stress, and mitigates the attack vector if the server is stressed.
      • Fully Manual indicates that you configure parameters for DoS vector detection and rate limiting manually. The system mitigates the attack vector based on the threshold values you set.
    • Detection Threshold EPS specifies how many packets per second the system must discover in traffic in order to detect this attack.
    • Detection Threshold Percent specifies the threshold percent the system must discover in traffic in order to detect this attack.
    • Mitigation Threshold EPS specifies the maximum number of this type of packet per second the system allows for a vector. The system drops packets once the traffic level exceeds the rate limit.
    • Bad Actor Detection specifies that Bad Actor detection is enabled. This appears only for non-error packets and non sweep/flood packets. Bad actor detection allows automatic detection, logging, and rate limiting of specific IP addresses that appear to be the source of an attack, based on criteria you configure.
    • Add Source Address to Category specifies that the source IP address be added to the blacklist category assigned to the DoS vector.
  9. To customize attack types individually, click the name of the attack type to open the properties screen:
    1. On the attack type properties screen, select the State for how to enforce protection for the attack type.
      • Mitigate indicates watch, learn, alert, and mitigate protection is used.
      • Detect Only indicates watch, learn, and alert protection is used.
      • Learn Only indicates that statistics should be collected with no mitigation.
      • Disabled indicates that there should be no statistics collection and no mitigation.
      The state you select determines which detection settings the screen displays.
    2. To configure the protection for the attack type, supply values for the properties shown.
    3. Click OK.
    Refer to the BIG-IP system documentation, BIG-IP® Systems: DoS Protection and Protocol Firewall Implementations, for information on each attack type.
  10. Save your work.
The settings are incorporated into the DoS profile.
You can view the attack details for an ongoing DDoS attack to monitor the impact of your edited DoS Profile.

Isolate status of protected objects under attack

Before you can display statistics and protected objects in the Protection Summary screen, you must have:
  • A BIG-IQ data collection device configured for the BIG-IQ device
  • The BIG-IP device located in your network and running a compatible software version
  • Statistics collection enabled for managed BIG-IP devices
You can identify the health of protected objects (virtual servers or applications) that are under DDoS attack. This information allows you to evaluate whether the attack threatens your protected objects, or to determine the effectiveness of mitigation measures.
Note: For HTTP object data, both applications and virtual servers are available from BIG-IP version 14.0.0.2 or later.
  1. At the top of the screen, click Monitoring.
  2. Click DASHBOARDS > DDoS > Protection Summary .
  3. Click the PROTECTED OBJECTS UNDER ATTACK area in the summary bar at the top of the screen.
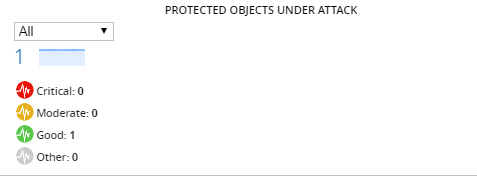
    The screen displays details of the objects under attack, including the object's health status, number of attacks detected, protection mode, and host BIG-IP device.
  4. In the PROTECTED OBJECTS UNDER ATTACK area, select Critical, Moderate, or Good to view objects according their current health status.
  5. Once you identify a protected object, note its name in the Protected Objects column.
  6. To identify the attacks affecting your protected objects, click the ATTACKS area in the summary bar to display the list of ongoing attacks.
  7. To display attacks on the protected object, enter the name of the protected object that you want to see in the filter below the summary bar.
  8. To display attack details and isolate events of the ongoing attack, click the attack ID.
  9. At the top right of the screen, click See All from the EVENTS HISTORY.
    The screen displays a chronological list of all correlated DoS alerts reported by your protected object's DoS profile.
  10. You can select one of the listed alerts to display details about the reported event.

Rules for correlated DoS attacks

Attacks detected from multiple BIG-IP devices may be correlated with an ongoing attack if they meet the following criteria, per security protocol. You can view correlated attack alerts either in the Attack Details screen ( Monitoring > DASHBOARDS > DDoS > Protection Summary > <Attack_ID> ) or Alert History screen ( Applications > ALERT MANAGEMENT > Alert History ).

HTTP

Reported HTTP attacks correlate if they share the following characteristics:
  • DoS Profile name
  • Device Service Cluster (DSC) name
  • Application

DNS

Reported DNS attacks correlate if they share the following characteristics:
  • DoS Profile name
  • Virtual server name or Device Sync Group
  • Device Service Cluster (DSC) name

Network

Reported DNS attacks correlate if they share the following characteristics:

  • DoS Profile name
  • Virtual server name
    Note: A network attack on a device level correlates attacks with the virtual server name Device.
  • Device Service Cluster (DSC) name

DDoS attack events

The BIG-IP system defines an attack by assigning an attack ID. The shared characteristics within the DDoS attack's data can correlate different attack IDs across a BIG-IP system environment (see Rules for correlated DoS attacks). These correlated attacks trigger events that allow you to evaluate a single attack's overall status, severity, and system impact. Attack inactivity indicates the end of a DDoS attack, which triggers a cleared event.

Raw attack events

Raw attack events report on the basis of a single attack ID reported by the BIG-IP system. Any changes in a raw attack's dimensions or severity are reflected in the raw attack events.

Correlated attack events

Correlated attack events report on the basis of the raw attack events that comprise a single correlated attack. Correlated events occur as a result of significant modifications to an attack's state across your BIG-IP system environment.

The following modifications change the correlated attack state:
  • A change in the highest reported status out of the active raw attacks that comprise the correlated attack:

    • Attack severity

    • Attack mitigation (this also impacts the corresponding attack trigger).

  • The correlated attack was detected by an additional BIG-IP blade or hostname.

  • The addition or removal of a raw attack.

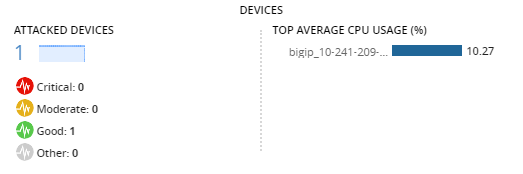
Detecting health issues in BIG-IP devices reporting DDoS attacks

BIG-IP services secure your protected objects from DDoS attacks, based on your security configuration and your DoS profile. It is important to ensure that the BIG-IP devices hosting these protection services have enough resources to withstand these attacks.

BIG-IP devices, or service scaling groups (SSG), receive a health score based on a configurable resource usage threshold (CPU, memory, throughput etc.). You can identify devices with low health that provide security services, to mitigate or monitor these resources to prevent issues with your system's performance.

Identify devices with low health managing DDoS attacks

You can identify the BIG-IP device(s) that are experiencing performance issues during a DDoS attack. This information allows you to understand whether the health of your device can sustain DoS security services, and to identify necessary mitigation measures for your devices.
  1. At the top of the screen, click Monitoring.
  2. Click DASHBOARDS > DDoS > Protection Summary .
  3. Click the DEVICES area in the summary bar at the top of the screen to display the list of devices with ongoing DoS attacks.
  4. To filter devices by their current health status, click Critical, Moderate, or Good.
  5. To sort the displayed devices by CPU usage, in descending order, click TOP CPU USAGE/STRESS in the DEVICES area.
    The screen displays the resource usage and performance details for all devices that reported an attack.
  6. Note both the BIG-IP Hostname and device address so you can adjust the BIG-IP resources, as required.
You can monitor your device's health using the charts and data found in the Device Health screen ( Monitoring > DASHBOARDS > Device > Health ).

Device health alerts

The device health alert notifies you of changes in device resource and throughput metric thresholds for your BIG-IP devices. To view your device health thresholds, go to the Alert Rules screen and select the default device rules ( Applications > ALERT MANAGEMENT > Alert Rules .

Alert Description Indication Default Thresholds Action (if applicable)
Device Health There has been a change in one or more of the of BIG-IP device health rule metrics. One or more of the device resources and/or throughput measurements crossed a defined threshold, which may impact your BIG-IP device's performance. For SSG devices: Customized rules per service scaling group. For SSG devices: A critical health status of your BIG-IP device might trigger a scale-out event. Investigate the active alerts for device metrics.

For stand-alone BIG-IP devices: Investigate BIG-IP devices with critical or moderate health to adjust or add resources.