Manual Chapter :
Understanding Access Policies
Applies To:
Show Versions
BIG-IP APM
- 11.4.1, 11.4.0
In an access policy, you define the criteria for granting access to various servers, applications, and other resources on your network.
Using an access policy, you can define a sequence of checks to enforce the required level of security on a users system, before the user is granted access to servers, applications, and other resources on your network.
An access policy can also include authentication checks, to authenticate a user before the user is granted access to the network resources.
 | Collect information about the client system You can use the access policy to collect and evaluate information about client computers. For example, you can check that the user is operating from a company-issued computer, what antivirus software is present on the machine, what operating system the computer is running, and other aspects of the client configuration. This is accomplished using both client-side checks and server-side checks in the access policy. |
| | Use the authentication action to verify client security against external authentication servers The access policy allows you to check and evaluate authentication against an external authentication database or a certificate, to make sure the client system recognizes the user. |
| | Retrieve users rights and attributes You can use the access policy to retrieve extended information from authentication servers including LDAP or Microsoft Active Directory attributes, and use the information retrieved to assign different resources. |
| | Grant access to resources With the access policy, you assign a network access resource after the client is authenticated. |
Every access policy begins at a start point. In the visual policy editor, this is a green rectangle with an angled right side, labeled Start, that has one fallback branch connected to it. You build the access policy starting on this fallback branch. 
Figure 4.1 An access policy Start point
An action performs a specific function in an access policy. These functions include client checks, authentication checks, and other access policy functions.
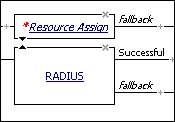
In the visual policy editor, the action appears as a rectangle surrounded by a single line in the access policy, with one branch entering it on the left, and one or more branches exiting on the right. If the action requires configuration, a red asterisk appears to the left of the action, and the name of the action appears in italics. In Figure 4.2, the RADIUS action is properly configured, and the resource assign action requires configuration.
The Access Policy Manager® (APM®) includes a number of pre-defined actions. You can see the available actions in the visual policy editor when you click the Add Item button  , which is activated by positioning the cursor along the actions rule branch. The Add Item popup screen opens as a floating popup screen on top of the visual policy editor.
Table 4.1 lists all the actions available in Access Policy Manager, in the order in which they appear on each tab in the Add Item popup screen, and describes what they can do.
| Enables creation of a group name (named for an AD domain group) and resource assignment for the group. | ||
| Assigns ACLs, network access, portal access, app tunnels, and remote desktop resources, Also assigns a webtop and webtop links. | ||
| LDAP Group Resource Assign | Enables creation of a group name (named for an LDAP domain group) and resource assignment for the group. | |
| Dynamically assigns a local traffic pool to a session. APM selects a pool in this priority order: a pool selected by an iRule that is defined for the virtual server takes precedence over any other a static pool defined in the Pool Assign agent takes precedence over a static pool defined for the virtual server | ||
| Assigns a network access resource, portal access, app tunnel, and remote desktop resources only. | ||
| Route Domain and SNAT Selection | ||
| Configures credential caching to use with single sign-on (SSO) for web applications. | ||
| If the Client SSL profile is configured to request the client certificate during the SSL handshake, checks the client certificate that was received during the SSL handshake. | ||
| Adds Certificate Revocation List Distribution Point (CRLDP) client certificate authentication to the access policy. | ||
| Adds Kerberos authentication, typically following an HTTP 401 Response action, to the access policy. | ||
| Adds authentication against a local user database instance to the access policy. | ||
| Checks the result of NTLM authentication. (If NTLM authentication occurs, it happens before the access policy starts). | ||
| Adds Online Certificate Status Protocol (OCSP) client certificate authentication to the access policy. | ||
| If the Client SSL profile is configured to ignore the client certificate during the SSL handshake, reinitiates SSL handshake and prompts users for a client certificate. | ||
| Adds sending accounting messages to a TACACS+ server when users log on and off. | ||
| Adds TACACS+ Authentication of end user credentials to the access policy. | ||
| Endpoint Security (Client-Side) | Checks for a specific file on the client computer. File check is available as three different actions for Windows, Mac OS, and Linux computers. | |
| (Windows, Linux, Mac) Process | Checks for running processes on the client computer. Process check is available as three different actions for Windows, Mac OS, and Linux computers. | |
| Checks for anti-spyware software on the client computer. Can check for anti-spyware software on Windows and Mac systems. | ||
| Checks for antivirus software on the client computer. Can check for antivirus software on Windows, Mac OS, and Linux clients. | ||
| Checks for firewall software on the client computer. Can check for firewall software on Windows, Mac OS, and Linux clients. | ||
| Checks for hard disk encryption software on the client compute (on Windows and Mac systems). | ||
| Checks for patch management software on the client computer (on Windows, Linux, and Mac systems). | ||
| Checks for peer-to -peer software on the client computer (on Windows, Linux, and Mac systems). | ||
| Windows Cache and Session Control | Cleans and removes browser cache, and optionally cleans form entries, passwords, dial-up entries, and sets timeouts for the access policy. | |
| Temporarily configures the Windows environment with a group policy. Windows Group Policy is an optional add-on that is enabled by FullArmors GPAnywhere product. | ||
| Checks for Windows Health Agent software on the client computer on Windows. | ||
| Checks for the version of Windows and for Windows updates on the client computer. | ||
| Collects Windows machine information from the client system, such as CPU, BIOS, network adapter, and hard disk details | ||
| Windows Protected Workspace | Provides a secure computing environment with a temporary desktop and profile that is removed after logout. For use with public computers or in other situations where higher security is required. | |
| Endpoint Security (Server-Side) | Checks whether the client is a Microsoft Exchange client, such as Microsoft Outlook, and so on. This action requires an Exchange profile. | |
| Detects the operating system of the remote client. Access Policy Manager detects this using information from the HTTP header. | ||
| Determines whether the user is connecting via a full or mobile browser, Edge Client®, Edge Portal®, Citrix Receiver, VMware View client, or Windows® Built-in Client. Note: Access Policy Manager can detect Windows Built-in Client only when the appropriate APM 11.4.x hotfix is installed. To determine hotfix requirements, refer to the BIG-IP APM Client Compatibility Matrix for APM 11.4.0 or APM 11.4.1 on the AskF5 web site at http://support.f5.com. | ||
| Checks whether the client supports JavaScript and supports either ActiveX controls or Netscape plug-ins. If a client can support JavaScript and one of these control types, it can run client-side checks. See Preparing for clients that cannot use client checks. | ||
| Jailbroken or Rooted Device Detection | ||
| Checks the landing URI that the client has used to start the current session. | ||
| Adds a logging agent that logs the specified session variables to the system logs. | ||
| Adds an external logon page to the access policy. Used with an external logon server like CSEs SECUREMATRIX. | ||
| Sends HTTP 401 Response for Basic or SPNEGO/Kerberos authentication. | ||
| Adds a logon page to the access policy. You can customize the messages and link text on the logon page, and create custom messages for different languages. | ||
| Displays a virtual keyboard on the logon screen when the user clicks in the Password box. | ||
| Displays logon screen on VMware View clients. For more information, refer to BIG-IP® Access Policy Manager® VMware Horizon View integration Implementations. |
Authentication actions are used to add authentication with an authentication server or with a client certificate. Microsoft Active Directory and LDAP authentication actions can also be used to perform queries of the Active Directory or LDAP databases.
For more information on configuring authentication actions, see the BIG-IP® Access Policy Manager® Authentication Configuration Guide, and Chapter 9, Using Certificate Authentication in APM.
A branch rule evaluates the result of an access policy action, findings about a client system, or other access policy item. The outcome of the evaluation of a branch rule grants or denies access, or continues on to the next action. The order of branch rules in an access policy determines the flow of action.
In an access policy, you use actions for which a set of branch rules are already defined. You can add branch rules to an action, or create new branch rules to test for a specific condition. You can use empty actions to create custom actions, and add your own branch rules to them. The ending is the last branch rule applied. Figure 4.3, shows the flow of a branch rule-checking operation.
By default, if the users system does not meet the access policy requirements, Access Policy Manager® denies the user access. You can change this outcome by changing the access policy ending, and by modifying branch rules to check for different criteria.
A branch rule uses data from variables returned by actions to determine user access criteria. For more information about session variables, see Understanding session variables.
When you create a new action, the visual policy editor automatically creates a set of branch rules. The last rule in this set is the fallback branch rule. It cannot be moved. It governs all cases that do not satisfy a preceding branch rule.
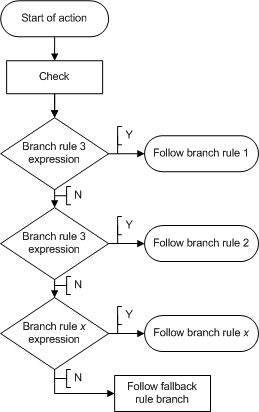
Figure 4.3 Internal process of an action
To view a predefined branch rule, you must first add an action to the access policy. The following example describes how to add a predefined action (client cert result) to an access policy, then how to view the underlying rule.
| 1. | On the Main tab of the navigation pane, expand Access Policy, then click Access Profiles. The Access Profiles List screen opens. |
| 2. | In the profile list, find the access policy you want to edit, then click Edit in the Access Policy column. The visual policy editor opens in a new window or new tab, depending on your browser settings. |
| 3. | On a branch of the access policy, click the plus sign [ The Add Item popup screen opens. |
| 4. | On the Authentication tab, select Client Cert Inspection and click Add Item to add the action to the access policy. The Client Cert Result action popup screen opens. |
| 5. | Click the Branch Rules tab. Under the Name Successful, you see the text Expression: Client Certificate is valid, and then a link to change the expression. |
| 6. |
| 7. | Click the Advanced tab. |
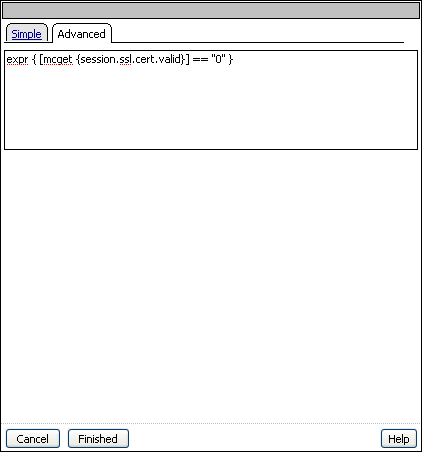
Figure 4.4 A rule displayed in an access policy action
When you configure an action, it creates a predefined rule. To further refine or customize a rule, you can use the expression builder to build a rule from a list of agents and conditions.
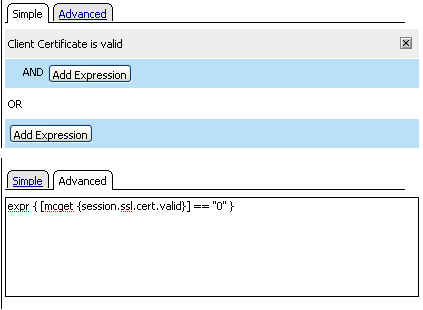
You can edit a rule on the Branch Rules tab by clicking change. You can edit rules in a rule builder on the Simple tab. You use this rule builder to choose from a simplified set of rules and automatically compile the Tcl syntax. You can also use the Advanced tab to edit the rule directly, using Tcl. Visual examples of the two editing methods are shown in Figure 4.5.
In the visual policy editor, you connect access policy items to other items with branches. A branch represents one of following three things:
| | The result of the evaluation of an access policy rule Most actions have branches that represent the evaluation of rules. These branches might be called Successful, or they might have a more descriptive name. In many cases, a rule branch is a positive result to the evaluation of an action (for example, Active Directory authentication has passed). A rule branch can also be an informational response to the evaluation of an action (for example, client operating system is Windows 7). |
| | An outgoing terminal from an access policy macro When you configure an access policy macro, the rule branches inside the access policy macro have endings called terminals. These terminals do not function like access policy endings, but instead, become branches in the access policy to which the macrocall is added, which represent the outcomes of actions inside the macrocall. |
| | A fallback rule A fallback rule is typically a negative response, if the action has successful branches. Some fallback rules are the result of the action returning no match or a failure for the access policy check. Fallback rules are also the result of actions that have no positive or negative result. For example, the logon page action has no positive or negative result, because it sends only a logon page to the client, so the result branch of a logon page is always a fallback rule branch. |
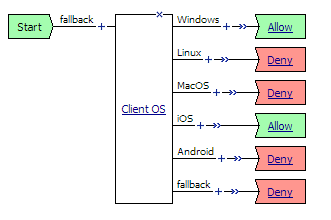
Figure 4.6 An action with multiple branches
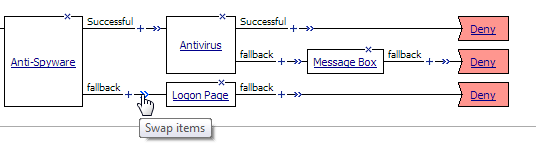
If you place your cursor over the swap [  ] icon on an access policy branch, the Swap items tooltip displays.
When you click the swap [ ] icon on an access policy branch, the actions that are available to swap display in green and arrows display and point to possible branches with which to swap. When you place your cursor over an arrow, it too displays in green. Refer to Figure 4.7.
Figure 4.7 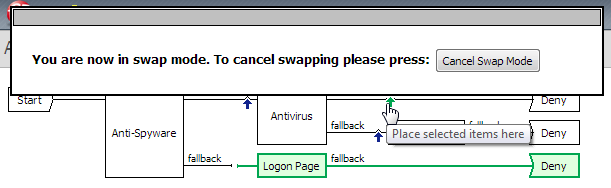 Using swap mode in an access policy
Using swap mode in an access policyAfter you click an arrow, the swap occurs. Figure 4.8 shows the result of the swap. The Logon Page and Deny ending (previously on the fallback branch after the Anti-Spyware action) switch places with the Deny ending on the Successful branch after the Antivirus action.
Figure 4.8 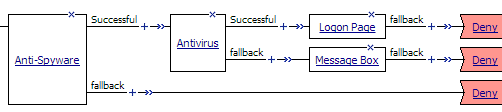 Result of swapping branches
Result of swapping branchesA macro is a collection of actions that you can configure to provide common access policy functions. You can create a macro for any action or series of actions in an access policy. You can also create macros that contain macrocalls to other macros (nested macros).
After you create a macro, you place it in the access policy by adding an item called a macrocall to your policy. A macrocall is an action that performs the functions defined in a macro. In the visual policy editor, a macrocall appears in an access policy, or in a macro definition, as a single rectangular item, surrounded by a double line, with one or more outgoing macro terminal branches, called terminals, as shown in Figure 4.9
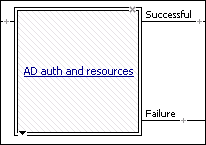
Figure 4.9 A macrocall in an access policy
Macro definitions, macro terminals, and macrocalls are defined for each access policy. Macros you create in one policy do not appear, and cannot be used, in another access policy.
Unlike other access policy actions, when you click a macrocall in the access policy, the macro definition is displayed below the access policy in the macros section, and not in a popup screen, as shown in Figure 4.10.
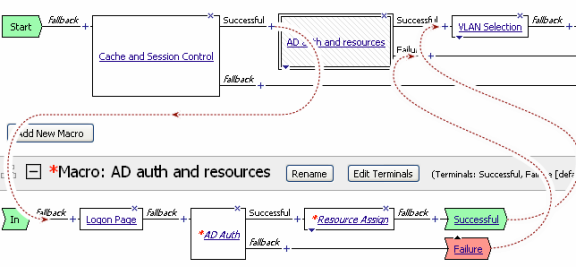
Figure 4.10 A macro expanded below an access policy
The BIG-IP® Access Policy Manager® includes several predefined macro templates. For example, BIG-IP Access Policy Manager includes macro templates for various actions. For the definitions and configuration information for a sampling of the macro templates, see Configuring macros.
A macro does not have endings, as does an access policy. Instead, a macro contains one or more end points called terminals. Terminals are the macro branches that are the result of the actions you add to the macro. The access policy uses the macro terminals after you insert a macrocall into an access policy. A macro can have many terminals. You can use terminals as you use access policy endings within the macro configuration.
Macro terminals are common shared endpoints for the access policy macro item. After you add a macro to the access policy using a macrocall, each macro terminal defined in the macro appears as a separate shared output. For example, if you configure four macro terminals, and use those terminals ten times in the macro definition, when you add the macrocall access policy item to the access policy, only four outputs appear from the access policy item.
To make macros easier to use, you can assign the macro terminals descriptive names and specific colors with the visual policy editor. When you add a macro to your access policy, the terminals from the macro become branches, and the branches take the names of their terminals.
After you add the macrocall to your access policy, the macrocall appears as a single access policy item, with four terminals that appear as four branches, named for the terminals. See Figure 4.11.
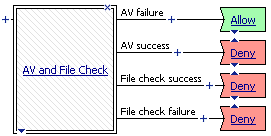
Figure 4.11 A macrocall with four macro terminal branches in an access policy
Note: You can make changes to the actions in a macro after you have added the macrocall to an access policy. However, you cannot delete terminals after a macrocall has been added to an access policy or another macro. For this reason, we recommend that you configure macro terminals before you add a macrocall to the access policy.
Access policy endings indicate the final outcome of a branch of the access policy. The Access Policy Manager® provides the following endings: Allowed, Deny, and Redirect. In the visual policy editor, endings appear as a rectangle with a cut-out left edge.
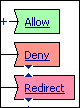
Figure 4.12 Access policy endings
In an access policy, the allow ending is a successful ending that allows the connection defined by the access policy branch. Configure your access policies so that only users who meet your security criteria reach an allow ending. The allow ending performs final validation of assigned resources, the webtop, and any resources added to the access policy branch, and allows the session to start.
Note: You must assign a valid network access or web application resource and a webtop for your users, unless you are using the access policy to control access to a local traffic virtual server, in a web access management scenario.
In an access policy, the deny ending denies the user access to the resource, and ends the users session. After the user reaches a deny ending, all the session information collected during access policy operation is deleted from the client. You can use this ending at the ends of failed rule branches. When a user reaches a deny ending, the user sees an access denied error message web page.
In an access policy, the redirect ending sends the user to a URL that you specify. Use this ending when the result of a certain access policy outcome does not result in a webtop ending, but you want to send the user to another internal or external URL. For example, you might send a user to the web site for an antivirus vendor, if an antivirus action determines that the users virus definitions are older than the access policy allows.
To close the Access Policy Manager session after the redirect, select the Close session after redirect check box.
The rules in access policies use the values that the actions return in session variables. During access policy operation, the Access Policy Manager® collects various information about the system that is attempting access. This information is organized in a hierarchical arrangement and is stored as the users session data.
Session variables are variables that allow the access policy to access users session data. The name of a session variable consists of multiple hierarchical nodes separated by periods (.).
session.ad.<username>.authresult = authentication result (0 = failed, 1=passed)
session.ad.<username>.attr.<attr_name> = the name of an attribute retrieved during the Active Directory query. Each retrieved attribute is converted to a separate session variable. Note that attributes assigned to a user on the AAA server are specific to that server, and not to Access Policy Manager.
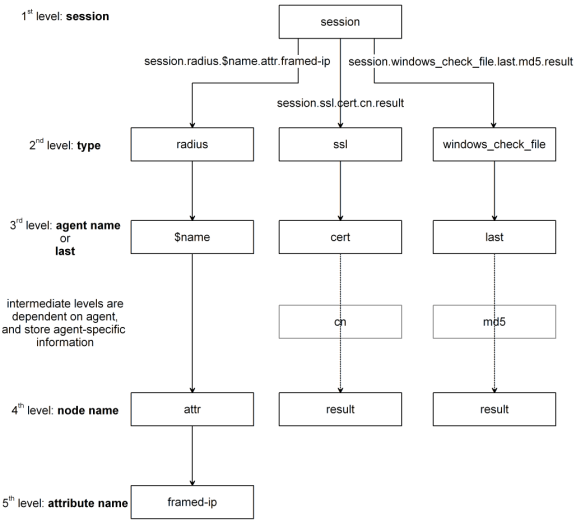
Figure 4.13 Session variable naming scheme
You can use session variables to customize access rules or to define your own access policy rules. You can assign users specific resources based on session variables, using the resource assign action.
You can use session variables to configure rules in access policies. You can use the values of session variables to provide different outcomes for policies. For more information on how to use session variables, see Assigning variables, and Using advanced access policy rules. For a complete listing of available session variables, see Appendix 14, Session Variables. You can view all session variables for a session at Reports > Current Sessions. Click a session name to view the session variables for the session.


