Manual Chapter :
Advanced Topics in Access Policies
Applies To:
Show Versions
BIG-IP APM
- 11.4.1, 11.4.0
In most applications, a logon page is used to present user name and password prompts to a user, to collect the credentials the user enters, and to forward those credentials on to an authentication method. In BIG-IP® Access Policy Manager®, you use the visual policy editor to assign a logon page in an access policy. This section describes the logon action, and how to customize the page presented by the logon action.
The logon page customization elements include the information that appears between the header and the footer. You customize this information using the Logon Page action in the access policy configuration. The default English logon page configuration appears in Figure 11.1.
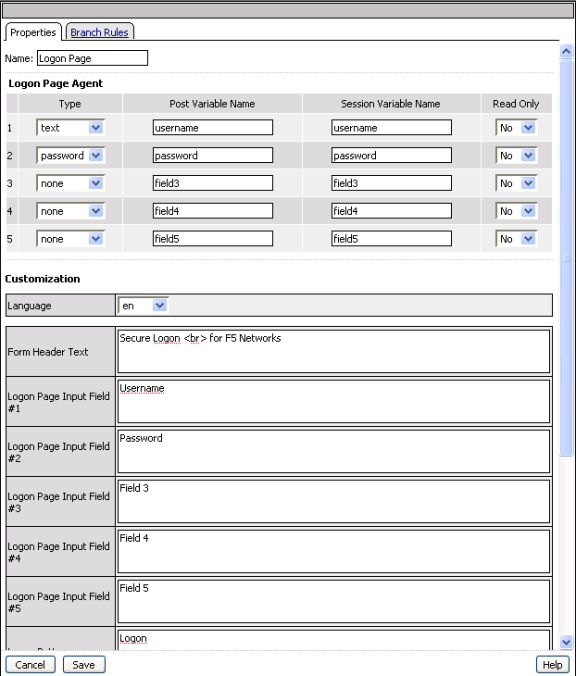
Figure 11.1 Default logon page action configuration
| 1. | On the Main tab of the navigation pane, expand Access Policy, then click Access Profiles. The Access Profiles List screen opens. |
| 2. | In the profile list, find the access policy you want to edit, then click Edit in the Access Policy column. The visual policy editor opens in a new window or new tab, depending on your browser settings. |
| 3. | On a branch of the access policy, click the plus sign ( The Add Item popup screen opens. |
| 4. | On the Logon tab, select Logon Page and click Add Item. The Logon Page configuration popup screen opens. |
For each Logon Page Agent you are using, customize the type of logon page agent. For each agent you can specify a Post Variable Name, Session Variable Name, and whether the agent is Read Only. See Adding and customizing a logon page, for more information.
| Form Header Text - Specifies the text that appears at the top of the login box. |
| Logon Page Input Field # (1-5) - These fields specify the text that is displayed on the logon page for each of the logon page agents, defined in the Logon Page Agent screen area. |
| Save Password Checkbox- Specifies the text that appears adjacent to the check box that allows users to save their passwords in the logon form. This field is used only in the secure access client, and not in the web client. |
| Logon Button - Specifies the text that appears on the logon button, which a user clicks to post the defined logon agents. |
| Front Image - Specifies an image file to display on the logon page. Click Browse to select a file from the file system. Click Show image or Hide Image to show or hide the currently selected image file. Click Revert to Default Image to discard any customization and use the default logon page image. |
| New Password Prompt - Specifies the prompt displayed when a new Active Directory password is requested. |
| Verify Password Prompt - Specifies the prompt displayed to confirm the new password when a new Active Directory password is requested. |
| Pasword and Password Verification do not Match - Specifies the prompt displayed to confirm the new password when a new Active Directory password is requested. |
| 8. | Click Save when the settings are customized. |
Example: Using a customized logon page to collect user credentials
In this example, a logon page action is added to an access policy. The logon page action presents the logon information to a user who attempts to start a network access connection. In this example, the English language logon page is customized with several fields for the fictitious company Bogon Networks, Inc. In addition, the user name, password, and logon fields are customized, and the footer message is changed.
| 1. | On the Main tab of the navigation pane, expand Access Policy, then click Access Profiles. The Access Profiles List screen opens. |
| 2. |
| 3. |
| 4. | Click the Access Policy tab, then click Edit Access Policy for Profile BogonNet1. The visual policy editor opens in a new window or new tab, depending on your browser settings. |
| 5. | Click the plus sign ( The Add Item popup screen opens. |
| 6. |
| 7. |
| 8. |
| 9. |
| 10. |
| 12. | Click Save. |
| 13. | Click Apply Access Policy. |
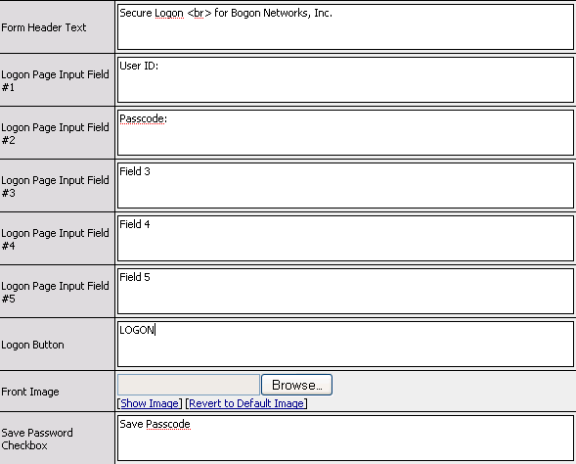
Note: Typically you configure the logon page by adding your own custom logo and graphics. To simplify this example, the header box is left as the default with the F5 graphics and background color.
| 2. |
| 3. |
| 4. | Click Find Customization. |
| 5. | Under Page Footer Settings, in the Footer Text box, type For use by employees of Bogon Networks, Inc., and subsidiaries.<br>Copyright 2009 Bogon Networks, Inc.<br>All rights reserved. |
| 6. | Click Update. |
| 7. | Click Apply Access Policy. |
In an access policy you can use multiple authentication methods by adding multiple authentication actions. With multiple authentication methods, you can add two-factor authentication to your access policy. You can also use multiple authentication methods to assign different resources or routes depending on the authentication method.
You can use two or more authentication methods in an access policy. This example uses a client certificate for authentication, followed by Microsoft Active Directory authentication. The Active Directory action uses the authentication information collected in the logon page action that precedes it. After the user is authenticated, the access policy assigns resources with the resource assign action, and the user is allowed access.
Example: Using client certificate authentication with Active Directory
In this example, a user who logs on to the network must have both a valid client certificate, and an account on the Microsoft Active Directory server. The following shows the sequence of events that occur in this example.
| The access policy first verifies the users operating system is Windows 7, Windows 8, or Windows XP. This step is optional. |
| If the users certificate check action passes successfully, the user sees a logon page. If the users certificate action does not pass successfully, the user sees a logon denied page. |
| On the logon page, the user inputs credentials, and the access policy tests these credentials against Active Directory. |
| If the Active Directory check succeeds, the Access Policy Manager assigns resources to the user, and the user is assigned a connection and can begin working with network resources. The user also sees a webtop, if one is assigned. |
Configuring the client certificate two factor authentication with Active Directory example
This example provides a guide to the tasks involved in the configuration of this access policy. Note that this is not a step-by-step procedure, but a list of procedures, with references to the tasks that you must perform to complete the example.
| 1. | (Optional) Add the Client OS action. See Setting up the client OS check. Configure the Client OS access policy item with one rule that specifies the Client OS is Windows 7, Windows 8, or Windows XP. Delete the other rules. You can optionally rename the Client OS access policy item. |
| 2. |
| 3. |
| 4. | Add the Active Directory auth action to the successful rule branch of the access policy. See the BIG-IP® Access Policy Manager® Authentication Configuration Guide. |
| 5. | Add the resource assign action to the successful rule branch of the access policy. The resource assign action must set a network access resource. You can optionally assign ACLs, and a network access webtop. See Assigning resources. |
| 6. | Change the ending of the successful branch of the access policy to an Allowed ending. See Using policy endings. |
| 7. | Click Apply Access Policy to start the access policy. |
You can use policy routing in a number of different scenarios to provide users access to different network segments or resources. For example, you might create a route domain that connects unauthenticated users on a publicly available wireless segment only to the external web, while denying access to internal network resources. To create this configuration, you can use a route domain and SNAT selection action in the access policy on the fallback rule branch of an authentication action, to send failed logons to a separate route domain from the internal network.
Access Policy Manager® uses route domain objects to provide access to routing features in access policies. The BIG-IP® system supports the ability to configure multiple route domains. A route domain is a BIG-IP system object that represents a particular network configuration. After creating a route domain, you can associate various BIG-IP® system objects with the domain: unique VLANs, routing table entries such as a default gateway and static routes, self IP addresses, virtual servers, and pool members.
Route domains provide the capability to segment network traffic, and define separate routing paths for different network objects and applications. Because route domains segment the network traffic, they also provide the capability to have separate IP networks on the same unit, where each route domain uses the same IPv4 address space. Using routing domains, you can assign the same IP address or subnet to more than one device on a network, as long as each instance of the IP address resides in a separate routing domain.
To configure policy routing, you must configure a route domain. For more information on configuring route domains, see the TMOS® Management Guide for BIG-IP® Systems.
Once you have defined a route domain, you can route users to the route domain in the access policy, using the route domain selection action.
| 1. | On the Main tab of the navigation pane, expand Access Policy, then click Access Profiles. The Access Profiles List screen opens. |
| 2. | In the profile list, find the access policy you want to edit, then click Edit in the Access Policy column. The visual policy editor opens in a new window or new tab, depending on your browser settings. |
| 3. | On a rule branch of the access policy, click the plus sign ( The Add Item popup screen opens. |
| 4. | On the Assignment tab, select Route Domain and SNAT Selection and click Add Item to add the action to the access policy. The Route Domain and SNAT Selection action popup screen opens. |
| 5. | From the Route Domain ID list, select the route domain ID. |
| 6. | Click Save to complete the configuration. |
In this example, your company has switched from RADIUS authentication to Active Directory authentication, but has not yet completed the full transition. Because of the state of the authentication changeover, you would like your legacy RADIUS users to pass through to a portal access connection on a separate router, instead of allowing full access to your network.
| An access policy that contains a logon page, an Active Directory Authentication action, a RADIUS authentication action, two resource assign actions, and a route domain and SNAT selection action. |
To configure this example, you must define a route domain and create an access policy that references that route domain. To keep the access policy generic enough for any implementation, the example does not specify names or addresses for the Active Directory server or the RADIUS server to use with the authentication action. The example also does not specify the portal access or network access resources to use with the resource assign actions. You can create the access policy without configuring these actions, and add your own servers and resources.
| 1. | On the Main tab of the navigation pane, expand Network, and click Route Domains. The Route Domain List screen appears. |
| 2. |
| 3. |
| 4. | In the VLANs section, from the Available list, select an available VLAN and click the << button to move the VLAN to the Members list. |
| 5. | Click Finished. |
| 1. | On the Main tab of the navigation pane, expand Access Policy, then click Access Profiles. The Access Profiles List screen opens. |
| 2. |
| 3. |
| 4. |
| 1. | On the access policy screen, click the link, Edit Access Policy for Profile. The visual policy editor opens in a new window or new tab, depending on your browser settings. |
| 2. | On the fallback branch of the access policy, click the plus sign ( The Add Item popup screen opens. |
| 3. | On the Logon tab, select the Logon Page action, and click Add Item. The Logon Page action popup screen opens. |
| 4. | Click Save to save and close the action. |
| 5. | Click the plus sign ( The Add Item popup screen opens. |
| 6. | On the Authentication tab, select AD Auth, and click Add Item. The Active Directory Authentication action popup screen opens. |
| 7. | From the Server list, select an Active Directory server. If you do not have an Active Directory server, you can leave the action unconfigured for the purposes of the example. |
| 8. | Click Save to save the action. |
| 9. | On the successful branch following the Active Directory action, click the plus sign ( The Add Item popup screen opens. |
| 10. | On the Assignment tab, select the Resource Assign action, and click Add Item. The Resource Assign action popup screen opens. |
| 11. | Click the Add new entry button. |
| 12. | Click the Set Network Access Resource link, select a network access resource to assign to clients who successfully authenticate with Active Directory, and click the Update button. |
| 13. | Optionally, click the Set Webtop link, and select a network access webtop to assign to clients who successfully authenticate with Active Directory, then click the Update button. |
| 14. | Click Save to save the action. |
| 15. | On the fallback branch following the Active Directory action, click the plus sign ( The Add Item popup screen opens. |
| 16. | On the Authentication tab, select the RADIUS Auth action, and click Add Item. The RADIUS authentication action popup screen opens. |
| 17. | From the AAA Server list, select a RADIUS server. If you do not have a RADIUS server, you can leave the action unconfigured for the purposes of the example. |
| 18. | Click Save to save the action. |
| 19. | On the successful branch following the RADIUS action, click the plus sign ( The Add Item popup screen opens. |
| 20. | On the Assignment tab, select the Route Domain and SNAT Selection action, and click Add Item. The Route Domain Selection action popup screen opens. |
| 21. | From the Route Domain ID list, select 1. This assigns the route domain gateway you defined earlier to clients who successfully authenticate to the RADIUS server. |
| 22. | Click Save to save the action. |
| 23. | On the successful branch following the route domain selection action, click the plus sign ( The Add Item popup screen opens. |
| 24. | On the Assignment tab, select the Advanced Resource Assign action, and click Add Item. The Resource Assignment action popup screen opens. |
| 25. | Click the Add new entry button. |
| 26. |
| 27. | On the Network Access tab, select a network access resource to assign to clients that successfully authenticate with RADIUS. |
| 28. | Optionally, on the Webtop tab, select a network access webtop to assign to clients who successfully authenticate with Active Directory. |
Note that you can assign the same network access resource to both types of clients, and because a different route domain is specifies in the route domain selection action, the clients will still reach separate routers.
| 29. |
| 30. |
| 31. | Click the ending following the resource assign actions and change it to an allow ending, by selecting Allow and clicking Save. |
You can use advanced rules in an access policy to provide customized functionality to users. This functionality is useful when the default access policy rules and the rules created with the expression builder do not provide functionality you require.
When you write an expression in the Advanced tab of the rule popup screen, a non-zero return value typically causes the rule to be evaluated as true or successful, and the access policy follows the corresponding rule branch. The return value of 0 causes the rule to be evaluated as false, and the rule follows the corresponding branch, or a fallback branch.
 | You can use an advanced access policy rule to make flexible decisions after an access policy action completes. To do this, you add the advanced access policy rule on the Advanced tab in the Expression popup screen of an action. In this scenario, if the value returned by the expression is not zero, the rule is evaluated as true, and the access policy runs and follows the corresponding rule branch. If the value returned by the expression is zero, the rule is evaluated as false, and the access policy follows the branch assigned to the negative response (typically a fallback branch). |
| | You can use an advanced access policy rule to add flexibility when assigning resources to users. To do this, you add the advanced access policy rule on the Advanced tab in the Expression popup screen of the resource assign action. In this scenario, if the value returned by the expression is not zero, the resource assignment rule is evaluated true, and the corresponding resource or ACL is assigned to the user. If the value returned by the expression is zero, the resource assignment rule is evaluated as false, and the resource or ACL is not assigned. |
| | You can use an advanced access policy rule to add flexibility by creating a custom session variable, and then assigning the session variable in other advanced access policy rules. To do this, you use the custom variable and custom expression options in the variable assign action. In this scenario, the value returned by the custom expression is assigned to the custom variable. |
| | You can use an advanced access policy rule to override the properties of an assigned network access resource. To do this, you assign a configuration variable to a custom expression, in the variable assign action. In this scenario, the value returned by the expression is used to overwrite the value of the selected property from the network access resource. |
Advanced access policy rules are written in the Tcl programming language. An advance access policy rule is a Tcl program. You can use the various facilities provided by the Tcl language in advance access policy rules. For example, you can use loops (while, foreach, and so on), conditions (ifelse, switch, and more), functions (proc), and built-in Tcl commands (strings, split, for instance) as well as various Tcl operators.
In Access Policy Manager access policies, session variables are accessed from system memory during the evaluation of an access policy rule. Access Policy Manager stores all session variables generated in a session in its memory cache. The Tcl command that gets these variables is mcget, which is an abbreviation for get the session variable from the memory cache.
In this example, the name of the session variable, session.ssl.cert.cn, is enclosed in braces { }. The brackets [ ] that enclose the entire command are the TCL notation for command evaluation.
You can use a Tcl expression or a complete Tcl program as an advanced access policy rule. The return value of the expression or program is used to evaluate the access policy rule. For example, the following access policy rule uses a TCL expression to check if the Organizational Unit (OU) field of a user certificate contains the text PD.
Note: The Tcl language specifies that the expression begin with the syntax expr. For a complete description of the various operators and syntax allowed in a Tcl expression, see http://www.tcl.tk/man/tcl8.0/TclCmd/expr.htm.
In Access Policy Manager, the Tcl code entered in an action is not validated for proper Tcl syntax. If there is a Tcl syntax error in a rule, this error is not caught at configuration time, but the rule fails at session establishment time. We recommend that you test rules with an independent Tcl shell before they are configured in the access policy to avoid this.
The semicolon separator (;) is required between two consecutive Tcl statements. This is not the same as using the default newline (\n) as a separator.
Note: The name space for Access Policy Manager is shared across all rules. If you define a Tcl variable in one rule, it is accessible in another rule also. We recommend that you use a unique prefix for local variables in each rule, to avoid polluting variables from different rules.
You write an advanced rule in one of the four situations described in Understanding advanced access policy rule situations. These situations are:
| 1. | On the Main tab of the navigation pane, expand Access Policy, then click Access Profiles. The Access Profiles List screen opens. |
| 2. | In the profile list, find the access policy you want to edit, then click Edit in the Access Policy column. The visual policy editor opens in a new window or new tab, depending on your browser settings. |
| 3. | Add or edit an action. The action popup screen opens. |
| 5. |
| 7. | In the Advanced box, type the expression. |
| 8. | When you are finished, click Finished. |
| 9. | Click Save. |
In this scenario, if the value returned by the expression is not zero, the rule is evaluated as true, and the access policy continues and follows the corresponding rule branch. If the value returned by the expression is zero, the rule is evaluated as false, and the access policy follows the branch assigned to the negative response (typically a fallback branch).
To write an advanced access policy rule in the resource assign action
| 1. | On the Main tab of the navigation pane, expand Access Policy, then click Access Profiles. The Access Profiles List screen opens. |
| 2. | In the profile list, find the access policy you want to edit, then click Edit in the Access Policy column. The visual policy editor opens in a new window or new tab, depending on your browser settings. |
| 3. | Add or edit a resource assign action. The resource assign popup screen opens. |
| 4. | Click the Add New Entry button. |
| 5. |
| 7. | In the Advanced box, type the expression. |
| 8. | When you are finished, click Finished. |
| 9. | Click Save. |
In this scenario, the expression returns a value. If the return value is not zero, the resource assignment rule is true, and the access policy assigns the corresponding resource or ACL to the user. If the return value is zero, the resource assignment rule is evaluated as false, and the access policy does not assign the resource or ACL.
| 1. | On the Main tab of the navigation pane, expand Access Policy, then click Access Profiles. The Access Profiles List screen opens. |
| 2. | In the profile list, find the access policy you want to edit, then click Edit in the Access Policy column. The visual policy editor opens in a new window or new tab, depending on your browser settings. |
| 3. | Add or edit a variable assign action. The variable assign action popup screen opens. |
| 5. |
| 6. |
| 7. | In the Custom Variable box, type the new custom variable. |
| 8. | In the Custom Expression box, type the expression. |
| 9. | When you are finished, click Finished. |
| 10. | Click Save. |
In this scenario, the custom expression returns a value that the variable assign action then assigns to the custom variable.
| 1. | On the Main tab of the navigation pane, expand Access Policy, then click Access Profiles. The Access Profiles List screen opens. |
| 2. | In the profile list, find the access policy you want to edit, then click Edit in the Access Policy column. The visual policy editor opens in a new window or new tab, depending on your browser settings. |
| 3. | Add or edit a variable assign action. The variable assign action popup screen opens. |
| 5. |
| 6. |
| 7. | On the left side, select Configuration Variable. |
| 8. | From the Name list, select the name of the network access resource in which you want to overwrite the variable. |
| 9. | From the Property list, select the network access resource property you want to overwrite with a custom expression. |
| 10. | In the Custom Expression box, type the expression. |
| 11. | When you are finished, click Finished. |
| 12. | Click Save. |
In this scenario, the expression returns a value that overwrites the value of the selected property from the network access resource.
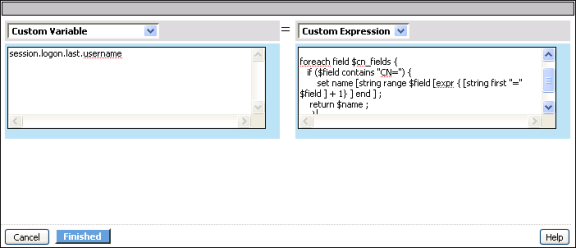
In this example, the access policy parses the CommonName (CN) field from the clients SSL certificate, and the access policy uses part of that CN as the logon name. The result of this example, if the name field for the certificate includes CN=Smith, OU=SBU,O=CompanyName,L=SanJose, ST=CA,C=US, is that the data Smith is extracted from the name field, and the access policy passes this on as the logon name. Successive actions on this branch of the access policy can then use this logon name.
You can use the variable assignment agent to assign the value from the certificates CN field to the value for the session variable session.logon.last.username, using the variable assignment agent.
You assign the result of this example code to a custom variable called session.logon.last.username using the variable assign action.
| 1. | On the Main tab of the navigation pane, expand Access Policy, then click Access Profiles. The Access Profiles List screen opens. |
| 2. | In the profile list, find the access policy you want to edit, then click Edit in the Access Policy column. The visual policy editor opens in a new window or new tab, depending on your browser settings. |
| 3. | To add the variable assign action, click the plus sign ( The Add Item popup screen opens. |
| 4. | On the Assignment tab, select Variable Assign and click Add Item. The Variable Assign action popup screen opens. |
| 5. | Click the Add New Entry button. |
| 6. |
| 7. |
| 8. | In the Custom Expression box, type the complete expression: |
| 9. | When you are finished, click Finished. |
| 10. | Click Save. |