Manual Chapter : Installing DDoS Hybrid Defender for High Availability

Applies To:

Show Versions Show Versions

F5 DDoS Hybrid Defender

  • 14.0.0
Manual Chapter

Installing DDoS Hybrid Defender for High Availability

Overview: Installing DDoS Hybrid Defender for High Availability

You can install DDoS Hybrid Defender™ onto a dedicated system (device 1) and set up a failover system that automatically takes over in case of system failure (device 2). The system processing traffic is called the active system. A second system is set up as a standby system, and data is synchronized between the active and standby systems. If the active system goes offline, the standby system becomes active, and begins processing traffic and protecting against DDoS attacks.

Note: To set up two DDoS Hybrid Defender devices for high availability, you need to follow the steps outlined in this section exactly in the order shown.

You can assign the management IP addresses from the LCD panel of the devices, or with a hypervisor if you are using the Virtual Edition.

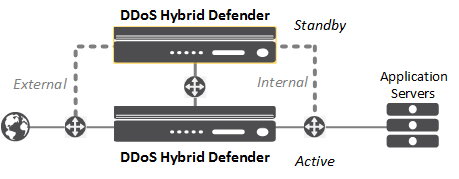
DDoS Hybrid Defender High-Availability deployment

You must have two DDoS Hybrid Defender systems to set up high availability. Before you begin, make sure you have this information for both devices:

  • Base registration key
  • Management IP address, network mask, and management route IP address
  • Passwords for the root and admin accounts
  • NTP server IP address (optional)
  • Remote DNS lookup server IP address (required for F5 Silverline® integration or if resolving host names)

Performing initial setup

Before you begin, be sure to have the base registration key.
You need to perform an initial setup on your system before you can start to use DDoS Hybrid Defender™. Some of the steps vary, depending on the state your system is in when you begin, and whether you are using a physical device or a virtual edition.
Important: If setting up two systems for high availability, you need to perform initial setup on both systems.
  1. If this is a new system, specify the management IP address using the LCD panel or command line on the physical device, or using the appropriate hypervisor on the virtual edition.
  2. From a workstation browser on the network connected to the system, type: https://<management_IP_address> .
  3. At the login prompt, type the default user name admin, and password admin, and click Log in.
    The Setup utility screen opens.
  4. Click Next.
    The License screen opens.
  5. In the Base Registration Key field, type or paste the registration key.
    You receive the registration key when you purchase DDoS Hybrid Defender. If you also have the add-on IP Intelligence service, specify the key in the Add-On Key field.
  6. For Activation Method, leave it set to Automatic unless the system does not have Internet access. In that case, click Manual and follow the instructions for manually licensing DDoS Hybrid Defender.
  7. Click Activate.
    The license is activated.
  8. Click Next; the device certificate is displayed, and click Next again.
    The Platform screen opens.
  9. For the Management Port Configuration setting, click Manual.
  10. Verify that the Management Port 1 setting includes the management interface details that were previously set up.
  11. If you want to define an alternate management IP address, configure the Management Port 2 setting.
    Note: If the IP address defined in the Management Port 1 setting is an IPv4 address, then this address must be an IPv6 address.
  12. In the Host Name field, type the name of this system.
    For example, ddosdefender1.example.com.
  13. In the User Administration area, we strongly recommend that you change the Root and Admin Account passwords from the defaults. Type and confirm the new passwords.
    The Root account provides access to the command line, and the Admin account accesses the user interface.
    Note: When you re-enter the username and password, the system logs you out. Log back in to continue with the next screen in the setup process.
  14. Click Next.
    The NTP (Network Time Protocol) screen opens.
  15. Optional: To synchronize the system clock with an NTP server, in the Address field, type the IP address of the NTP server, and click Add.
  16. Click Next.
    The DNS (Domain Name Server) screen opens.
  17. To resolve host names on the DDoS Hybrid Defender system, set up the DNS and associated servers (required for IP Intelligence):
    1. For the DNS Lookup Server List, in the Address field, type the IP address of the DNS server, and click Add.
    2. If you use BIND servers, add them to the BIND Forwarder Server List.
    3. For doing local domain lookups to resolve local host names, add them to the DNS Search Domain List.
  18. Click Finished.
If the system is connected to the Internet, it is now licensed and ready for you to configure DDoS Hybrid Defender. If the system is not connected to the Internet, you have to manually activate the license.

Manually licensing DDoS Hybrid Defender

If the DDoS Hybrid Defender™ system is not connected to the Internet, use this procedure to manually activate the license. Otherwise, skip this task.
Important: If setting up two systems for high availability, you have to activate the license on both systems.
  1. From a workstation on the network connected to the system, type: https://<management_IP_address> .
  2. At the login prompt, type the user name and password for the system, and click Log in.
    The Setup utility screen opens.
  3. Click Next.
    The License screen opens.
  4. In the Base Registration Key field, type or paste the registration key.
    You receive the registration key when you purchase DDoS Hybrid Defender. If you also have the add-on IP Intelligence service, specify the key in the Add-On Key field.
  5. For the Activation Method setting, select Manual and click the Generate Dossier button.
    The dossier is displayed in the Device Dossier field.
  6. Select and copy the text displayed in the Device Dossier field, and click the Click here to access F5 Licensing Server link.
    Alternatively, you can navigate to the F5 license activation portal at https://activate.f5.com/license/.
  7. Click Activate License.
  8. Into the Enter your dossier field, paste the dossier.
    Alternatively, if you saved the file onto your system, click the Choose File button and navigate to the file.
    The license key text is displayed.
  9. Copy the license key, and paste it into the License Text field.
  10. Continue with the Setup Utility.

Connecting two DDoS Hybrid Defender devices

For you to set up two DDoS Hybrid Defender™ devices for high availability, they need to be physically connected in the network.

When installing two systems for high availability, the system you plan to set up as the active system, device 1, must be the system with the highest management IP address.

  1. Connect the two DDoS Hybrid Defender™ devices as required by your network configuration.
  2. Note the interfaces and VLAN used to connect the devices.
The two systems are connected to each other and both systems are active, but they are not yet configured for high availability or DoS protection.
If not using Silverline, skip the next section, then proceed to set up high availability on device 1.

Connecting with F5 Silverline

Connecting with F5 Silverline® is optional, and is available for customers who have an active F5 Silverline DDoS Protection subscription.
To integrate the F5 Silverline Cloud Platform with DDoS Hybrid Defender™ as a way to mitigate DDoS attacks, you need to specify F5 Silverline authentication credentials.
Note: If setting up the two systems for high availability, you must register with Silverline on both the active and standby systems.
  1. On the Main tab, click DoS Setup > Silverline .
  2. In the Username field, type the user name for an active Silverline DDoS Protection account. For example, username@example.com.
  3. In the Password field, type the password for the Silverline DDoS Protection account.
  4. In the Service URL field, type the URL or fully qualified domain name used to connect to the Silverline DDoS Protection service.
  5. Click Update to save the credentials.
    DDoS Hybrid Defender sends a registration request to the F5 Silverline Cloud Platform.
  6. Log in to the F5 Silverline customer portal (https://portal.f5silverline.com) and specify DDoS Hybrid Defender as an Approved Hybrid Signaling Device.
Important: Depending on your network configuration, you may need to add a VLAN and route to enable DDoS Hybrid Defender to communicate with Silverline.

DDoS Hybrid Defender is now integrated with the Silverline Cloud Platform.

When configuring the device or objects to protect, you will need to select the Silverline check box to send information about DDoS attacks to the Silverline Cloud Platform.

Configuring high availability on device 1

Before you can set up a failover device, you must have connected the two devices (device 1 and device 2) that will run DDoS Hybrid Defender. You need to have performed initial setup on both devices, and both should be the same hardware platform.
Start configuring high availability on device 1, the one with the highest IP address. This is the device that will be selected as the Active (or primary) device when HA configuration is complete.
  1. Log in to device 1 using the administrator username and password.
    The system displays the Welcome screen with the DoS menu on the left.
  2. On the Main tab, click Network > High Availability .
    On the High Availability screen, the HA Cluster Configuration is displayed, and shows partial configuration of the device on which you are working (device 1).
  3. Click the management IP address of device 1, and specify this information:
    1. Type the Username and Password of the system administrator account on device 1.
    2. Optional: In the MAC Masquerading field, type the floating Media Access Control (MAC) address to associate with the floating IP address if you plan to define one for the two systems when configuring the network. The MAC address must have been created using an industry-standard method for creating a locally administered MAC address.
      MAC masquerading takes advantage of a shared MAC address. Upon failover, the shared MAC address(es) float to the newly active BIG-IP system along with the shared IP addresses.
    3. If your network requires a VLAN Tag, type the number (1-4094). Otherwise, leave it blank.
    4. Click Select Interface and select the interface to connect to the active system. If you specified a VLAN tag and want to accept only frames that contain VLAN tags, select Tagged; otherwise, leave it unselected.
    5. Select the interface to connect to the standby system. If you specified a VLAN tag and want to accept only frames that contain VLAN tags, select Tagged; otherwise, leave it unselected.
      You can associate multiple VLANs with tagged interfaces, but you can associate only one VLAN with untagged interfaces.
    6. In the IP Address/Mask field, type the IP address and netmask that specifies the HA interface.
  4. Click Remote Device Management IP, and specify this information for device 2, the standby system:
    1. In the Remote IP field, type the management IP address of the remote device (device 2) to use for high availability.
    2. Type the Username and Password of the system administrator account on device 2.
    3. If your network requires a VLAN Tag, type the number (1-4094). Otherwise, leave it blank.
    4. Click Select Interface and select the interface to connect to the active system. If you specified a VLAN tag and want to accept only frames that contain VLAN tags, select Tagged; otherwise, leave it unselected.
    5. In the IP Address/Mask field, type the IP address and netmask of the HA interface.
  5. Click Submit.
    Device 1 becomes the Active device and device 2 is the Standby device. In the upper left corner of the screen on device 1, it says ONLINE (ACTIVE).
You have set up the two systems for high availability. The two systems connect and begin synchronizing the data. When you finish setting up the two systems and configuring DDoS, the standby or failover system will be able to automatically take over and handle DDoS protection if the active system goes offline.
Next, you need to configure the network on the DDoS Hybrid Defender systems.

Checking the status of DDoS Hybrid Defender on device 2

You can now check the status of DDoS Hybrid Defender on device 2, the system that is selected as the standby system when two systems are configured for high availability.
Log in to device 2 using the administrator username and password.
In the upper left corner, if the two systems are configured properly, it says ONLINE (STANDBY).
You can proceed to configure the network on both systems. However, note that you should configure DoS protection on the Active device.

Configuring the network for high availability

You must configure the network to create the workflow on both the active and standby DDoS Hybrid Defender™ systems. The way you set up the system depends on your network organization.
Note: If you are using the BIG-IP® Virtual Edition, to set up the network as described here, you must create a security policy on the vSwitch. Configure the security policy to accept the Promiscuous Mode and Forged Transmits policy exceptions. For details about these options, see the VMware ESX or ESXi Configuration Guide.
  1. Log in to DDoS Hybrid Defender device 1 using the administrator user name and password.
  2. On the Main tab, click Network > Topology .
    The Configured Network Topologies screen shows the different types of configurations you can implement, and if any configurations exist, it shows the # of Configurations on the right.
  3. If the configuration requires trunks or route domains, on the right, click << to expand the Shared Objects panel where you can add trunks or route domains to use for any of the configurations.
    1. Click Trunks or Route Domains.
    2. Click the appropriate + to add the needed trunks or route domains.
    3. Click Commit.
    You can also create trunks or route domains the same way in each of the separate topology screens.
  4. On the main screen, click Create to use the network configuration tools.
  5. Click the appropriate network topology to get started.
    Most locations use only one type of configuration on the system. However, Netflow requires an additional configuration, such as Routed Mode, to direct the traffic to the BIG-IP system.
    Topology When to Use
    Routed Mode Use to deploy inline for routing traffic between subnets.
    Virtual Wire Use Virtual Wire (L2Wire) to set up the system as an inline L2 transparent mode device. Note: Not available on virtual edition platform.
    VLAN Group (L2 Bridge) Use the VLAN group configuration if your network relies on switch topology, and all traffic ingress to the BIG-IP system is from one VLAN, and traffic egress is through another VLAN. This is an inline deployment as an L2 transparent bridge between two L2 network segments.
    Netflow For out-of-band deployment with additional configuration such as Routed Mode: Specifies NetFlow configuration where the system is listening for NetFlow messages and traffic information (metadata).
    SPAN Port For out-of-band deployment only: Specifies the ports passively observing mirrored traffic (packets), and allows the system to detect but not mitigate attacks on other protected objects. Not typically used with high availability.
    Separate tasks describe configuring each of the configurations.
  6. Log in to DDoS Hybrid Defender device 2 using the administrator user name and password.
  7. Repeat the network configuration steps (2-5) on device 2, using a similar configuration.
    Tip: The names of the VLANs (if you added new VLANs), VLAN tags, floating IP address, and routes (if added) should be the same on both systems.
After you complete the network configuration on both devices, the active and standby DDoS Hybrid Defender systems are set up to work within your network for most typical configurations. The standby system automatically takes over in case of system failure. The network configurations are not synchronized between the two devices because they need to differ. However, other settings that you configure on the active device are synchronized automatically with the standby device.

Configuring the network using routed mode

If using routed technology, you can deploy DDoS Hybrid Defender™ in routed mode within the current configuration. You can choose the network whose traffic goes through the DDoS Hybrid Defender, and let the rest continue to follow the path prior to deploying the device. The way you set up the system depends on your network organization.
Note: If setting up the two systems for high availability, you must configure the network on both the active and standby systems.
  1. On the Main tab, click Network > Topology .
  2. Click Create to start configuring the network.
    A visual representation of the network configuration types is displayed.
  3. Click the Routed Mode configuration.
  4. In the VLAN area, type a name, select the VLAN tag, select the interface for the VLAN, whether it is tagged or untagged, then click Add.
  5. In the IP Address/Mask (Port Lockdown) area:
    1. Type the IP address and mask that specifies a range of IP addresses spanning the hosts in the VLAN. This is required.
    2. After the IP address, select the Port Lockdown setting: Select Allow None to accept no traffic; Allow Default to accept default protocols and services only; and Allow All to activate TCP and UDP services.
    3. Optional: To share an IP address between two high availability devices (such as if data passes through a router on the way to DDoS Hybrid Defender), in the Floating IP/Mask (Port Lockdown) field, type the floating IP address (it must be in the same subnet as the IP address), and select the Port Lockdown setting.
      The floating IP address must be the same on both devices, and you must configure it on both devices since it represents the active device.
      Tip: Using a floating IP address makes it so the router always goes to the same address regardless of which system is active.
    4. Click Add.
  6. If your system connects to other networks through additional routers, add the required routes so the traffic can reach its destination. In the Routes area, type the network IP address, netmask, and gateway IP address (this is the next hop router address), then click Add.
  7. Click Save Configuration.
  8. If you need additional routed mode configurations, click Add to create them.
  9. When done, click Finished.
The system is configured for routing traffic between subnets.
At this point, you can start configuring DDoS Hybrid Defender. You can set up remote logging and Silverline, if you are using those features. Then you can begin setting up DDoS protection.

Deploying inline using virtual wire

Use the virtual wire configuration to set up the system as an inline L2 transparent mode device (the ingress and egress VLANs are the same). This deployment is not available on virtual edition platforms.
Note: If setting up the two systems for high availability, you must configure the network on both the active and standby systems.
  1. On the Main tab, click Network > Topology .
  2. Click Create to start configuring the network.
    A visual representation of the network configuration types is displayed.
  3. Click the Virtual Wire configuration.
  4. For Name, type a name for the Virtual Wire configuration.
  5. For Member 1 and Member 2, select unique interfaces (or trunks) for the ingress and egress ports on the system.
  6. In the VLAN Traffic Management Configuration area, for Define VLANs, select Add to create a VLAN group.
  7. For Name, type a name for the VLAN group.
  8. If using tagged VLANs, type a tag number for the VLANs (an integer from 1 to 4095), select the Tagged check box.
  9. Click Add to add the VLAN group.
  10. In the Actions area, for Propagate Virtual Wire Link Status, select Enabled if you want to propagate link status.
  11. Click Finished.
The system creates a Virtual Wire configuration.
At this point, you can start configuring DDoS Hybrid Defender. You can set up remote logging and Silverline, if you are using those features. Then you can begin setting up DDoS protection.

Deploying inline using VLAN groups

You can put DDoS Hybrid Defender in transparent mode on a link between two Layer 3 devices, so that the IP addresses on each end of the link don’t have to change. The VLAN Group configuration creates VLANs and VLAN groups to set up the system as an inline L2 transparent bridge between two network segments. This is useful if your network relies on switch topology, and all traffic ingress to the BIG-IP system is from one VLAN, and traffic egress is through another VLAN.
Note: If setting up the two systems for high availability, you must configure the network on both the active and standby systems.
  1. On the Main tab, click Network > Topology .
  2. Click Create to start configuring the network.
    A visual representation of the network configuration types is displayed.
  3. Click the VLAN Group configuration.
  4. For VLAN Group Name, type a name for the VLAN Group.
  5. Specify the members of the VLAN group. For Member 1 and Member 2, type the VLAN tag number, specify the interface to use for traffic management, select whether it is tagged or untagged, and click Add.
  6. In the IP Address/Mask (Port Lockdown) area:
    1. Type the IP address and mask that specifies a range of IP addresses spanning the hosts in the VLAN. This is required.
    2. After the IP address, select the Port Lockdown setting: Select Allow None to accept no traffic; Allow Default to accept default protocols and services only; and Allow All to activate TCP and UDP services.
    3. Optional: To share an IP address between two high availability devices (such as if data passes through a router on the way to DDoS Hybrid Defender), in the Floating IP/Mask (Port Lockdown) field, type the floating IP address (it must be in the same subnet as the IP address), and select the Port Lockdown setting.
      The floating IP address must be the same on both devices, and you must configure it on both devices since it represents the active device.
      Tip: Using a floating IP address makes it so the router always goes to the same address regardless of which system is active.
    4. Click Add.
  7. If your system connects to other networks through additional routers, add the required routes so the traffic can reach its destination. In the Routes area, type the network IP address, netmask, and gateway IP address (this is the next hop router address), then click Add.
  8. Click Finished.
The system is deployed inline as an L2 transparent bridge between two L2 network segments.
At this point, you can start configuring DDoS Hybrid Defender. You can set up remote logging and Silverline, if you are using those features. Then you can begin setting up DDoS protection.

Examining traffic metadata using Netflow messages

Before you can use Netflow with the system, you need to perform other network configuration so that traffic is directed to the system. You can use one of the other configurations to do this. For example, you could use Routed Mode to route network traffic to the DDoS Hybrid Defender.
You can configure DDoS Hybrid Defender to receive Netflow messages so that it can examine traffic metadata for evidence of and prevent DoS attacks.
  1. On the Main tab, click Network > Topology .
  2. Click Create to start configuring the network.
    A visual representation of the network configuration types is displayed.
  3. Click the Netflow configuration.
  4. For Name, type a name for the Netflow configuration.
  5. For Destination, type the IP address and netmask that specifies the IP addresses where the system listens for NetFlow messages from other devices on the network.
  6. For Port, specify the port from which the system is listening for NetFlow messages.
  7. For Netflow Version, specify which version of Netflow messages to listen for.
  8. Click Finished.
DDoS Hybrid Defender is configured to listen for Netflow messages at the system level.
Next, you can create Netflow Protected Servers to more distinctly represent the servers that DDoS Hybrid Defender is protecting from DoS attacks using data from the Netflow messages. If you want to redirect traffic using scrubbing, you can create a scrubbing profile to mitigate attacks.

Setting up remote logging

You can specify remote logging destinations on DDoS Hybrid Defender™. Set up remote logging if you want to consolidate statistics gathered from multiple appliances onto a Security Information and Event Management (SIEM) device, such as Arcsight or Splunk. If setting up high availability, configure remote logging on the active device.

When configuring remote high-speed logging of system events, it is helpful to understand the objects you need to create and why, as described here:

What to create Why
Pool Create a pool of remote log servers to which the BIG-IP system can send log messages.
Destination Create a log destination of Remote High-Speed Log type that specifies a pool of remote log servers. If your remote log servers are the ArcSight, Splunk, IPFIX, or Remote Syslog type, create an additional log destination to format the logs in the required format and forward the logs to a remote high-speed log destination.
Publisher Create a log publisher to send logs to a set of specified log destinations.
Logging profile Create a logging profile to enable logging of user-specified data at a user-specified level, and associate a log publisher with the profile.
Protected object Associate a logging profile with a protected object to define how the system logs security events on the traffic that the protected object processes.

Following are the general steps to set up remote logging:

  1. Create a pool of remote servers to which the system can send log messages: on the Main tab, click Visibility > Event Logs > Pools , create, then add the log servers and ports.
  2. Create a remote high-speed log destination: on the Main tab, click System > Logs > Configuration > Log Destinations , create, specify the type, and any other settings for the remote log destination.
  3. Create a publisher for the system to send log messages: on the Main tab, click System > Logs > Configuration > Log Publishers , create, and select the log destinations for the publisher.
  4. Create a logging profile: on the Main tab, click Visibility > Event Logs > Logging Profiles , create, select the types of logs, and complete the associated settings.
    • Network Firewall provides logs for IP intelligence and traffic statistics.
    • DoS Protection provides logs for DNS, SIP, and Network DoS events.
    • Bot Defense provides logs for HTTP DoS protection for application security.
  5. Associate the logging profile with the appropriate protected object: on the Main tab, click DoS Configuration > Protected Objects , click the name of the protected object. In the properties pane on the right, select the logging profile to use.
Important: Depending on your network configuration, you may need to add a VLAN and route to enable DDoS Hybrid Defender to communicate with the remote logging server.
Refer to External Monitoring of BIG-IP Systems: Implementations for additional information about configuring logging.

Event logs from DDoS Hybrid Defender are sent to the remote logging server in the format you specified.