Manual Chapter : Provide User Access to Applications

Applies To:

Show Versions Show Versions

BIG-IQ Centralized Management

  • 6.1.0
Manual Chapter

Provide User Access to Applications

Overview: Providing a user access to a SharePoint application hosted on BIG-IP

This use case scenario walks you through the tasks you'll need to provide a user access to a single application, SharePoint, that is hosted on your managed BIG-IP device.

The required tasks are:

Role Type
Create a custom role type associated with one or more services. Then select the type of resources (object types) this role needs to do their job, and then specify how you want to allow this role type to interact with those objects. For this example:
  • Select the Local Traffic (LTM) service.
  • Create a role type named SharePoint Management.
  • Select the Virtual Server: Local Traffic and add it to the selected resources.
  • Provide permissions for this role type to read, add, edit, and delete those objects.
Resource Group
Create a custom resource group that contains the specific resources you want to provide access to. For this example:
  • Create a resource group, SharePoint Server.
  • Select the SharePoint Management role type to narrow the service and object types displayed to only those this role type has permissions to.
  • Select the Local Traffic (LTM) service.
  • Select the Virtual Server: Local Traffic service
  • Locate the virtual server that is hosting your SharePoint application, and add it to the selected resources.
Role
Create a custom role associated with the custom role type, and assign the custom resource group to that role. For this example:
  • Create a custom role called SharePoint Manager.
  • Associate the SharePoint Management role type to it.
  • Associate the SharePoint Server resource group to it.
User
Create a user and associate it with the role you created. For this example:
  • Create a user named Sam.
  • Associate the user with the SharePoint Manager role.

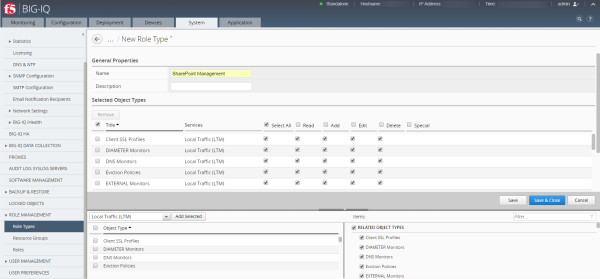
Create a custom role type with permissions to access LTM virtual servers


The first step to providing your user access to an application is to create a custom role type and define a set of permissions to specify how that role type interacts with objects that are associated with a service.

In this example, we'll be providing access to BIG-IP virtual servers (because your applications are hosted on BIG-IP virtual servers) with permissions to read, add, edit, and delete all associated objects.

Note: At this point, you're just defining the object type you want a custom role type to interact with. You'll select the specific BIG-IP virtual server hosting your SharePoint application when you create a resource group.
  1. At the top of the screen, click System.
  2. On the left, click ROLE MANAGEMENT > Role Types .
  3. Near the top of the screen, click the Add button.
  4. Give this role type a name. Name: SharePoint Management
    A description is optional.
  5. From the Services list, select Local Traffic (LTM).
  6. In the Object Type list, select the check box next to Virtual Servers: Local Traffic.
    Important: When you select an object type, the screen displays related object types. As you know, interactions and relationships between objects in your network can be complex. Because of that, it's best to leave all of the objects selected. This ensures you don't unintentionally limit this role type's ability to manage the SharePoint application.
  7. Click the Add Selected Resources button.
    All of the objects associated with virtual servers appear in the Selected Objects Types list.
  8. Next to each object type, select check box beneath the permissions you want to give to this role type.
    You must select at least one permission for each Selected Object Type.
    Your screen should now look like this:


  9. Click the Save & Close button.
The role type you created displays in the Role Type list.
Now you can create a resource group that contains the specific virtual server hosting your SharePoint application.

Create a custom resource group

Create a resource group with all of the BIG-IP objects you want to provide access to, and assign a role type to it.


  1. At the top of the screen, click System.
  2. On the left, click ROLE MANAGEMENT > Resource Groups .
  3. Near the top of the screen, click the Add button.
  4. In the Name field, type a name to identify this group of resources.
  5. From the Role Type list, select the role type you want to provide access to for this group of resources.
  6. From the Select Service list, select the service(s) you want to provide access to for this group of resources.
  7. From the Object Type list, select the type of object you want to add to this group of resources.
  8. For the Source setting:
    • Selected Instances - Select this option to put only the source objects you selected into this resource group. If you select this option, the associated role will not have access to any new objects of the same type added in the future unless you explicitly add it to this resource group.
    • Any Instances - Select this option if you want to add any objects of the same type created in the future to this resources group. If you select this option, any new object of the same type added in the future will be assigned to this resource group, and access to those new resources will automatically be given to the associated role type.
  9. Select the check box next to the name of each object you want to add to this group of resources, and click the Add Selected button.
    Tip: You might have to horizontally re-size your screen so you can see all the objects you need to see.
  10. Click the Save & Close button.
Now you can associate this role type and resource group to a role.

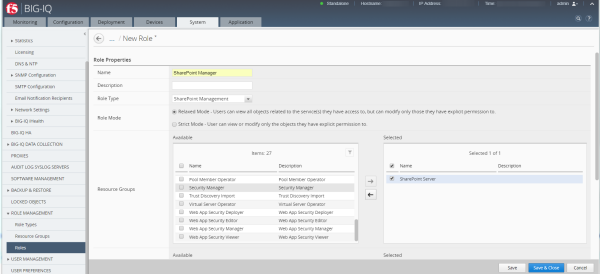
Create a custom role for the SharePoint Manager

After you create a resource group that contains the virtual server hosting your SharePoint application, you can create a SharePoint Manager role and associate it with your custom SharePoint Management role type and SharePoint Server resource group.


In this example, we'll be creating a role for SharePoint Manager.

  1. On the left, click ROLE MANAGEMENT > Roles .
  2. Near the top of the screen, click the Add button.
  3. Give the new role a name, SharePoint Manager.
    A description is optional.
  4. From the Role Type list, select SharePoint Management.
  5. For the Role Mode setting, select an option.
    • Relaxed Mode – If you select this option, users associated with this role can view and manage all objects you've given explicit permission to, and it can see (but won't be able to manage) related objects for associated services.
    • Strict Mode – If you select this option, users associated with this role can view and manage only the specific objects you’ve given explicit permission to.
    Tip: Refer to the screenshots that follow for an example of the differences.
  6. From the Resource Groups Available list, select the check box next to SharePoint Server and move it the Selected list.
  7. To view the user access permissions associated with this role, click the View Permissions button towards the bottom of the screen.
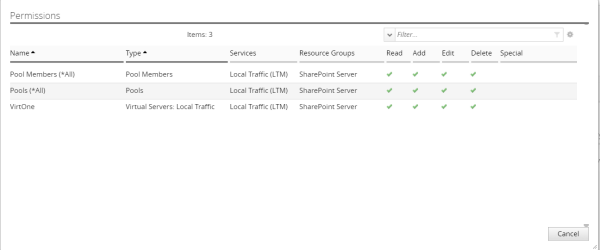
    This is what you would see if you created the role in Strict Mode.


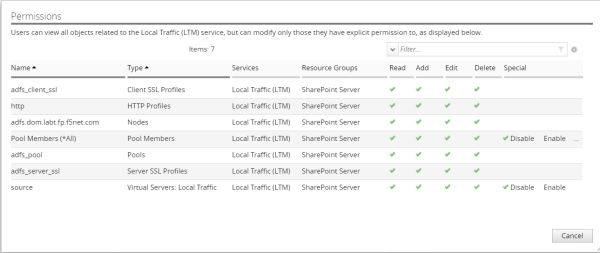
    You'd see something similar to the following if you created the role in Relaxed Mode.

    Your screen should now look similar to the following:


  8. Click the Save & Close button.
You can now associate users with this custom role.