Manual Chapter : Adding a new BIG-IP GTM to a GTM Synchronization Group

Applies To:

Show Versions Show Versions

BIG-IP GTM

  • 11.6.5, 11.6.4, 11.6.3, 11.6.2, 11.6.1
Manual Chapter

Adding a new BIG-IP GTM to a GTM Synchronization Group

Overview: Adding a BIG-IP GTM system to a GTM synchronization group

You can configure BIG-IP® Global Traffic Manager™ (GTM)™ systems in collections called GTM synchronization groups. All BIG-IP GTM systems in the same GTM synchronization group have the same rank, exchange heartbeat messages, and share probing responsibility.

Configuration changes to one device in a GTM synchronization group are synchronized incrementally across the devices in the group. That is, only the data that has changed on a GTM device is synchronized to the other devices in the group. Although incremental synchronization is the default behavior, if an incremental synchronization fails, the system automatically performs a full configuration synchronization.

BIG-IP                 GTM systems in a synchronization group

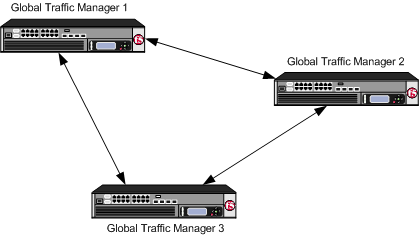
BIG-IP GTM systems in a GTM synchronization group

When you add a BIG-IP® (GTM)™ system to a network that contains older BIG-IP GTM systems, the devices can exchange heartbeat messages, even though the BIG-IP software versions are different. However, to add a GTM to a configuration synchronization group, you must run the gtm_add script.

Task Summary

When adding a BIG-IP® GTM to a network that already contains BIG-IP GTM systems in a synchronization group, perform the following tasks.

Enabling synchronization on the existing GTM

Ensure that BIG-IP® GTM™ references your NTP servers.

Decide to which GTM synchronization group you want to add the GTM system. Make certain that at least one previously-configured GTM belongs to that GTM synchronization group.

Enable synchronization on the system to ensure that the GTM system that is already installed on your network can share configuration changes with other GTM systems that you add to the GTM synchronization group.
  1. On the Main tab, click DNS > Settings > GSLB > General .
    The General configuration screen opens.
  2. Select the Synchronize check box.
  3. In the Group Name field, type the name of the synchronization group to which you want this system to belong.
  4. In the Time Tolerance field, type the maximum number of seconds allowed between the time settings on this system and the other systems in the synchronization group.
    The lower the value, the more often this system makes a log entry indicating that there is a difference.
    Tip: If you are using NTP, leave this setting at the default value of 10. In the event that NTP fails, the system uses the time_tolerance variable to maintain synchronization.
  5. Click Update.
When a change is made on one GTM system in the GTM synchronization group, that change is automatically synchronized to the other systems in the group.

Creating a data center on the existing GTM

Create a data center on the existing GTM™ system to represent the location where the new GTM system resides.
  1. On the Main tab, click DNS > GSLB > Data Centers .
    The Data Center List screen opens.
  2. Click Create.
    The New Data Center screen opens.
  3. In the Name field, type a name to identify the data center.
    Important: The data center name is limited to 63 characters.
  4. In the Location field, type the geographic location of the data center.
  5. In the Contact field, type the name of either the administrator or the department that manages the data center.
  6. From the State list, select Enabled or Disabled.
    The default is Enabled, which specifies that the data center and its resources are available for load balancing.
  7. Click Finished.

Defining a server on the existing GTM

Ensure that a data center where the new GTM™ system resides is available in the configuration of the existing GTM.
Define a new server, on the existing GTM system, to represent the new GTM system.
  1. On the Main tab, click DNS > GSLB > Servers .
    The Server List screen opens.
  2. Click Create.
    The New Server screen opens.
  3. In the Name field, type a name for the server.
    Important: Server names are limited to 63 characters.
  4. From the Product list, select BIG-IP System (Single).
    The server type determines the metrics that the system can collect from the server.
  5. In the Address List area, add the IP address of the server.
    Important: You must use a self IP address for a BIG-IP® system; you cannot use the management IP address.
  6. From the Data Center list, select the data center where the server resides.
  7. From the Virtual Server Discovery list, select how you want virtual servers to be added to the system.
    Option Description
    Disabled The system does not use the discovery feature to automatically add virtual servers. This is the default value. Use this option for a standalone GTM system or for a GTM/LTM® combo system when you plan to manually add virtual servers to the system, or if your network uses multiple route domains.
    Enabled The system uses the discovery feature to automatically add virtual servers. Use this option for a GTM/LTM combo system when you want the GTM system to discover LTM virtual servers.
    Enabled (No Delete) The system uses the discovery feature to automatically add virtual servers and does not delete any virtual servers that already exist. Use this option for a GTM/LTM combo system when you want the GTM system to discover LTM virtual servers.
  8. In the Virtual Server List area, if you selected Disabled from the Virtual Server Discovery list, specify the virtual servers that are resources on this server.
    1. In the Name field, type the name of the virtual server.
    2. In the Address field, type the IP address of the virtual server.
    3. From the Service Port list, select the port the server uses.
    4. Click Add.
  9. Click Create.
    Note: The gtmd process on each BIG-IP GTM system will attempt to establish an iQuery® connection over port 4353 with each self IP address defined on each server in the BIG-IP GTM configuration of type BIG-IP. Allow port 4353 in your port lockdown settings for iQuery® to work.
    The Server List screen opens displaying the new server in the list.
The status of the newly defined GTM system is Unknown, because you have not yet run the gtm_add script.

Running the gtm_add script

Determine the self IP address of a GTM™ system in the GTM synchronization group to which you want to add another GTM.
Run the gtm_add script on the GTM system you are adding to your network to acquire the configuration settings from a GTM system that is already installed on your network. For additional information about running the script, see SOL13312 on AskF5.com (www.askf5.com).
Note: The BIG-IP GTM and other BIG-IP systems must have TCP port 22 open between the systems for the script to work. You must perform this task from the command-line interface.
  1. Log in as root to the GTM system you are adding to your network.
  2. Run this command to access tmsh.
    tmsh
  3. Run this command to run the gtm_add script
    run gtm gtm_add
    1. Press the y key to start the gtm_add script.
    2. Type the IP address of the GTM system in the synchronization group to which you are adding this GTM system.
    3. Press Enter.
    4. If prompted, type the root password.
    5. Press Enter.
The GTM system you are installing on your network acquires the configuration of the GTM system already installed on your network.

Implementation result

The new BIG-IP® GTM™ system that you added to the network is a part of a GTM synchronization group. Changes you make to any system in the GTM synchronization group are automatically propagated to all other GTM systems in the group.