Manual Chapter : OAuth Bearer Single Sign-On Method

Applies To:

Show Versions Show Versions
Manual Chapter

OAuth Bearer Single Sign-On Method

Overview: Configuring SSO OAuth Bearer using passthrough

You can configure OAuth Bearer SSO as passthrough to use the JSON Web Token (JWT) received from the client. The OAuth scope check authenticates the client, and sends the received token to the backend server.

Before you start, you need to have created an access policy, access profile, and a virtual server to meet your needs. Here we configure OAuth Bearer SSO using the passthrough option for the token source.

Creating an OAuth bearer SSO configuration for passthrough

You create an OAuth bearer SSO configuration when you want to allow single-sign on using an OAuth token. In this task, the token is retrieved from the client, and is generated on an external OAuth authorization server.
  1. On the Main tab, select Access > Single Sign-On > OAuth Bearer .
    The OAuth Bearer Configurations screen opens.
  2. Click Create.
    The New SSO Configuration screen opens.
  3. In the Name field, type a name for the SSO configuration.
    The maximum length of a single sign-on configuration is 225 characters, including the partition name.
  4. For Send Token, select when to send the token:
    • To always send the token, select Always.
    • To send the token when you receive a 4xx response from the server, select On 4xx Response and choose one or more 4xx responses.
  5. For Log Settings, select the log settings to use for the access event logs.
    By default, the log settings specified in the access profile are used. You can also create custom log settings or use the default-log-setting for this SSO configuration. Click + to create custom settings.
  6. If getting the JWK token from the client, for Token Source, select Passthrough, and select a server from the OAuth Server list.
  7. Click Finished.
When you configure an APM access policy that supports single sign-on, it includes an SSO Configuration property. Select the SSO bearer configuration from the object where you want to put SSO into effect.

For example, to use OAuth Bearer SSO, you need an access profile, access policy, and a virtual server. The access profile being used in this configuration must contain an OAuth Bearer SSO configuration. The virtual server needs to specify the access profile.

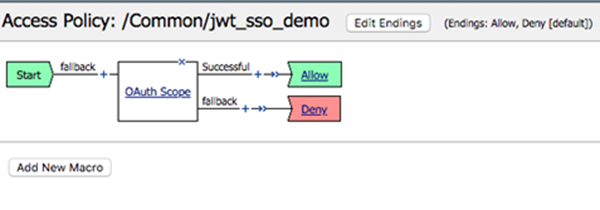
Example access policy configuration using passthrough

Here is an example access policy configured using passthrough. The JWT token received from the client is used, it goes through the OAuth scope check, and if the check is successful, the received JWT token is sent to the backend server.

Overview: Configuring SSO OAuth Bearer to create JWT

You can configure OAuth Bearer SSO to create, sign, and send a JSON Web Token (JWT) to backend applications that require an access token.

Setting this up requires performing the following tasks:
  • Create claims for the JWT, as needed
  • Create a JSON Web Key (JWK) configuration
  • Create an OAuth Bearer SSO configuration
  • Associate the OAuth Bearer configuration with the access profile
  • Use AAA (AD query), SAML, or other authentication method in the access policy
  • Assign the access profile to the virtual server

Before you start, you need to have created an access policy, access profile, and a virtual server to meet your needs. Here we add the OAuth Bearer SSO configuration to your environment.

About OAuth Bearer SSO

Bearer tokens are tokens that OAuth 2.0 uses to authorize clients to access protected resources.

OAuth Bearer SSO provides a JSON Web Token (JWT) in the form of a bearer token to the backend resource server. You can configure OAuth Bearer SSO as passthrough (where the JWT received from the client is used), or have APM generate and sign the JWT token for the backend SSO.

Configuring JWT claims

You can configure the claims that you want to include in the JSON web tokens (JWTs). (A claim specifies a string, and optionally, a value, that represents a resource.) This is only required if you plan to specify claims in your JWTs.
  1. On the Main tab, select Access > Federation > OAuth Authorization Server > Claim .
  2. Click Create.
  3. In Name, type a name for the configuration.
  4. From Claim Type, select the type of claim: String, Number, Boolean, or Custom.
  5. In Claim Name, type a name for the claim.
  6. In Claim Value, type a value for the claim depending on its type.
    Claim Type Value can be
    String ASCII characters or session variable
    Number Valid number or session variable
    Boolean true, false, or session variable
    Custom Any other format not covered by the other options or session variable
  7. Click Save.
    The newly created claim displays on the list.
You associate claims with tokens an OAuth bearer SSO configuration.

Configuring JSON web keys (JWKs)

A JSON web key configuration specifies a cryptographic JSON web key (JWK). You configure JWKs for the system to use to sign the JSON web tokens that it issues. For example, you use JWK key configurations when setting up OAuth bearer single sign-on.
  1. On the Main tab, select Access > Federation > JSON Web Token > Key Configuration .
    The Key Configuration screen opens.
  2. Click Create.
  3. In the Name field, type a name.
  4. In ID, type the ID.
  5. For Type, select RSA, Octet, or Elliptic Curve.
    Additional parameters display for the type that you select.
  6. For Signing Algorithm, select any one.
  7. For the Octet type, you only need to configure one additional setting:
    1. In Shared Secret, type the secret.
      Important: To maximize the security of the algorithm, use enough characters so that the resulting key size matches the block size for the signing algorithm: for HS256, 32 characters; for HS384, 48 characters; for HS512, 64 characters.
    2. Click Save.
      The newly created JWK displays on the list.
  8. For the RSA or Elliptic Curve key types, configure the settings in the Certificates areas:
    1. For Certificate File, select a certificate.
      Important: Do not select the default certificate when the BIG-IP system is on a chassis platform or is included in an HA pair. F5 strongly discourages the use of the default certificate in a JWK in any configuration.
    2. For Certificate Key, select one.
      Important: Do not use the default key when the BIG-IP system is on a chassis platform or is included in an HA pair. F5 strongly discourages the use of the default key in a JWK in any configuration.
    3. For Key Passphrase, type a passphrase.
    4. For Certificate Chain, select one.
      If this field is filled in, values for the parameters are auto-generated.
  9. Click Save.
    The newly created JWK configuration displays in the list.

Creating an OAuth bearer SSO configuration to create JWT

You create an OAuth bearer SSO configuration when you want to allow single-sign on using an OAuth token. SSO generates a signed JWT (JSON web token) and sends it to the backend as an OAuth bearer token.
  1. On the Main tab, select Access > Single Sign-On > OAuth Bearer .
    The OAuth Bearer Configurations screen opens.
  2. Click Create.
    The New SSO Configuration screen opens.
  3. In the Name field, type a name for the SSO configuration.
    The maximum length of a single sign-on configuration is 225 characters, including the partition name.
  4. For Send Token, select when to send the token:
    • To always send the token, select Always.
    • To send the token when you receive a 4xx response from the server, select On 4xx Response and choose one or more 4xx responses.
  5. For Log Settings, select the log settings to use for the access event logs.
    By default, the log settings specified in the access profile are used. You can also create custom log settings or use the default-log-setting for this SSO configuration. Click + to create custom settings.
  6. For Token Source, select Generate JWT and follow the remaining steps in this task to define the JWT.
  7. For Issuer, type the URL for the JWT issuer. For example, https://jwt-issuer.com.
  8. In Subject, retain the default value, %{session.assigned.uuid}, or type a subject for the JWT.
    The session variable session.assigned.uuid contains the UUID that the system assigns to the session after the access policy completes.
  9. To increase performance until the cached JWT expires, click Enable Token Cache to store the token in cache for the session and reuse it as needed.
  10. For Access Token Lifetime, type the number of minutes you want the JWT access token to be considered valid.
    The default is 5 minutes.
  11. From Signing Key, select the JWK key configuration previously created for signing the token.
  12. For Audience, add the audience claim or claims for which the JWT access token is intended. This is a list of values. Each value in this list can be a string, URI, or session variable.
  13. For Scope, type one or more space-separated scope strings (using the ASCII character set) or session variables. For example, openid phone email.
    Note: For example, to create a JWT claim called scope, specify it here. You cannot use reserved words such as scope as the name of a JWT claim.
  14. If you created claims for the token, for JWT Claims, move the previously created claims you want to use to the Selected list.
  15. The other fields are not required but you can set them if needed.
  16. Click Finished.
When you configure an APM object that supports single sign-on, it includes an SSO Configuration property. Select the SSO bearer configuration from the object where you want to put SSO into effect.

OAuth Bearer SSO configuration settings

These settings are available when you create an OAuth Bearer SSO configuration.

General Properties for OAuth Bearer SSO configuration
Setting Value Additional Information
Name Name of the SSO configuration. The name must begin with a letter, or underscore, and contain only letters, numbers, underscores, dashes, and periods. Maximum length including the partition name is 225 characters. Avoid using global reserved words in the name, such as all, delete, disable, enable, help, list, none, show, or None.
SSO Method Displays the type of SSO configuration. Cannot be changed.
Headers Header name-value pairs to send with the SSO method. Available when you select Advanced from the General Properties list.
Send Token Specifies when to send the token (for OAuth Bearer).

Specify Always to always send the token.

Specify On 4xx Response to send the token when you receive a 4xx response from the server; select On 400, On 401, and/or On 403. The system first forwards the user's HTTP request to the web server without inserting the token. If the server requests authentication by responding with a 4xx status code (that is enabled), the system retries the request with the token.

Log Settings Specifies which log settings to use for the access event logs. By default, the log settings specified in the access profile are used. You can create custom log settings or use the default-log-settings for this SSO configuration. Click + to create custom settings.
Passthrough OAuth Bearer SSO configuration settings

These are the settings to use when the bearer token is retrieved from another source.

Setting Value Additional Information
Token Source Specifies Passthrough to indicate that the user has a token from another source. Default value
OAuth Server Specifies the OAuth server that provided the token. Required value
Generate JWT OAuth Bearer SSO configuration settings

These are the settings to use when the system generates and signs the OAuth bearer token. For this configuration, you need to have created a JWK key configuration and optional JWT claims.

Setting Value Additional Information
Token Source Specifies Generate JWT to indicate that you want the system to create a JWT access token. The system creates a JWT token and sends it to the backend server as an OAuthBearer token.
Issuer Specifies the issuer of the JWT. This must be a URI and it is mandatory. For example, https://authserver/oauth2.
Subject Specifies what the token is intended for. The value can be a string, URI, or session variable, such as %{session.assigned.uuid}.
Enable Token Cache When selected, stores the token in cache for the session and reuses it; enabling the cache provides increased performance. When cleared, the token is generated for every request.
Access Token Lifetime Specifies the number of minutes a JWT access token is considered valid. The default is 5 minutes.
Ignore Expired Certificate Validation When selected, the certificate is used for signing a JWT access token even if it is expired. When cleared, the system sends an error message if the certificate has expired.
Signing Key Specifies a JSON web key (JWK) configuration for signing the token. It is mandatory. You can create JWKs in Access > Federation > JSON Web Token > Key Configuration .
Audience Specifies the audience claim for which the JWT access token is intended. This is a list of values. Each value in this list can be a string, URI, or session variable. For example, https://newapp.
Scope Specifies one or more space-separated scope strings (using the ASCII character set) or session variables. For example, openid phone email.
JWT Claims Specifies a list of claims that define additional information that you want to transmit as part of the JWT access token. You can create claims in Access > Federation > OAuth Authorization Server > Claim .

Adding OAuth bearer SSO to an access profile

You add an OAuth bearer SSO configuration to an access profile if you want to allow single sign-on using an OAuth bearer token.
Note: You can also select an SSO configuration from a portal access resource.
  1. On the Main tab, click Access > Profiles / Policies .
    The Access Profiles (Per-Session Policies) screen opens.
  2. Click the name of the access profile that you want to edit.
    The properties screen opens.
  3. Click SSO / Auth Domains on the menu bar.
    The SSO Across Authentication Domains screen opens.
  4. From the SSO Configuration list, select the OAuth bearer SSO configuration you want the access profile to use.
    Other settings on the screen are not relevant when using an OAuth bearer SSO configuration.
  5. Click Update.
An access profile goes into effect when it is associated with a virtual server.

Example access policy configurations generating JWTs

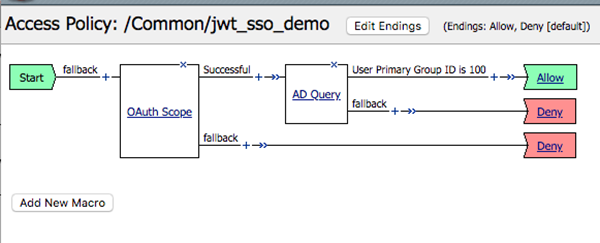
Here is an example access policy using an OAuth scope check. If the check is successful, an AD Query retrieves more user data. Then, SSO generates the JWT access token with the retrieved infromation and sends it to the backend server.

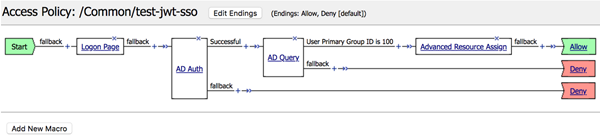
Here is an example access policy configured with an AAA agent. It goes through the OAuth scope check. If the check is successful, an AD Query retrieves more user data. Then, SSO generates the JWT token with the retrieved infromation and send to the backend server.

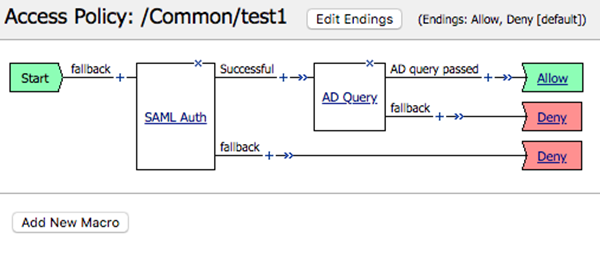
Here is an access policy configured with a SAML SP agent. SAML authentication retrieves the SAML2.0 bearer token and validates.

Adding the access profile to the virtual server

You associate the access profile with the virtual server so that the system can apply the profile to incoming traffic.

  1. On the Main tab, click Local Traffic > Virtual Servers .
    The Virtual Server List screen opens.
  2. Click the name of the virtual server you want to modify.
  3. In the Access Policy area, from the Access Profile list, select the access profile that you configured earlier.
  4. Click Update to save the changes.
Your access policy is now associated with the virtual server.