Manual Chapter :
Introducing BIG-IP Access Policy Manager
Applies To:
Show Versions
BIG-IP APM
- 11.4.1, 11.4.0
The BIG-IP® system is a port-based, multilayer switch that supports virtual local area network (VLAN) technology. Because hosts within a VLAN can communicate at the data-link layer (Layer 2), a BIG-IP system reduces the need for routers and IP routing on the network. This in turn reduces equipment costs and boosts overall network performance. At the same time, the BIG-IP systems multilayer capabilities enable the system to process traffic at other OSI layers. The BIG-IP system can perform IP routing at Layer 3, as well as manage TCP, UDP, and other application traffic at Layers 4 through 7. The following modules provide comprehensive traffic management and security for many traffic types. The modules are fully integrated to provide efficient solutions to meet any network, traffic management, and security needs.
BIG-IP® Local Traffic Manager includes features that help make the most of network resources. Using the powerful Configuration utility, you can customize the way that the BIG-IP system processes specific types of protocol and application traffic. By using features such as virtual servers, pools, and profiles, you ensure that traffic passing through the BIG-IP system is processed quickly and efficiently, while meeting all of your security needs. For more information, see BIG-IP® Local Traffic Manager: Concepts on http://www.f5.com.
The F5® Networks BIG-IP® Access Policy Manager® is a software component of the BIG-IP hardware platform that provides your users with secured connections to Local Traffic Manager virtual servers, specific web applications, or the entire corporate network. By leveraging standard web browsers and security technology, the Access Policy Manager enables your corporation or organization to provide users access to various internal resources easily and cost-effectively, with no special software or configuration on the users system.
All Access Policy Manager® models include the following features:
 | Standard Web browser support Access Policy Managers can be used with most standard browsers supporting secure HTTP (also known as HTTPS). These include Internet Explorer, Safari, and Firefox. |
| | Privacy The Access Policy Manager supports common encryption technologies, including RC4, Triple DES, and AES. It uses standard SSL encryption from the client browser to the Access Policy Manager. |
| | Authentication The Access Policy Manager can perform authentication, authorization, and accounting (AAA), using standard AAA methods, including LDAP directories, Microsoft Active Directory and Microsoft Windows Domain servers, RADIUS servers, and HTTP authentication. The Access Policy Manager supports native RSA SecurID authentication. In addition, the controller can use signed client digital certificates to authenticate devices. |
| | Client-side checks The Access Policy Manager provides a broad set of client-side checks such as client integrity checking, browser cache cleaner, secure virtual keyboard, and support for a large number of antivirus and firewall packages. |
| | Visual policy editor To facilitate access policy definition, the Access Policy Manager provides a built-in policy editor that is graphically based, which eases management and supports a visual audit of security access policies. |
| | Administration The Access Policy Manager provides a web-based Configuration utility. The Configuration utility includes tools for managing the Access Policy Manager, configuring secure access, creating and assigning resources, certificate generation and installation, and customization of the remote client user interface. |
| | Web access management With Access Policy Manager, you can configure authentication and access control for a web application behind a local traffic virtual server. Using web access management, you create an access policy for a new or existing local traffic virtual server to provide authentication, access control, and endpoint security for the web application. |
| | Network access With Access Policy Manager, you can configure a network access VPN connection for remote access. Using network access, you create an access policy and local traffic virtual server so end users can establish a full VPN connection to internal network resources. |
| | Portal access With the Access Policy Manager you can configure a remote access connection to one or more internal web applications. Using portal access, you create an access policy and local traffic virtual server so end users can access internal web applications through a single external virtual server. Use this if you need to provide secure extranet access to internal web applications without creating a full VPN connection. |
| | Audit trail The Access Policy Manager provides audit tools including full-session audit trails, drill-down session queries, and customizable reports and queries. |
| | High availability You can configure Access Policy Managers to fail over to standby controllers, ensuring availability for users. |
| | Scalability Access Policy Manager integrates with BIG-IP® system to support large-scale, high-performance deployments, providing universal, secure access for remote, wireless, and internal network users. |
| | BIG-IP system module The Access Policy Manager runs as a module of the BIG-IP system. This integration provides a uniform framework that enables users to leverage access policy features with other BIG-IP modules, such as Application Security ManagerTM. |
| | Client support The Access Policy Manager includes web client support for many different systems, including Macintosh and Linux. |
| | BIG-IP Edge Client Access Policy Manager is compatible with the BIG-IP Edge Client®, a standalone secure client with robust connection features. |
Access Policy Manager® can be configured to provide four types of access:
You use each type of access for a different system scenario. Access Policy Manager provides a set of objects that you can define to provide access to your users through different access methods. You configure Access Policy Manager connections differently for each access type. On the next page, Figure 1.1 shows the configuration of an Access Policy Manager access type. Each access type has common elements and differences. The following table lists the configuration elements that you use to configure each access policy type.
| Web access management | ||||
| Can use one virtual server for network access, portal access, and application access | Can use one virtual server for network access, portal access, and application access | Can use one virtual server for network access, portal access, and application access | Can use existing local traffic manager virtual server, or create a specific one with the wizard | |
| Yes, required with at least one member | ||||
| Access profile and access policy | ||||
| Connectivity profile | ||||
| Network access resource | ||||
| Portal access resource | ||||
| App tunnel resource | ||||
| Remote desktop resource | ||||
| Network access webtop | ||||
| Portal access webtop | ||||
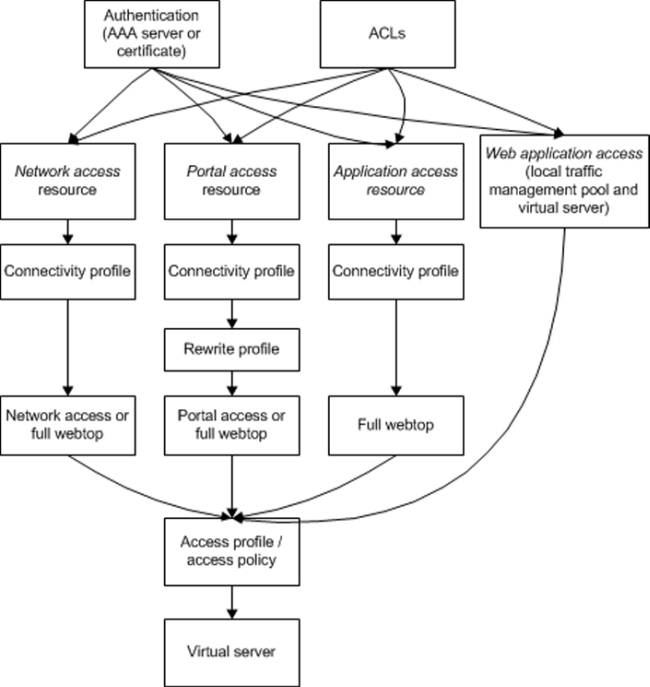
A client system can only connect using one of these configuration types at a time. However, you can configure multiple access types, and Access Policy Manager can dynamically determine the access type to provide during the access policy process, after the session starts.
Network access provides a full encrypted VPN tunnel from the client system to back end servers. Network access virtually puts the client machine inside the company network, so that clients perform operations exactly as if they sat within the corporate LAN. The administrator can configure access control lists that restrict access over the tunnel. Network access can provide connections that are always available to supported clients. Typically, you use full network access as the deployment method for client computers that are from well-known or trusted sources, such as company-provided laptops.
This basic network access configuration assigns a webtop and a connection to network access clients, and uses access control lists (ACLs) to control the resources and protocols a user can work with. This network access connection specifies no authentication.
| an access profile and an access policy that assigns the network access resource, network access or full webtop, and the ACLs |
| a virtual server that specifies particular network access settings, including the connectivity profile and access profile |
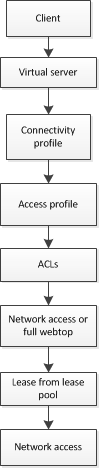
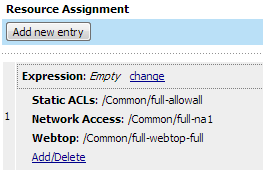
The access policy for this scenario is very simple, and contains only one item: an advanced resource assign action that assigns the network access resource, the network access or full webtop, and any ACLs. The access policy is shown in Figure 1.3. An example resource assign action for this policy is shown in Figure 1.4.

Portal access connections configure a remote access connection to one or more internal web applications. With this access type, users can access internal web applications through a single external virtual server. The portal access resource provides secure interaction with proprietary and standard web applications, using link rewriting technology. Typically, you use portal access on less trusted devices, or when full network access is not supported on a particular type of device. Use this if you need to provide secure extranet access to internal web-based applications without creating a full VPN connection.
This basic web applications configuration assigns a webtop and portal access resource for use by a remote access user. This portal access configuration specifies no authentication.
| an access profile and an access policy that assigns the portal access resource and the portal access or full webtop |
| a virtual server that specifies particular portal access settings, including the rewrite profile, the connectivity profile, and the access profile |

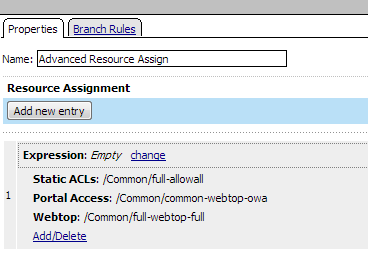
The access policy for this scenario is very simple, and contains only one item: an advanced resource assign action that assigns the portal access resource, and ACL, and a full webtop. This access policy, as it appears in the visual policy editor, is shown in Figure 1.6. An example resource assign action for this policy is shown in Figure 1.7.
Application access connections provide secure, application-level tunnel or remote desktop connections from the client to the network.
Additionally, optimization is available for app tunnels. Typically, you use application tunnels or remote desktop connections for users who require optimized access to applications or remote desktops.
This basic application access configuration assigns an app tunnel resource for use by a remote access user. This application access configuration specifies no authentication.
| an access profile and an access policy that assigns the app tunnel resource and the full webtop |
| a virtual server that specifies particular app tunnel settings, including the connectivity profile and the access profile |
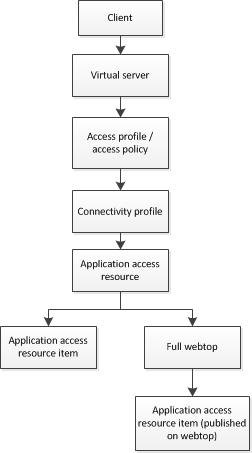
Figure 1.8 Basic application access object flow
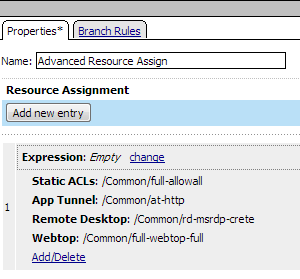
The access policy for this scenario is very simple, and contains only one item: an advanced resource assign action that assigns the application access resource, an ACL, and a full webtop. This access policy, as it appears in the visual policy editor, is shown in Figure 1.9. An example resource assign action for this policy is shown in Figure 1.10.
Web access management provides client-side security, authentication services, and access control to Local Traffic Manager virtual servers that load balance web applications. Typically, you use web access management to secure access to applications from a client system that is within a corporate environment.
This basic web access management configuration provides access control to a local traffic virtual server, and specifies client-specific ACLs. This access policy specifies no authentication.
| an access profile and an access policy. The access profile is then selected in the Local Traffic Manager virtual server |
The objects that define this simple web access management scenario are related as shown in Figure 1.11.
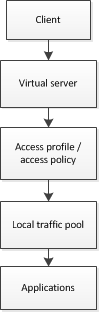
Figure 1.11 Basic web access management object flow
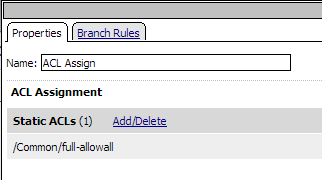
The access policy for this scenario contains a start point, an ACL assign action, and an allow ending. You assign one or more ACLs to the access policy with the ACL assign action, and by doing so you control access to the local traffic management virtual server. For a web access management connection, no network access, portal access, app tunnel, or remote desktop resource is assigned, and no webtop is assigned. This access policy appears in the visual policy editor as shown in Figure 1.12. An example resource assign action for this policy, with only an ACL assigned, is shown in Figure 1.13.

Figure 1.12 Basic web access management policy with ACLs
Access policies are configured visually in the visual policy editor. In the visual policy editor, all access policies start with a start point, and every access policy has at least one rule branch. All access policies have one or more endings. A successful ending is an allow ending, and an unsuccessful ending is a deny ending. Between the start and the end point are access policy items, which define the behavior of the access policy. The access policy is similar to a flow chart, where you read flow of a user policy from left to right.
The simplest successful web access management policy has a start point, one or more ACLs, and an allow ending. This scenario, described in the section Understanding a basic web access management scenario, provides access control features for a local traffic virtual server.
The simplest access policy includes a start point and an allow ending, and includes a resource assign action that assigns a connection resource and a webtop. When a user connects with this access policy, the user is assigned a connection and a webtop by the resource assign action. The user then goes to an allow policy ending, and the remote connection type is assigned to the user. Two such scenarios are described in the previous sections, Understanding a basic network access scenario, and Understanding a basic portal access scenario.
However, you typically check for client integrity, and require authentication to access resources, so a more typical access policy is shown in Figure 1.14. This access policy contains one or more client-side checks, such as antivirus, firewall, or operating system checks, a logon page and authentication action, and an advanced resource assignment action, followed by at least one allow ending, and deny endings for non-successful rule branches. The resource assignment action is used to assign connection resources, a webtop, webtop links, and any ACLs that apply to the connection. For a web access management connection, you can assign ACLs with the full resource assignment action or with the ACL assign action, but you do not assign a webtop, portal access, network access, or application access resources.

The basic access policy in Figure 1.14 includes actions that have successful and fallback rule branches (Antivirus, Firewall, Active Directory authentication), and actions that have single rule branches (Logon Page and Advanced Resource Assign).
You select an access profile in a virtual server definition, and the access policy associated with that access profile starts when a client connects to the virtual server. Access Policy Manager creates a blank access policy for every access profile. You can configure the access policy to dynamically assign objects to the user when the session starts, to determine the resources a user connects to, and to perform authentication and check client integrity. You can add logic and functionality to the access policy using configurable access policy items, and configure branches that change the flow of the policy. You can specify one or more connection resources and a webtop for the user as well.
For more information on access policy structure and configuration, see Chapter 4, Understanding Access Policies, and Chapter 5, Creating Access Profiles and Access Policies.
You can add authentication to an access policy using AAA servers (Authentication, Authorization, and Accounting) or client certificates.
Typically, you add two access policy items to add server authentication: a logon page action, and a AAA server action. Add the logon page action before the AAA server action. The logon page action presents a user with a logon page with customizable fields and text. The user enters credentials (for example, a logon name and password), and these credentials are then passed to the AAA server selected in the AAA server action. If a user is successfully authenticated, that user continues on the successful branch. A user who is not successfully authenticated continues on the fallback branch.
Figure 1.15 shows an access policy for web access management that includes authentication. This access policy includes only two items: a logon page action, and an Active Directory authentication action. This policy requires a user to authenticate successfully to Active Directory to connect to a local traffic virtual server, which is load-balancing applications.

Figure 1.15 Simple access policy for web access management
You can add authentication to any access policy or any branch in an access policy. You can even add multiple authentication types, so, for example, a user who fails Active Directory authentication might then attempt RADIUS authentication. You can configure multiple types of authentication, for example, requiring users to authenticate with a certificate and with a AAA server. For more information on authentication methods and scenarios, see BIG-IP® Access Policy Manager® Authentication Configuration Guide, and Chapter 9, Using Certificate Authentication in APM.
The Configuration utility is the browser-based graphical user interface for the BIG-IP system. In the Configuration utility, the navigation pane main tab provides access to the access policy configuration objects, as well as the network, system, and local traffic configuration objects. The Help tab contains context-sensitive online help for each screen.
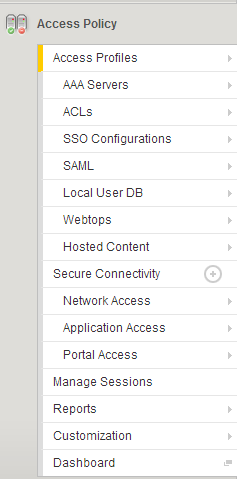
Figure 1.16 Access policy items in the Configuration utility navigation pane
| | The identification and messages area The identification and messages area of the Configuration utility is the screen region that is above the navigation pane, the menu bar, and the body. In this area, you find the system identification, including the host name, and management IP address. This area is also where certain system messages display, for example Apply Access Policy, which appears when you need to activate an access policy. |
| | The navigation pane The navigation pane, on the left side of the screen, contains the Main tab, the Help tab, and, the About tab. The Main tab provides links to the major configuration objects. The Help tab provides context-sensitive help for each screen in the Configuration utility. The About tab provides a quick way to view commonly used configuration objects. |
| | The menu bar The menu bar, which is below the identification and messages area, and above the body, provides links to the additional configuration objects within each major object. |
| | The body The body is the screen area where the configuration settings display. |
The Access Policy Manager® is a multi-featured appliance whose interface allows configuration from any location. To initially set up the secure access connections for users, you can follow different choices in your approach. We recommend setting up a basic working policy, using the Access Policy Manager connection wizards. To set up connections with the wizards, review the section Using Access Policy Manager configuration wizards. You can follow the guidelines in Following the recommended configuration path section to set up Access Policy Manager, or you can elect to travel your own path, choosing from the options described in Possible configuration scenarios.
With the Access Policy Manager® wizards, you can quickly configure any of the three access types with a simple working configuration. After you configure a connection with the wizard, you can go back and edit the configuration to further customize the access policy.
To access Access Policy Manager wizards, in the navigation pane, expand Templates and Wizards, and click Device Wizards. The Device Wizards screen opens.
| Network Access Setup Wizard for Remote Access - Configures a working VPN connection. Typically, this allows users outside your network to connect to specified networks, and use their applications and network sites as if they are physically on the network. |
| Portal Access Setup Wizard - Configures access to specific web applications for remote users. Typically, this allows users outside the network to connect to specified web applications, such as Microsoft Outlook Web Access or SharePoint, without allowing full access to the entire network. |
| Web Application Access Management for Local Traffic Virtual Servers - Configures access to a local traffic virtual server managing web applications (web access management). Typically, this allows you to control access to the applications managed by the local traffic virtual server, using the features provided in the access policy. As an example, you can configure AAA server authentication, endpoint security, and other system checks before you allow access to the local traffic virtual server. You can configure this access type for an existing local traffic virtual server, or you can configure the virtual server with the wizard. |
Note: The system includes online help for every screen in the wizard. To view the online help, click the Help tab in the navigation pane.
Follow the steps and instructions in the wizard to configure and deploy a working network access connection. Note the following configuration items.
| The Policy Name specifies the name of the access policy to be created, and is used as the naming prefix for other objects configured with the access policy. Later, when you look for items created with the wizard, they are named with this prefix. For example, if you specify the prefix mytest, the access policy name is mytest_ap, and the virtual server is named mytest_vs. This name must be unique, and not already in use on the system. |
| When you select the client side check option Enable Antivirus Check in Access Policy, the wizard adds a basic antivirus client-side check to the access policy. You can later refine this client-side check to verify a particular antivirus product, check the date of the virus database, and more. You can also add other client-side checks to the access policy. For more information, see Chapter 7, Configuring Endpoint Security (Client-Side). |
| You can configure authentication with the wizard, or select No Authentication to create an access policy without authentication. After you select an authentication type, you can view online help for the authentication configuration options by clicking the Help tab in the navigation pane. |
| Lease pools are a configuration requirement for network access connections. Each connection is assigned an IP address from the lease pool. You must configure a lease pool with as many IP addresses as connected users you expect to host. |
| Client settings can be configured for the connection with the wizard. We strongly recommend you read the BIG-IP® Access Policy Manager® Network Access Guide, and use the online help, if you plan to use settings other than the default values. |
| DNS hosts for network access are required for your users to have functioning name resolution and Windows networking on your internal network. Specify a primary name server at a minimum. If you are using Microsoft networking features on your network, specify a primary WINS server. |
| Specify a host name for the virtual server. In most cases, you do not specify a network when creating this virtual server. Allow the redirect server to be created; this eliminates the simple connection issue that users encounter when they do not type https before the virtual server host name. |
| When you review the configuration, you can use the Previous and Next buttons to go back and edit the configuration before you click Finish. After you click Finish, the system creates and applies network access objects. You can still edit any item associated with the access profile from the Access Profile page (Access Policy > Access Profiles > name of access profile). You can edit the virtual server on the Virtual Server page (Local Traffic > Virtual Servers > name of virtual server). |
Follow the steps and instructions in the wizard to configure and deploy a working web applications access policy. Note the following configuration items.
| The Policy Name specifies the name of the access policy to be created, and is used as the naming prefix for other objects configured with the access policy. Later, when you look for items created with the wizard, they are named with this prefix. For example, if you specify the prefix mytest, the access policy name is mytest_ap, and the virtual server is named mytest_vs. This name must be unique, and not already in use on the system. |
| When you select the client side check option Enable Antivirus Check in Access Policy, the wizard adds a basic antivirus client-side check to the access policy. You can later refine this client-side check to verify a particular antivirus product, check the date of the virus database, and more. You can also add other client-side checks to the access policy. For more information, see Chapter 7, Configuring Endpoint Security (Client-Side). |
| You can configure authentication with the wizard, or select No Authentication to create an access policy without authentication. After you select an authentication type, you can view online help for the authentication configuration options by clicking the Help tab in the navigation pane. |
| Select Configure SSO to set up Single Sign-On for web applications, and specify the SSO Method by selecting from the list. |
| Specify the internal portal access start URI. This specifies the URI of the first page that a user sees after passing the access policy. For example, http://myintranet.siterequest.com or http://myintranet/owa). |
| Specify a virtual server IP address or host name. Allow the redirect server to be created; this eliminates the simple connection issue that users encounter when they do not type https before the virtual server host name. |
| When you review the configuration, you can use the Previous and Next buttons to go back and edit the configuration before you click Finish. After you click Finish, the system creates and applies portal access objects. You can still edit any item associated with the access profile from the Access Profile page (Access Policy > Access Profiles > name of access profile). You can edit the virtual server on the Virtual Server page (Local Traffic > Virtual Servers > name of virtual server). |
Follow the steps and instructions in the wizard to configure and deploy a working web access management access policy. Note the following configuration items.
| On the first screen of the wizard, you have the option to continue the wizard and either use an existing virtual server or create a new virtual server with basic settings. Alternatively, you can cancel the wizard and create a virtual server manually, then later restart the wizard and select that virtual server in the configuration. |
| The Policy Name specifies the name of the access policy to be created, and is used as the naming prefix for other objects configured with the access policy. Later, when you look for items created with the wizard, they are named with this prefix. For example, if you specify the prefix mytest, the access policy name is mytest_ap, and the virtual server is named mytest_vs. This name must be unique, and not already in use on the system. |
| When you select the client side check option Enable Antivirus Check in Access Policy, the wizard adds a basic antivirus client-side check to the access policy. You can later refine this client-side check to verify a particular antivirus product, check the date of the virus database, and more. You can also add other client-side checks to the access policy. For more information, see Chapter 7, Configuring Endpoint Security (Client-Side). |
| You can configure authentication with the wizard, or select No Authentication to create an access policy without authentication. After you select an authentication type, you can view online help for the authentication configuration options by clicking the Help tab in the navigation pane. |
| If you are creating a virtual server in the wizard, specify a host name for the virtual server. In most cases, you do not specify a network when creating this virtual server. Allow the redirect server to be created; this eliminates the simple connection issue that users encounter when they do not type https before the virtual server host name. |
| Specify a pool member IP address. This specifies the IP address for a new member of a default local traffic pool. When you create the virtual server, the wizard defines a new default pool with one member, defined by this IP address. |
| When you review the configuration, you can use the Previous and Next buttons to go back and edit the configuration before you click Finish. After you click Finish, the system creates and applies virtual server objects. You can still edit any item associated with the access profile from the Access Profile page (Access Policy > Access Profiles > name of access profile). You can edit the virtual server on the Virtual Server page (Local Traffic > Virtual Servers > name of virtual server). |
If you are new to the Access Policy Manager®, you can follow the path outlined in this section. This recommended path is designed to guide you through the most common operations, and includes references to other sections with related functionality.
| | Determine client-system security requirements. For more information, see Understanding endpoint security (client-side) checks. |
| | Identify the authentication mechanism. The Access Policy Manager supports external authentication. You can select from a number of authentication methods, depending on the security setup you employ. These include Active Directory, RADIUS, LDAP, OAM, RSA SecurID, OCSP, CRLDP, TACACS+ and certificate-based security. |
| If you are not sure which type of authentication you want, review the BIG-IP® Access Policy Manager® Authentication Configuration Guide. |
| If you already have an authentication mechanism in place and you want to use it for verifying user identity, you can read more in the BIG-IP® Access Policy Manager® Authentication Configuration Guide. |
| Configure network access resources with the applications and functionality you want to provide, or create app tunnels, remote desktops, and portal access resources for your users. For web access management applications, you do not create resources or webtops. For more information, you can review the configuration guides for network access, portal access, and application access, and Chapter 2, . |
| |
| | Create an access profile and access policy that you can associate with your virtual server, to give your clients secure access. For more information, see Chapter 5, Creating Access Profiles and Access Policies. |
| |
| | Test user connectivity. This is a good place to stop and test to make sure that users can connect to the Access Policy Manager. To do so, open a new browser window and log on using a logon account that you know exists. |
| |
| | Create advanced access policies, for more complex secure access scenarios. For more information, you can review the content in Chapter 11, Advanced Topics in Access Policies, and in the BIG-IP Module Interoperability Implementations Guide. |
| |
| | To authenticate users from an authentication server If you have an authentication mechanism in place and you want to use it to verify user identity, you can read more in the BIG-IP® Access Policy Manager® Authentication Configuration Guide. |
| | To gather information from client systems If you want to specify requirements for client systems to determine authentication (whether to grant user access) and authorization (which resources to grant access to), you can read more in Chapter 7, Configuring Endpoint Security (Client-Side). |
| | To configure the resources, applications, and functionality you want to provide If you prefer to start with the resources, applications, and functionality that you want to provide to your users, you can read more in Chapter 3, Configuring Resources, the BIG-IP® Access Policy Manager® Network Access Configuration Guide, and the BIG-IP® Access Policy Manager® Portal Access Configuration Guide. |
| | To learn about logging with the Access Policy Manager If you want to get a head start on understanding the ongoing operations and logging functionality provided with the Access Policy Manager, review content in Chapter 12, Logging and Reporting. |
| | To set up certificates on the server If you are ready to set up and install server certificates for the Access Policy Manager, read more in Chapter 9, Using Certificate Authentication in APM. |
| | To see access policy examples If you want exposure to sample policies with step-by-step examples, see Appendix 15, Access Policy Example, and Chapter 11, Advanced Topics in Access Policies. |
You can find additional technical documentation about the Access Policy Manager® using the following resources:
| | The BIG-IP® Systems: Getting Started Guide describes how to initially set up, configure, and license your BIG-IP system. Before you set up the Access Policy Manager for the first time, we recommend that you read this guide in its entirety to become familiar with the product features, and the procedures for provisioning and licensing features. |
| | Release notes Release notes containing the latest information for the current version of the Access Policy Manager are available on the F5 Networks Technical Support web site at http://support.f5.com. This site includes release notes for current and previous versions of the Access Policy Manager. |
| | Online help for Access Policy Manager features You can find help online for all screens on the Configuration utility. To open the context-sensitive help in the Configuration utility, click the Help tab in the left navigation pane. To get help on a screen in the visual policy editor, click the Help button. |
| | F5 Networks Technical Support web site The F5® Networks Technical Support web site at http://support.f5.com, provides the latest technical notes, answers to frequently asked questions, release notes and release note updates, and the AskF5TM Knowledge Base. You can also find all the guides in PDF format. |
When you work with F5 Networks Technical Support, you might need to have the version number of the Access Policy Manager® (APM®) software that is running on your platform. You can find the software version number in the Configuration utility. Expand System in the navigation bar, then click Configuration. The Device General properties screen presents the host name, software version number, and other information. This is an example of the Properties and Operations table.


