Manual Chapter : Integrating Application Access and Secure Web Gateway

Applies To:

Show Versions Show Versions

BIG-IP APM

  • 13.1.5, 13.1.4, 13.1.3, 13.1.1, 13.1.0
Manual Chapter

Overview: Configuring transparent forward proxy for remote access

Access Policy Manager® (APM®) can be configured to act as a transparent forward proxy to support remote clients that connect using application access, network access, or portal access.

Note: Using a distinct APM transparent forward proxy configuration to process traffic from remote clients separately from a forward proxy configuration used for processing traffic from internal clients provides an important measure of network security.
BIG-IP system with remote access and SWG transparent configurations

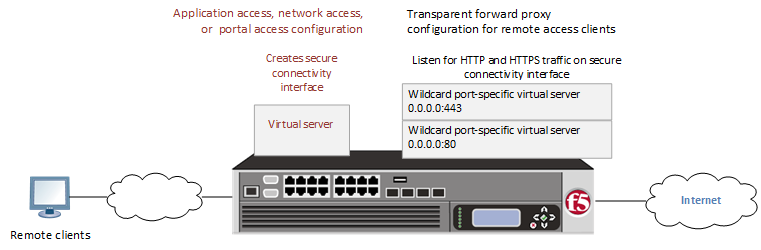
Transparent forward proxy for remote access

Task summary

Prerequisites for APM transparent forward proxy for remote access

Before you start to create an Access Policy Manager® (APM®) transparent forward proxy configuration to support remote access clients, you must have completed these tasks.

  • You must have a working Network Access, Portal Access, or Application Access configuration.
  • You need a per-request policy configured for forward proxy.
  • On a BIG-IP® system with an SWG subscription, you must ensure that the URL database is downloaded. You can also configure any URL filters that you want to use in addition to, or instead of, the default URL filters.
  • On a BIG-IP® system without an SWG subscription, if you want to designate only a few URLs for specific handling, you probably do not need to configure user-defined URL categories and filters. However, if you need to control access to many URLs, for better performance and ease-of-use you should configure user-defined URL categories and filters.

Configuration outline for APM transparent forward proxy for remote access

Tasks for integrating an Access Policy Manager® (APM®) remote access configuration with a transparent forward proxy configuration for APM follow this order.

  • First, update the existing application access, network access, or portal access configuration to add a secure connectivity profile to the virtual server if one is not already specified.
  • Next, create a transparent forward proxy configuration for APM. The per-request policy is part of this configuration.
  • Finally, update the access policy in the existing application access, network access, or portal access configuration if needed. If the per-request policy uses group or class lookup items, add queries to the access policy to populate the session variables on which the lookup items rely.

Creating a connectivity profile

You create a connectivity profile to configure client connections.
  1. On the Main tab, click Access > Connectivity / VPN > Connectivity > Profiles .
    A list of connectivity profiles displays.
  2. Click Add.
    The Create New Connectivity Profile popup screen opens and displays General Settings.
  3. Type a Profile Name for the connectivity profile.
  4. Select a Parent Profile from the list.
    APM® provides a default profile, connectivity.
  5. Click OK.
    The popup screen closes, and the Connectivity Profile List displays.
The connectivity profile displays in the list.
To provide functionality with a connectivity profile, you must add the connectivity profile and an access profile to a virtual server.

Adding a connectivity profile to a virtual server

Update a virtual server that is part of an Access Policy Manager® application access, network access, or portal access configuration to enable a secure connectivity interface for traffic from the client.

  1. On the Main tab, click Local Traffic > Virtual Servers .
    The Virtual Server List screen opens.
  2. Click the name of the virtual server you want to modify.
  3. Scroll down to the Access Policy area.
  4. From the Connectivity Profile list, select the connectivity profile.
  5. Click Update to save the changes.

Creating an access profile for transparent forward proxy

You create an access profile to supply an access policy.
  1. On the Main tab, click Access > Profiles / Policies .
    The Access Profiles (Per-Session Policies) screen opens.
  2. Click Create.
    The New Profile screen opens.
  3. In the Name field, type a name for the access profile.
    Note: An access profile name must be unique among all per-session profile and per-request policy names.
  4. From the Profile Type list, select SWG-Transparent.
    Additional fields display set to default values.
  5. In the Language Settings area, add and remove accepted languages, and set the default language.
    A browser uses the highest priority accepted language. If no browser language matches the accepted languages list, the browser uses the default language.
  6. Click Finished.
    The Access Profiles list screen displays.
The access profile displays in the Access Profiles List. Default-log-setting is assigned to the access profile.
You do not need to add any actions or make any changes to the access policy.

Creating a wildcard virtual server for HTTP traffic on the connectivity interface

Before you begin, you need to know the name of the connectivity profile specified in the virtual server for the remote access configuration that you want Access Policy Manager® (APM®) to protect.
You configure a virtual server to process web traffic on the secure connectivity interface for a remote access client.
  1. On the Main tab, click Local Traffic > Virtual Servers .
    The Virtual Server List screen opens.
  2. Click the Create button.
    The New Virtual Server screen opens.
  3. In the Name field, type a unique name for the virtual server.
  4. In the Destination Address field, type 0.0.0.0 to accept any IPv4 traffic.
  5. In the Service Port field, type 80, or select HTTP from the list.
  6. From the Configuration list, select Advanced.
  7. From the HTTP Profile list, select http.
  8. Scroll down to the VLAN and Tunnel Traffic setting and select Enabled on.
  9. For the VLANs and Tunnels setting, move the secure connectivity interface to the Selected list.
  10. From the Source Address Translation list, select Auto Map.
  11. Scroll down to the Port Translation setting and clear the Enabled check box.
  12. In the Access Policy area, from the Access Profile list, select the access profile that you configured earlier.
  13. In the Access Policy area, from the Per-Request Policy list, select the policy that you configured earlier.
  14. Click Finished.

Creating a custom Client SSL forward proxy profile

Creating a Client SSL forward proxy profile makes it possible for client and server authentication, while still allowing the BIG-IP® system to perform data optimization, such as decryption and encryption. This profile applies to client-side SSL forward proxy traffic only.

  1. On the Main tab, click Local Traffic > Profiles > SSL > Client .
    The Client SSL profile list screen opens.
  2. Click Create.
    The New Client SSL Profile screen opens.
  3. In the Name field, type a unique name for the profile.
  4. From the Parent Profile list, select clientssl.
  5. To avoid issues with privacy concerns, you might need to enable SSL forward proxy bypass for URLs that expose personal user information, such as those for financial or government sites.
    1. Scroll down to the SSL Forward Proxy list, and select Advanced.
    2. Select the Custom check box for the SSL Forward Proxy area.
    3. From the SSL Forward Proxy list, select Enabled.
      You can update this setting later but only while the profile is not assigned to a virtual server.
    4. From the CA Certificate list, select a certificate.
    5. From the CA Key list, select a key.
    6. In the CA Passphrase field, type a passphrase.
    7. In the Confirm CA Passphrase field, type the passphrase again.
    8. In the Certificate Lifespan field, type a lifespan for the SSL forward proxy certificate in days.
    9. Optional: From the Certificate Extensions list, select Extensions List.
    10. Optional: For the Certificate Extensions List setting, select the extensions that you want in the Available extensions field, and move them to the Enabled Extensions field using the Enable button.
    11. From the SSL Forward Proxy Bypass list, select Enabled.
      You can update this setting later but only while the profile is not assigned to a virtual server.
      Additional settings display.
    12. For Default Bypass Action, retain the default value Intercept.
      You can override the value of this action on a case-by-case basis in the per-request policy for the virtual server.
      Note: Bypass and intercept lists do not work with per-request policies. Retain the setting None for the remainder of the fields.
  6. Click Finished.
The custom Client SSL forward proxy profile now appears in the Client SSL profile list screen.

Creating a custom Server SSL profile

Create a custom server SSL profile to support SSL forward proxy.
  1. On the Main tab, click Local Traffic > Profiles > SSL > Server .
    The Server SSL profile list screen opens.
  2. Click Create.
    The New Server SSL Profile screen opens.
  3. In the Name field, type a unique name for the profile.
  4. For Parent Profile, retain the default selection, serverssl.
  5. From the Configuration list, select Advanced.
  6. Select the Custom check box.
    The settings become available for change.
  7. From the SSL Forward Proxy list, select Enabled.
    You can update this setting later, but only while the profile is not assigned to a virtual server.
  8. From the SSL Forward Proxy Bypass list, select Enabled (or retain the default value Disabled).
    The values of the SSL Forward Proxy Bypass settings in the server SSL and the client SSL profiles specified in a virtual server must match. You can update this setting later but only while the profile is not assigned to a virtual server.
  9. Scroll down to the Secure Renegotiation list and select Request.
  10. Click Finished.
The custom Server SSL profile is now listed in the SSL Server profile list.

Creating a wildcard virtual server for SSL traffic on the connectivity interface

Before you begin, you need to know the name of the connectivity profile specified in the virtual server for the remote access configuration that you want Secure Web Gateway (SWG) to protect. Also, if you do not have existing client SSL and server SSL profiles that you want to use, configure them before you start.
You configure a virtual server to process SSL web traffic coming in on the secure connectivity interface for a remote access client.
  1. On the Main tab, click Local Traffic > Virtual Servers .
    The Virtual Server List screen opens.
  2. Click the Create button.
    The New Virtual Server screen opens.
  3. In the Name field, type a unique name for the virtual server.
  4. In the Destination Address field, type 0.0.0.0 to accept any IPv4 traffic.
  5. In the Service Port field, type 443 or select HTTPS from the list.
  6. From the Configuration list, select Advanced.
  7. From the HTTP Profile list, select http.
  8. For the SSL Profile (Client) setting, from the Available list, select the name of the Client SSL forward proxy profile you previously created, and using the Move button, move the name to the Selected list.
    Important: To enable SSL forward proxy functionality, you can either:
    • Disassociate existing Client SSL and Server SSL profiles from a virtual server and configure the SSL Forward Proxy settings.
    • Create new Client SSL and Server SSL profiles and configure the SSL Forward Proxy settings.
    Then with either option, select the Client SSL and Server SSL profiles on a virtual server. You cannot modify existing Client SSL and Server SSL profiles while they are selected on a virtual server to enable SSL forward proxy functionality.
  9. For the SSL Profile (Server) setting, from the Available list, select the name of the Server SSL forward proxy profile you previously created, and using the Move button, move the name to the Selected list.
    Important: To enable SSL forward proxy functionality, you can either:
    • Disassociate existing Client SSL and Server SSL profiles from a virtual server and configure the SSL Forward Proxy settings.
    • Create new Client SSL and Server SSL profiles and configure the SSL Forward Proxy settings.
    Then with either option, select the Client SSL and Server SSL profiles on a virtual server. You cannot modify existing Client SSL and Server SSL profiles while they are selected on a virtual server to enable SSL forward proxy functionality.
  10. Scroll down to the VLAN and Tunnel Traffic setting and select Enabled on.
  11. For the VLANs and Tunnels setting, move the secure connectivity interface to the Selected list.
  12. From the Source Address Translation list, select Auto Map.
  13. Scroll down to the Port Translation setting and clear the Enabled check box.
  14. For the Address Translation setting, clear the Enabled check box.
  15. In the Access Policy area, from the Access Profile list, select the access profile that you configured earlier.
  16. In the Access Policy area, from the Per-Request Policy list, select the policy that you configured earlier.
  17. Click Finished.

Updating the access policy in the remote access configuration

Add queries to the access policy to populate any session variables that are required for successful execution of the per-request policy.

Note: Class lookup or group lookup items in a per-request policy rely on session variables that can only be populated in this access policy.
  1. On the Main tab, click Access > Profiles / Policies .
    The Access Profiles (Per-Session Policies) screen opens.
  2. Click the name of the access profile that you want to edit.
    The properties screen opens.
  3. In the General Properties area, click the Edit Access Policy for Profile profile_name link.
    The visual policy editor opens the access policy in a separate screen.
  4. Click the (+) icon anywhere in the access policy to add a new item.
    Note: Only an applicable subset of access policy items is available for selection in the visual policy editor for any access profile type.
    A popup screen opens, listing predefined actions on tabs such as General Purpose, Authentication, and so on.
  5. To supply LDAP group information for use in the per-request policy, add an LDAP Query item anywhere in the policy and configure its properties:
    1. From the Server list, select an AAA LDAP server.
      An LDAP Query uses SSL connections when you select an LDAP AAA server that is configured for LDAPS.
    2. Specify the SearchDN, and SearchFilter settings.
      SearchDN is the base DN from which the search is done.
    3. Click Save.
    This item populates the session.ldap.last.attr.memberOf session variable.
  6. To supply Active Directory groups for use in the per-request policy, add an AD Query item anywhere in the policy and configure its properties:
    1. From the Server list, select an AAA AD server.
    2. Select the Fetch Primary Group check box.
      The value of the primary user group populates the session.ad.last.attr.primaryGroupID session variable.
    3. Click Save.
  7. To supply RADIUS class attributes for use in the per-request policy, add a RADIUS Auth item anywhere in the policy and configure its properties:
    1. From the Server list, select an AAA RADIUS server.
    2. Click Save.
    This item populates the session.radius.last.attr.class session variable.
  8. To supply local database groups for use in the per-request policy, add a Local Database item anywhere in the policy and configure its properties:
    1. From the LocalDB Instance list, select a local user database.
    2. In the User Name field, retain the default session variable.
    3. Click Add new entry
      A new line is added to the list of entries with the Action set to Read and other default settings.
    4. In the Destination column Session Variable field, type session.localdb.groups.
      If you type a name other than session.localdb.groups, note it. You will need it when you configure the per-request access policy.
    5. In the Source column from the DB Property list, select groups.
    6. Click Save.
    This item populates the session.localdb.groups session variable.
The access policy is configured to support the per-request policy.
Click the Apply Access Policy link to apply and activate your changes to this access policy.
Note: To ensure that logging is configured to meet your requirements, verify the log settings for the access profile.

Implementation result

A transparent forward proxy configuration is ready to process web traffic from remote access clients.

About configuration elements for transparent forward proxy (remote access)

When you configure the BIG-IP®system so that Access Policy Manager® (APM®) can act as a transparent forward proxy for use by remote access clients, you might want to understand how these objects fit into the overall configuration.

Secure connectivity interface
In a remote access configuration, a connectivity profile is required on the virtual server to specify a secure connectivity interface for traffic from the client. In the APM configuration, wildcard virtual servers must listen on the secure connectivity interface for traffic from remote access clients.
Per-request policy
In any APM forward proxy configuration, the determination of whether a user can access a URL must be made in a per-request access policy. A per-request access policy determines whether to block or allow access to a request based on time or date or group membership or other criteria that you configure.
Access policies
The access policy in the remote access configuration continues to authenticate users, assign resources, and evaluate ACLs, if any. In addition, this access policy must populate any session variables used in the per-request policy. An access profile of the SWG-Transparent type is required; however, it is not necessary to include any items in the access policy.

Per-request policy items that read session variables

This table lists per-request policy items that read session variables and lists the access policy items that populate the variables.

Per-request policy item Session variable Access policy item
AD Group Lookup session.ad.last.attr.primaryGroupID AD Query
LDAP Group Lookup session.ldap.last.attr.memberOf LDAP Query
LocalDB Group Lookup session.localdb.groups
Note: This session variable is a default in the expression for LocalDB Group Lookup; any session variable in the expression must match the session variable used in the Local Database action in the access policy.
Local Database
RADIUS Class Lookup session.radius.last.attr.class RADIUS Auth