Manual Chapter : Configuring Subscriber Discovery based on DHCP

Applies To:

Show Versions Show Versions

BIG-IP PEM

  • 12.1.6, 12.1.5, 12.1.4, 12.1.3, 12.1.2, 12.1.1, 12.1.0
Manual Chapter

Configuring Subscriber Discovery based on DHCP

Overview: Configuring subscriber discovery based on DHCP

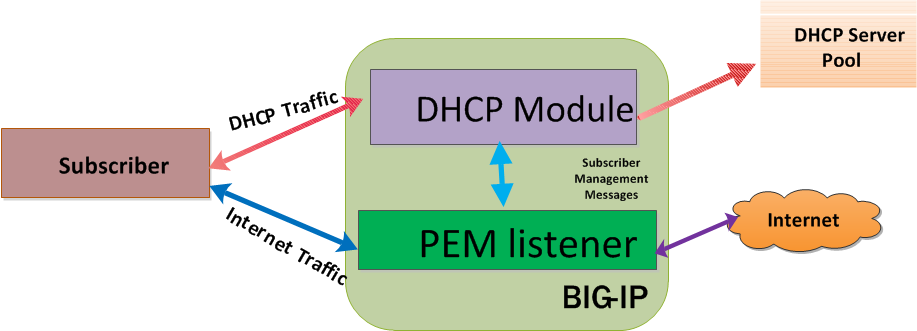
The Policy Enforcement Manager™ uses DHCP to discover subscribers. The DHCP consists of two components, which includes a protocol for delivering host-specific parameters from a DHCP server to a host, and the ability to allocate network addresses to hosts. The BIG-IP® system processes the DHCP traffic between subscribers and DHCP server and extracts of the subscriber's identity and other information that is important for subscriber handling.

The BIG-IP DHCP module has two functional modes:

  • Relay mode: The DHCP-Relay agent handles the DHCP traffic from the subscriber, modifies it as required, and relays it to the DHCP server according to the configuration.
  • Forward or pass-through mode: The DHCP module does not relay the messages or modify the message in this mode.

In both modes, the DHCP module snoops the DHCP packets, parses relay-agent options and the allocated IP address, and then extracts session information. The relay-agent options are option 82 for DHCPv4 and options 37 and 38 for DHCPv6.

Subscriber Discovery through DHCP

The DHCP module monitors the clients DHCP traffic after the initial IP allocation and snoops for DHCP lease renewal packets, releasing of the IP address, and reconfiguring requests. This determines when the BIG-IP system can safely delete the session.

Task summary

Creating a listener for DHCPv4 discovery virtual

You can use DHCP to discover subscribers in order to handle traffic for policy enforcement. For subscribers discovered through DHCP, an identifier comprises of relay agent information option (option 82) and MAC address, as configured in the corresponding DHCP profile.
  1. On the Main tab, click Policy Enforcement > Listeners .
    The Listeners screen opens.
  2. Select DHCPv4 from the profiles list, and click Add.
    The New DHCPv4 Discovery Virtual screen opens.
  3. In the Name field, type a unique name for the listener.
  4. In the Description field, type a description of the listener.
  5. For the Source setting, type the IP address or network from which the virtual server will accept traffic.
  6. In the Destination Address field, type the IP address of the virtual server. For example, 10.0.0.1 or 10.0.0.0/24.
    Note: When you use an IPv4 address without specifying a prefix, the BIG-IP® system automatically uses a /32 prefix.
    Tip: You can use a catch-all virtual server (0.0.0.0) to specify all traffic that is delivered to the BIG-IP® system. Configure the source and destination setting, during forwarding mode only. In the relay mode, the client does not have an IP address and the DHCP provides the client with an IP address.
    The system will create a virtual server using the address or network you specify.
  7. From the VLAN and Tunnel Traffic list, select Enabled on. Then, for the VLANs and Tunnels setting, move the VLAN or VLANs on which you want to allow the virtual servers to share traffic from the Available list to the Selected list.
  8. For the VLANs and Tunnels setting, move the VLANs and tunnels that you want to monitor from the Available list to the Selected list.
  9. For the DHCP Mode setting, select Relay or Forward to specify the mode in which the DHCP client requests are sent.
  10. For the Pool Member Configuration setting, add the DHCP virtual servers that are to be members of the pool. Type the Member IP Address and Port number, then click Add.
  11. From the Subscriber Discovery list, select Enabled. Then, for the Subscriber ID Format setting, select the format you want to implement.
    Format Description
    MAC Address Uses the subscriber ID as the MAC address through which the subscriber ID goes through.
    Relay Agent Option: Suboption ID 1 Uses the relay agent first option suboption ID.
    Relay Agent Option: Suboption ID 1 + <Separator> + Suboption ID 2 Uses the relay agent first and second suboption IDs.
    MAC Address + <Separator> + Relay Agent Option: Suboption ID 1 Uses the MAC Address and the relay agent first suboption ID.
    MAC Address + <Separator> + Relay Agent Option: Suboption ID 1 <Separator> + Suboption ID 2 Uses the relay agent first option suboption ID.
    TCL Expression Uses the TCL expression to format the subscriber ID.
  12. From the Authentication Settings list, select Enabled. Then, select the virtual server name from the Authentication Virtual list. Select the User Name Format you want to implement.
    The User Name Format has the same options as the Subscriber ID Format, in the Subscriber Discovery setting.
  13. Click Finished.
    The Policy Enforcement Manager creates a listener.
When you create a new DHCPv4 discover virtual, the Policy Enforcement Manager™ also creates a corresponding DHCPv4 profile.

Creating a DHCPv4 profile for policy enforcement

You can create a DHCP profile when you want to configure the DHCP virtual to use Relay mode or Pass-through mode.

  1. On the Main tab, click Local Traffic > Profiles > Services > DHCPv4 .
  2. Click Create.
    The New DHCPv4 Profile screen opens.
  3. In the Description field, type a descriptive text that identifies the profile.
  4. From the Parent Profile list, select the default dhcpv4 profile.
  5. Select the Custom check box.
  6. In the Protocol and Proxy Settings Features area, make a selection from the DHCP Mode list.
    Option Description
    Relay When in relay mode, a virtual server relays Dynamic Host Control Protocol (DHCP) client requests and applies unicast IP addresses as the relayed message destination.
    Forward When in forward mode, a virtual server forwards Dynamic Host Control Protocol (DHCP), and does not modify, client requests for an IP address to one or more DHCP servers.
  7. For the Idle Timeout setting, type the number of seconds that a BIG-IP DHCP connection is idle before the connection is eligible for deletion.
  8. For the Max Hops setting, select the Custom check box to enable this option. Type the maximum expected number of relay agents that the messages should pass through, before reaching the DHCPv4 server.
  9. For the Default TTL setting, select the Custom check box to enable this option. Type the time to live (TTL) value that you want to set for each outgoing DHCP packet.
  10. For the Default Lease Time setting, select the Custom check box to enable this option. Type the time, in seconds, of the default value of the DHCPv4 lease time.
  11. For the TTL Decrement Amount setting, select the Custom check box to enable this option. Type the amount that the DHCP virtual will use to decrement the TTL for each outgoing DHCP packet.
  12. For the Transaction Timeout setting, select the Custom check box to enable this option. Type the number of seconds, taken to internally process the messages.
  13. For the Insert Relay Agent ID (Option 82) setting, select the Custom check box to enable this option if you want the DHCP module to insert option 82.
  14. For the Remove Relay Agent ID From Client Messages setting, select the Custom check box to enable this option and if you want the DHCP relay agent to remove option 82 from the server to client traffic.
  15. From the Subscriber Discovery list, select Enabled. Then, for the Subscriber ID Format setting, select the format you want to implement.
    Format Description
    MAC Address Uses the subscriber ID as the MAC address through which the subscriber ID goes through.
    Relay Agent Option: Suboption ID 1 Uses the relay agent first option suboption ID.
    Relay Agent Option: Suboption ID 1 + <Separator> + Suboption ID 2 Uses the relay agent first and second suboption IDs.
    MAC Address + <Separator> + Relay Agent Option: Suboption ID 1 Uses the MAC Address and the relay agent first suboption ID.
    MAC Address + <Separator> + Relay Agent Option: Suboption ID 1 <Separator> + Suboption ID 2 Uses the relay agent first option suboption ID.
    TCL Expression Uses the TCL expression to format the subscriber ID.
  16. From the Authentication Settings list, select Enabled. Then, select the virtual server name from the Authentication Virtual list. Select the User Name Format you want to implement.
    The User Name Format has the same options as the Subscriber ID Format, in the Subscriber Discovery setting.
  17. Click Finished.

The DHCPv4 profile that you created can be chosen from the DHCPv4 profiles in Local Traffic > Virtual Servers > Virtual Server List > New Virtual Server > , only if you choose DHCP as a virtual type.

Creating a listener for DHCPv6 discovery virtual

You can use DHCPv6 to discover subscribers in order to handle traffic for policy enforcement. For each subscriber discovered through DHCPv6, an identifier comprises of remote-id, subscriber-id options (options 37 and 38) and MAC address, as configured in the corresponding DHCPv6 profile.
  1. On the Main tab, click Policy Enforcement > Listeners .
    The Listeners screen opens.
  2. Select DHCPv6 from the profiles list, and click Add.
    The New DHCPv6 Discovery Virtual screen opens.
  3. In the Name field, type a unique name for the listener.
  4. In the Description field, type a description of the listener.
  5. For the Source setting, type the IP address or network from which the virtual server will accept traffic.
  6. In the Destination Address field, type the IP address of the virtual server. For example, ffe1::0020/64 or 2001:ed8:77b5:2:10:10:100:42/64.
    Tip: For DHCPv6 discovery virtual, the source and destination should be any (::/0).
    The system will create a virtual server using the address or network you specify.
  7. From the VLAN and Tunnel Traffic list, select Enabled on. Then, for the VLANs and Tunnels setting, move the VLAN or VLANs on which you want to allow the virtual servers to share traffic from the Available list to the Selected list.
  8. For the VLANs and Tunnels setting, move the VLANs and tunnels that you want to monitor from the Available list to the Selected list.
  9. For the DHCP Mode setting, select Relay or Forward to specify the mode in which the DHCP client requests are sent.
  10. For the Pool Member Configuration setting, add the DHCP virtual servers that are to be members of the pool. Type the Member IP Address and Port number, then click Add.
  11. From the Subscriber Discovery list, select Enabled. Then, for the Subscriber ID Format setting, select the format you want to implement.
    Format Description
    MAC Address Uses the subscriber ID as the MAC address through which the subscriber ID goes through.
    MAC Address + <Separator> + Option 37 Uses the MAC address and the remote ID relay agent option.
    MAC Address + <Separator>+ Option 37 <Separator> + Option 38 Uses the MAC address, the remote ID relay agent option and the subscriber ID option.
    MAC Address + <Separator> + Option 38 Uses the MAC address and the subscriber ID option.
    Option 37 Uses the remote ID relay agent option.
    Option 37 <Separator> + Option 38: Uses the remote ID relay agent option and the subscriber ID option.
    Option 38 Uses the subscriber ID option.
    TCL Expression Uses the TCL expression to format the subscriber ID.
  12. From the Authentication Settings list, select Enabled. Then, select the virtual server name from the Authentication Virtual list. Select the User Name Format you want to implement.
    The User Name Format has the same options as the Subscriber ID Format, in the Subscriber Discovery setting.
When you create a new DHCPv6 discover virtual, the Policy Enforcement Manager™ also creates a corresponding DHCP profile.

Creating a DHCPv6 profile for policy enforcement

You can create a DHCP profile when you want to configure the DHCP virtual to use Relay mode or Pass-through mode.

  1. On the Main tab, click Local Traffic > Profiles > Services > DHCPv6 .
  2. In the Description field, type a descriptive text that identifies the profile.
  3. From the Parent Profile list, select the default dhcpv6 profile.
  4. Select the Custom check box.
  5. In the Protocol and Proxy Settings Features area, make a selection from the DHCP Mode list.
    Option Description
    Relay When in relay mode, a virtual server relays Dynamic Host Control Protocol (DHCP) client requests and applies unicast IP addresses as the relayed message destination.
    Forward When in forward mode, a virtual server forwards Dynamic Host Control Protocol (DHCP), and does not modify, client requests for an IP address to one or more DHCP servers.
  6. For the Idle Timeout setting, type the number of seconds that a BIG-IP DHCP connection is idle before the connection is eligible for deletion.
  7. For the Max Hops setting, select the Custom check box to enable this option. Type the maximum expected number of relay agents that the messages should pass through, before reaching the DHCPv4 server.
  8. For the Default Lease Time setting, select the Custom check box to enable this option. Type the time, in seconds, of the default value of the DHCPv4 lease time.
  9. For the Transaction Timeout setting, select the Custom check box to enable this option. Type the number of seconds, taken to internally process the messages.
  10. For the Insert Remote ID (Option 37) setting, select the Custom check box to enable this option if you want the DHCP module to insert option 37.
  11. For the Insert Remote ID (Option 37) setting, select the Custom check box to enable this option if you want the DHCP module to insert option 38.
  12. For the Remove Subscriber Agent ID From Client Messages setting, select the Custom check box to enable this option and if you want the DHCP relay agent to remove option 37 from the server to client traffic.
  13. For the Remove Relay Agent ID From Client Messages setting, select the Custom check box to enable this option and if you want the DHCP module to remove option 38 from the server to client traffic.
  14. From the Subscriber Discovery list, select Enabled. Then, for the Subscriber ID Format setting, select the format you want to implement.
    Format Description
    MAC Address Uses the subscriber ID as the MAC address through which the subscriber ID goes through.
    MAC Address + <Separator> + Option 37 Uses the MAC address and the remote ID relay agent option.
    MAC Address + <Separator>+ Option 37 <Separator> + Option 38 Uses the MAC address, the remote ID relay agent option and the subscriber ID option.
    MAC Address + <Separator> + Option 38 Uses the MAC address and the subscriber ID option.
    Option 37 Uses the remote ID relay agent option.
    Option 37 <Separator> + Option 38: Uses the remote ID relay agent option and the subscriber ID option.
    Option 38 Uses the subscriber ID option.
    TCL Expression Uses the TCL expression to format the subscriber ID.
  15. From the Authentication Settings list, select Enabled. Then, select the virtual server name from the Authentication Virtual list. Select the User Name Format you want to implement.
    The User Name Format has the same options as the Subscriber ID Format, in the Subscriber Discovery setting.
  16. Click Finished.

The DHCPv6 profile that you created can be chosen from the DHCPv6 profiles in Local Traffic > Virtual Servers > Virtual Server List > New Virtual Server > , only if you choose DHCP as a virtual type.

Creating a listener for RADIUS subscriber discovery

You can create listeners that specify the RADIUS discovery virtual for extracting subscriber information from the RADIUS packets. Creating a listener does preliminary setup tasks on the BIG-IP® system for application visibility, intelligent steering, bandwidth management, and reporting.
  1. On the Main tab, click Policy Enforcement > Listeners .
    The Listeners screen opens.
  2. From the Subscriber Discovery Virtuals area, select RADIUS, and click Add.
    The New RADIUS Discovery Virtual screen opens.
  3. In the Name field, type a unique name for the RADIUS discovery virtual.
  4. In the Description field, type a description of the listener.
  5. For the Source setting, type the IP address or network from which the virtual server will accept traffic.
  6. In the Destination Address field, type the IP address of the virtual server. For example, 10.0.0.1 or 10.0.0.0/24.
    Note: When you use an IPv4 address without specifying a prefix, the BIG-IP® system automatically uses a /32 prefix.
    Tip: You can use a catch-all virtual server (0.0.0.0) to specify all traffic that is delivered to the BIG-IP® system. Configure the source and destination setting, during forwarding mode only. In the relay mode, the client does not have an IP address and the DHCP provides the client with an IP address.
    The system will create a virtual server using the address or network you specify.
  7. To use network address translation, from the Source Address Translation list, select Auto Map.
    The system treats all of the self IP addresses as translation addresses.
  8. From the VLAN and Tunnel Traffic list, select Enabled on. Then, for the VLANs and Tunnels setting, move the VLAN or VLANs on which you want to allow the virtual servers to share traffic from the Available list to the Selected list.
  9. For the Pool Member Configuration setting, add the RADIUS discovery virtual servers that are to be members of the pool. Type the Member IP Address and Port number, then click Add.
  10. Click Finished.
    The Policy Enforcement Manager creates a RADIUS virtual server, and displays in the subscriber discovery list.
When you create a RADIUS discovery virtual for a subscriber, the Policy Enforcement Manager™ creates a corresponding profile ( Policy Enforcement > Listeners > Control Virtual Servers ).