Applies To:
Show Versions
BIG-IP DNS
- 12.1.5, 12.1.4, 12.1.3, 12.1.2, 12.1.1, 12.1.0
Configuring BIG-IP DNS on a Network with Multiple Route Domains
Overview: How do I deploy BIG-IP DNS on a network with multiple route domains?
You can deploy BIG-IP® DNS (formerly GTM) on a network where BIG-IP Local Traffic Manager™ (LTM®) systems are configured with multiple route domains and overlapping IP addresses.
The following figure shows BIG-IP DNS deployed in a network with multiple BIG-IP Local Traffic Manager™ (LTM®) systems, one configured with the default route domain (zero), and one configured with two additional route domains. BIG-IP DNS can monitor the Application1 and Application2 servers that have overlapping IP addresses and reside in different route domains. The firewalls perform the required address translation between the BIG-IP DNS and BIG-IP LTM addresses; you must configure the firewalls to segment traffic and avoid improperly routing packets between route domain 1 and route domain 2.
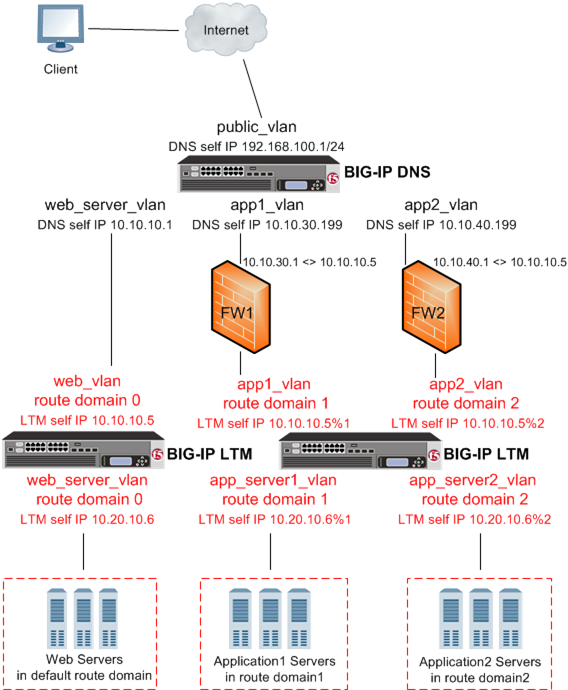
BIG-IP DNS deployed on a network with multiple route domains
Before BIG-IP® DNS can gather status and statistics for the virtual servers hosted on BIG-IP LTM® systems that are configured with route domains, you must configure the following on each BIG-IP LTM that handles traffic for route domains:
- VLANs through which traffic for your route domains passes
- Route domains that represent each network segment
- Self IP addresses that represent the address spaces of the route domains
Additionally, configure a BIG-IP DNS server object on BIG-IP DNS to represent each LTM system device.
Task summary
Perform the following tasks to configure BIG-IP DNS to monitor BIG-IP LTM systems with route domains.
Creating VLANs for a route domain on BIG-IP LTM
Creating a route domain on BIG-IP LTM
Creating a self IP address for a route domain on BIG-IP LTM
Defining a server for a route domain on BIG-IP DNS
Implementation result
You now have an implementation in which BIG-IP DNS monitors BIG-IP LTM virtual servers on the various route domains in your network.


