Applies To:
Show Versions
BIG-IP AAM
- 14.1.3, 13.1.5, 13.1.4, 13.1.3, 13.1.1, 13.1.0, 13.0.1, 13.0.0
BIG-IP APM
- 14.1.3, 14.1.2, 14.0.1, 14.0.0, 13.1.5, 13.1.4, 13.1.3, 13.1.1, 13.1.0, 13.0.1, 13.0.0
Overview: Securing an iSession deployment
For a secure iSession™ deployment, you must use SSL encryption to secure the endpoints of the iSession™ connection. The default SSL profile settings on BIG-IP® acceleration Quick Start screen are sufficient to get symmetric optimization up and running in a demo environment or for testing. F5® recommends that, to secure the endpoints, you specify SSL profiles that use a symmetric optimization-specific root certificate (cert) from a trusted certificate authority (CA).
This illustration shows the network setup for a secure iSession deployment. The example in this implementation uses the specified IP addresses.
- The local endpoint IP address on the BIG-IP SiteA system is 1.1.1.1.
- The local endpoint IP address on the BIG-IP SiteB system is 2.2.2.2.

Network topology for a secure iSession connection
Task summary
The process of securing an iSession™ deployment using SSL includes creating a cert for each iSession endpoint, and then specifying this cert (along with its associated key) in acceleration-related profiles and settings on the system. Before you start this procedure, ensure that you have configured the BIG-IP system on both sides of the WAN. This implementation is based on the default acceleration settings, except where noted.
Task list
Generating and importing SSL certificates for a secure iSession connection
- Generate a root certificate using external Certificate Authority (CA) software, such as the freeware program SimpleCA.
- Import the generated root certificate into both BIG-IP® systems (for example, BIG-IP SiteA and BIG-IP SiteB).
-
On one of the BIG-IP systems, complete the following steps.
- On the Main tab, click .
- From the Import Type list, select Certificate.
- For the Certificate Name setting, click Create New, and type wom-root-ca.
- For the Certificate Source setting, either click Upload File and provide a file name by typing or browsing to the file, or click Paste Text, and paste the text copied from another source into the field.
- Click Import.
- Repeat these steps on the other BIG-IP system.
-
Create a certificate and key on one of the BIG-IP systems (for example, BIG-IP
SiteA).
- On the Main tab, click .
- Click the Create button.
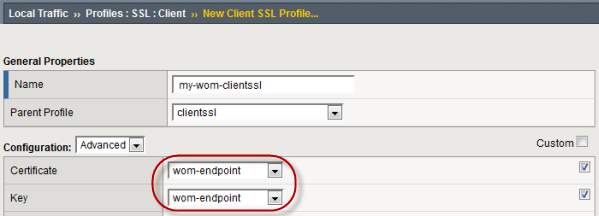
- In the Name field, type wom-endpoint.
- From the Issuer list, select Certificate Authority.
- In the Common Name field, type the IP address of the local endpoint for the BIG-IP, for example, 1.1.1.1.
- Provide any additional information required by your organization.
- Click Finished.
- On the Certificate Signing Request screen, copy or download the certificate signing request for the certificate created in the previous step, and use it to generate a signed certificate using your external CA and the CA certificate that you generated in step 1.
-
Import the generated certificate into the BIG-IP system (for example, BIG-IP
SiteA).
- On the Main tab, click .
- Click wom-endpoint (the certificate you created in step 4).
- Select the file wom-endpoint.crt.
- Click Import.
- Repeat steps 4-6 on the other BIG-IP system (for example, BIG-IP SiteB), but type 2.2.2.2 in the Common Name field on the New SSL Certificate screen.
Customizing SSL profiles for a secure iSession connection
-
On one of the BIG-IP® systems (for example, BIG-IP SiteA),
create a new SSL client profile based on the parent profile
clientssl.
-
For the Key setting, select the associated
Custom check box, and select wom-endpoint from
the list.
-
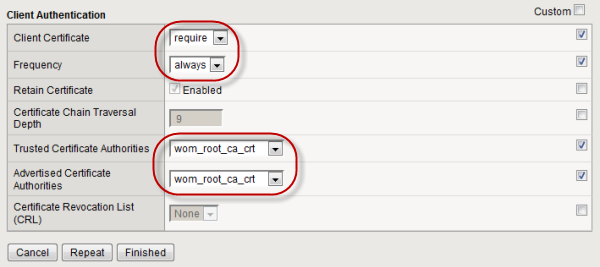
For the Advertised Certificates Authorities
setting, select the associated Custom check box, and select
wom-root-ca from the list.
-
For the Key setting, select the associated
Custom check box, and select wom-endpoint from
the list.
-
Update the configuration on the BIG-IP system (BIG-IP SiteA in our example) to
refer to the new client SSL profile.
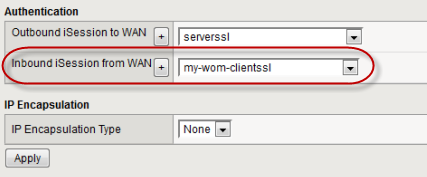
-
From the Inbound iSession from WAN list, select
wom-clientssl.
-
From the Inbound iSession from WAN list, select
wom-clientssl.
- Repeat steps 1-2 on the other BIG-IP system (BIG-IP SiteB in our example).
Configuring the remote endpoints for a secure iSession connection
-
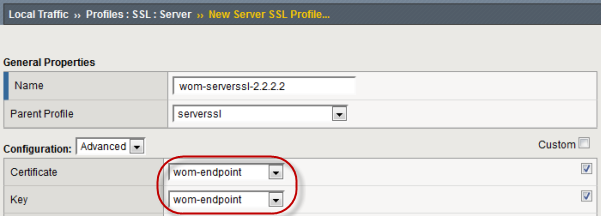
On the first BIG-IP® system (for example, BIG-IP SiteA)
create a new SSL server profile based on the parent profile
serverssl.
-
For the Key setting, select the associated
Custom check box, and select wom-endpoint from
the list.
-
For the Trusted Certificates Authorities
setting, select the associated Custom check box, and select
wom-root-ca from the list.
-
For the Key setting, select the associated
Custom check box, and select wom-endpoint from
the list.
-
On the first BIG-IP system (BIG-IP SiteA in our example), edit the remote
endpoint settings.
-
For the Authentication and Encryption setting,
select wom-serverssl-2.2.2.2.

-
For the Authentication and Encryption setting,
select wom-serverssl-2.2.2.2.
-
On the second BIG-IP system (BIG-IP SiteB in our example), create a new SSL
server profile based on the parent profile
serverssl.
- On the Main tab, click .
- Click the Create button.
- In the Name box, type wom-serverssl-1.1.1.1.
- From the Parent Profile list, select serverssl.
- From the Configuration list, select Advanced to display more options.
- For the Certificate setting, select the associated Custom check box (to override the default setting), and select wom-endpoint from the list.
- For the Key setting, select the associated Custom check box, and select wom-endpoint from the list.
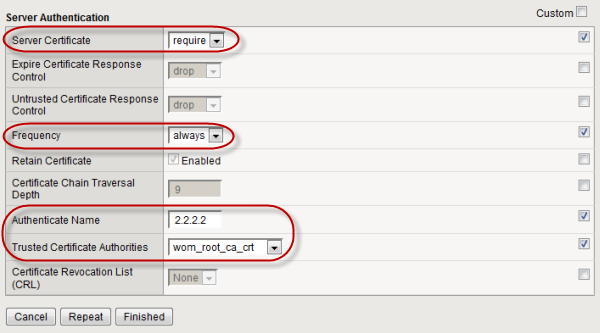
- In the Client Authentication area, for the Server Certificate setting, select the associated Custom check box, and select require from the list.
- For the Frequency setting, select the associated Custom check box, and select always from the list.
- For the Authenticate Name setting, select the associated Custom check box, and type 1.1.1.1.
- For the Trusted Certificates Authorities setting, select the associated Custom check box, and select wom-root-ca from the list.
- Click Finished.
-
On the second BIG-IP system (BIG-IP SiteB in our example), edit the remote
endpoint settings.
- On the Main tab, click .
- In the IP Address column, click 1.1.1.1 to open the properties screen for that remote endpoint.
- For the Authentication and Encryption setting, select wom-serverssl-1.1.1.1.
- Click Update.
Implementation result
After you complete the tasks in this implementation, you have secured the iSession endpoints of your symmetric deployment. The iSession traffic is now secure. Next, you can encrypt data traffic with iSession, using either IPsec for all applications, or SSL on a per-application basis.


