Manual Chapter :
Site Planning
Applies To:
Show Versions
ARX
- 6.3.0
This manual describes network and environmental considerations for installing an Adaptive Resource Switch (ARX®). Use this document to prepare for adding an ARX to your network.
The ARX acts as a resource proxy between the current clients and servers on your network. The switch terminates client requests, determines the correct server to process the request, and then originates a new request to the server. Messages in the reverse direction, from servers to clients, also terminate and restart at the ARX. The clients are said to be at the front end of the ARX, and the servers are said to be at the back end. As you plan to add a switch to your network, it is helpful to remember the sharp division between the switchs front-end and back-end processing.
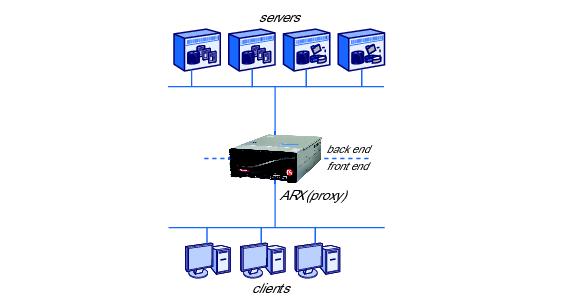
You can configure one or more namespaces for your front-end clients. Each namespace is a collection of virtual file systems, called volumes, under a single authentication domain. A volume is a collection of shares (or exports) hosted on the back-end file servers.
| One-armed proxy. The ARX uses a single logical connection to reach all clients and servers. |
| Multiple subnet. The ARX terminates one or more client subnets and a separate server subnet. |
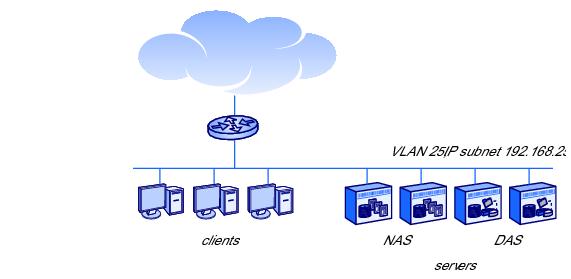
1.2 shows clients and servers on the same VLAN and subnet before the introduction of the ARX. The router connects the LAN to additional client and server subnets, perhaps on other campuses.
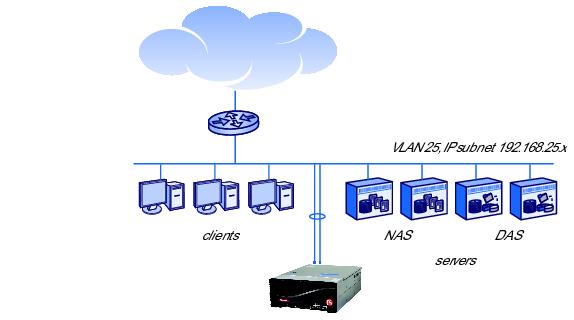
1.3 shows clients and servers after cutting in an ARX.
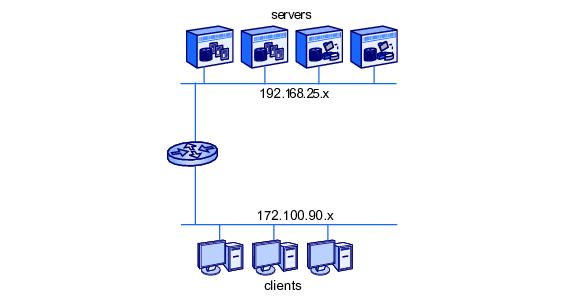
1.4 shows clients and servers on separate VLANs and subnets, with a router connecting the two subnets.
As shown in 1.5, the ARX has a separate connection to the client subnet and the server subnet in a multiple subnet topology. The switch serves as a proxy for CIFS and/or NFS transactions between the clients and servers.
As a proxy, the ARX has separate transactions with clients on its front end and servers on its back end. In this topology, the ARX does not cause looping.
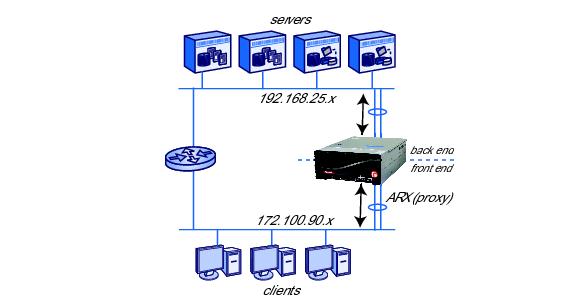
Communication to client subnets is less distributed: a minimum of one IP address is required per namespace to handle client requests. The client-side IP addresses are called virtual IPs, or VIPs.

The ARX also has an interface for out-of-band management (typically labeled MGMT) on its front panel. This interface is designed for installations with discrete management networks. It must have an IP address outside of the server subnet or any of the client subnets.
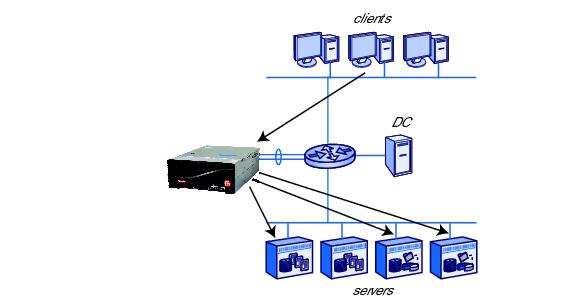
The ARX is assumed to operate in a three-tiered network in a large data center. The first tier is core routers that provide connectivity to a campus or WAN. The second tier has redundant distribution switches that distribute all data center traffic between the access switches; the access switches constitute the third tier of the network. All LAN clients and back-end file servers connect to the access switches. Through the access switches and distribution switches, LAN clients connect to all back-end servers/storage, to one another, and to the WAN. 1.6 shows a sample network.
Figure 1.6 Sample Network
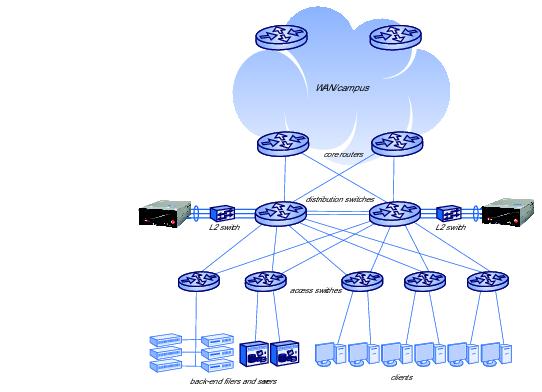
Table 1.2 lists the ports required by the ARX to communicate with its authentication services, back-end storage, and front-end client services. If you plan to operate in a secure environment, these ports must be opened on fire walls in order for the ARX to function properly.
Data Manager installs and runs on any Microsoft® Windows® platform that meets a set of minimum system and network requirements. For specifics on these requirements, consult the product Release Notes. To download your free trial version of Data Manager, click:
To prepare multiple file server shares for inclusion in the same namespace volume, you should avoid name collisions. A name collision occurs when two shares contain a file with the same path and name. The collision is resolved by renaming the second file (and all subsequent files with that path and name) before they are imported.
When a namespace imports an NFS export/share, the ARX takes inventory by reading the shares directory tree as root. The shares cannot squash root access by the ARX devices proxy IPs, or this tree walk (and therefore the import) may fail. Set your NFS shares to no-root-squash for all of your proxy IPs.
For a list of all proxy IP addresses on the ARX, issue a show ip proxy-addresses command. Note the addresses that are in use. See the following example.
bstnA> show ip proxy-addresses
Do not allow access to these shares from actual clients; changes from other clients would cause confusion for the namespace software. The only exception to this rule would be a management client, which may require access for backups or troubleshooting.
To import a share, navigate to NFS > Manage Exports (in the left-hand navigation panel) and double-click the share that you want the ARX to import. 1.7 shows the NetApp Manage Exports screen.
Figure 1.7 NetApp Manage Exports screen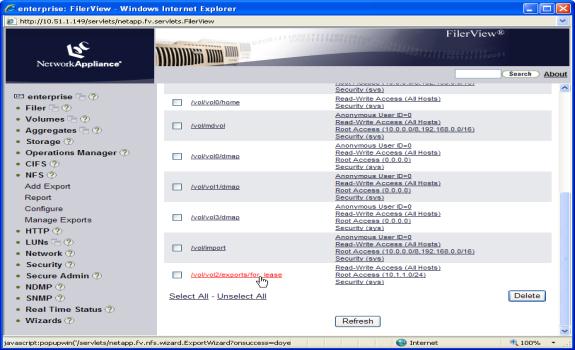
Figure 1.8 NFS Export wizard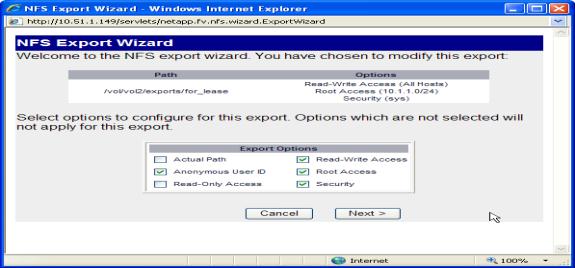
On the wizard Commit screen (the final screen), click Commit. See the following figure.
Figure 1.9 NFS Export wizard Commit screen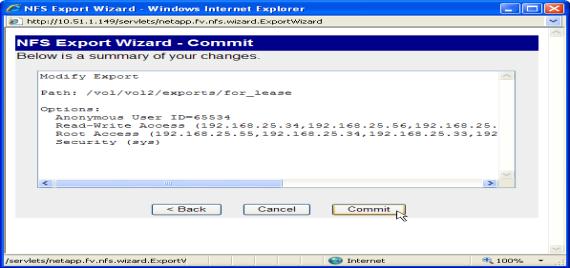
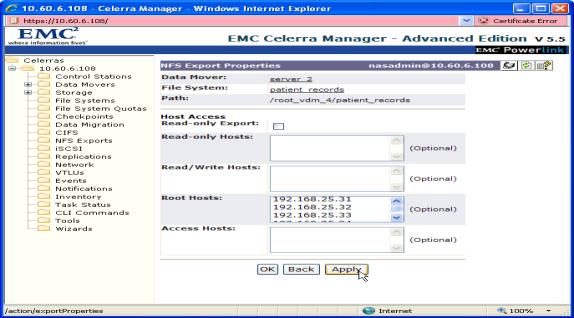
On the EMC Celerra server, select NFS Exports. See the left-hand navigation column in the following figure.
Click New or click an existing export name, as appropriate.
Figure 1.10 EMC Celerra screen for an existing export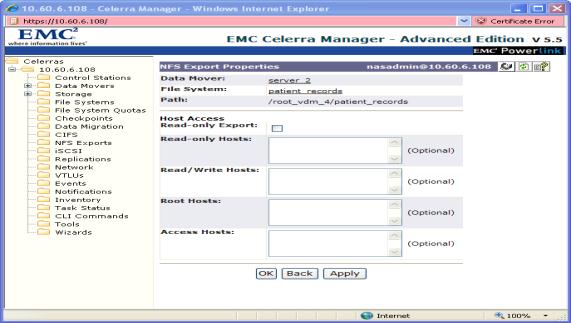
All Data Domain exports are in the /backup directory. You can use the Data Domain CLI to export one of those directories through NFS. Use the nfs add command to create an NFS export, specifying the ARX proxy-IP addresses as the only clients that can access the export.
sysadmin@med-dd510# nfs add /backup/t3users 192.168.25.31 192.168.25.32 192.168.25.33 192.168.25.34 192.168.25.141 192.168.25.142 192.168.25.143 192.168.25.144 192.168.25.145 192.168.25.146 192.168.25.147 192.168.25.148
To use the edited exports file, use the following commands at the Linux file server (still as root):
As root, edit the /etc/exports file to accomplish all of these goals. To allow mounts below the root of the share, you must use the -alldirs flag. For security reasons, BSD only allows this flag for shares that map to block devices. On the BSD machine, use the df command for a list of block devices.
BSD2-[/root]# ps ax | grep mountd
BSD2-[/root]# kill -HUP 347
Autonomous ARX operations, such as migrating files between back-end CIFS shares, require a Windows user identity so that the ARX can similarly access servers. This identity, called a proxy user, is a valid user account in the file servers Windows domain. The proxy user requires strong privileges on all CIFS-supporting servers, This user account must belong to the Backup Operators group or a group with equivalent privileges, and it must have full control (defined as both read and change control) over all files and directories in the share.
If your installation supports Per-Seat licensing, this is not an issue. For Per-Server licensing, you must configure each back-end server with 32 licenses per namespace.
You can also configure a volume to copy its files to a remote ARX volume, called a shadow volume. In this case, you must copy all local groups behind the source volume to all servers behind the shadow volume. This facilitates client access to the local copy as well as the remote one. If the shadow volume site is in a different Windows domain altogether, you must duplicate all of the Windows user groups in the source volume file servers in all of the shadow volume servers.
The EMC Data Domain system has a particular CLI command designed to support the ARX proxy user: cifs option set F5. This command accepts the domain and username of any valid Windows account, defined externally on your Windows Domain Controllers (DCs):
domain is the Windows domain for the proxy-user name, as defined on your DCs.
username is the name of an existing Windows user, also as defined on your DCs.
Then, run the filesys restart command. This gives the Windows user Backup Operator privileges on the Data Domain system. For example, the following command sequence provides Backup Operator privileges to jqpublic on the Data Domain system named med-dd510:
sysadmin@med-dd510# cifs option set F5 medarch.org\jqpublic
sysadmin@med-dd510# filesys restart
By default, the EMC Data Domain system allows access to a small number of CIFS clients with read-only access. However, an ARX volume facilitates read/write access to the Data-Domain share by any of its CIFS clients; even if CIFS clients access this share infrequently, there is typically a wide variety of them. When you use the cifs share create command to create a CIFS share, use the following options to prepare it for an ARX volume:
share-name is the name of the Data Domain share, as seen by the ARX volume.
path is directory path, which is always a subdirectory of /backup.
clients * allows all CIFS clients to access the share.
browsing enabled allows the ARX software to perform some necessary management functions.
writeable enabled allows CIFS clients and the ARX software to write to the share.
sysadmin@swic-dd510# cifs share create BUUSERS path /backup/buusers clients * browsing enabled writeable enabled
To disable name mangling, insert the following line in your mb.conf file in the [global] section:
To support NTLM or NTLMv2, each DC requires a separate Secure Agent installation. Refer to the ARX® Secure Agent Installation Guide for details on this type of installation.
A namespace can contain up to three types of volumes: managed volumes, direct volumes, and/or shadow volumes. A managed volume keeps metadata about all of its files and directories. Metadata is information about the location of the files on back-end filers, among other things. The managed volume uses the metadata to manage these file locations through namespace policy. A direct volume does not have any metadata and therefore does not support any policy. A shadow volume is a copy of a managed volume, possibly located on another ARX.
| the NFS file handle, and |
| the back-end filers file ID. |
The ARX Inter-Operability Matrix lists all of a direct volumes supported NFS filers and clients. This matrix is available from the ARX GUI, along with this document; click the Documentation link in the navigation panel to access all of the ARX documentation.
The ARX namespace metadata is data that contains the physical location of files that the managed volumes are managing. It is used to find files and directories on the physical file systems. Each managed volume in a namespace maintains its own metadata for the file systems it manages. Metadata is maintained on a per managed volume basis with a volume being a collection of physical file systems. A namespace can consist of multiple managed volumes and each volume can have a unique metadata location.
F5 Networks recommends a dedicated file system on a file server that has adequate performance and redundancy characteristics, as well as adequate space. For details on estimating the size required, see Sizing the Metadata Share.
All CIFS shares support synchronous writes, as do most implementations of NFS. For NFS servers that do not support synchronous writes by default (such as many Linux implementations), set the sync option for the NFS export. To improve volume performance, also set the no_wdelay option on the export.
This filer share is said to hold the volume root. Choose the root share for each of your volumes in advance. Configure the root share first as you configure your namespace volumes.
As an alternative, you can configure namespace policy to distribute new files and directories amongst several shares in the volume. This policy is called new-file placement policy in a share farm, and it is described in the ARX® CLI Storage-Management Guide.
If one share contains another (a fairly common scenario in a CIFS environment), only import one of the shares. Overlapping shares, imported into one or more namespaces, invariably cause namespace corruption. For example, suppose you have a C:\home share that contains C:\users\jrandom and C:\users\juser. You can import C:\home into a namespace volume, or you can import one or both of the subdirectories. Do not import both C:\home and any of its subdirectories.
For a CIFS subshare with a different Access-Control List (ACL) than its parent share, you can use a special CIFS subshare feature on the ARX. You use this feature to identify any subshares after the parent share is imported, and share them out to your CIFS clients.
Consult your filer documentation (from all vendors) concerning client access and the recommended security configurations. Pay particular attention to non-native access to the filer. Non-native access means accessing a UNIX file through CIFS, or an NTFS (Windows) file through NFS. Of particular interest are the following questions:
As mentioned earlier, the configured proxy user must have full read/write privileges from both NFS and CIFS. The NetApps NT/UNIX user map must equate the proxy-user credentials on the NT side with root on the UNIX side. The user map is in /etc/usermap.cfg, which you can access from an NFS client by mounting /vol/vol0. For example, this command sequence mounts the NetApp filer at 192.168.25.21 and lists the usermap.cfg file:
rh1:/mnt# mount 192.168.25.21:/vol/vol0/etc netapp/
rh1:/mnt# ls -l netapp/usermap.cfg
One line maps the Windows proxy user to root. Follow this syntax:
DOMAIN\proxy-username == root
DOMAIN is the Windows domain for the proxy user (use the short version; for example, MYDOMAIN instead of MYDOMAIN.MYCOMPANY),
proxy-username is the Windows username, and
the spaces before and after == are required.
If the proxy-username has spaces or a pound-sign (#) character in it, you must enclose it in quotation marks. Enclose only the username, not the entire DOMAIN\proxy-username string. For example:
EMC Celerra servers require a new, unused account for a proxy-user, immediately mapped to root on the UNIX side. If a client has already authenticated with a particular username and password, it would be prohibitively difficult to re-map the username to root on an EMC. EMC Release 5.5.24.2 introduces a command to resolve this problem; these instructions apply to prior releases.
Start by creating a new Windows account for the proxy user. Remember to add it to the Backup Operators or Administrators group on the EMC, or give it equivalent privileges. Then map the above user to root on the UNIX side, as described below.
server_file data-mover -get passwd passwd.new
where data-mover identifies the data mover behind the ARX.
where username is the name for the proxy-user account that you created from Windows. The two zeros in the third and fourth fields are the required UID and GID for root. The values for the remaining fields are outside the scope of this document; you can use man 5 passwd from the EMC CLI to access the EMC documentation.
server_file data-mover -put passwd.new passwd
For example, the following command sequence accesses the CLI of an EMC Celerra and maps the jqpublic user to root. (The name of the data mover is server_2 in this example.)
rh1:/# ssh nasadmin@192.168.25.51
nasadmin@192.168.25.51's password: password
[nasadmin@emc01-mgt nasadmin]$ server_file server_2 -get passwd passwd.new
[nasadmin@emc01-mgt nasadmin]$ vi passwd.new
[nasadmin@emc01-mgt nasadmin]$ server_file server_2 -put passwd.new passwd
rh1:/# ...
1.12 shows how the ARX acts as a resource proxy between clients and servers. In its role as a proxy, it must carry the identity of a client user through to the back-end servers. This allows for already-established Access Control Lists (ACLs) to continue their role in controlling access to files. This also makes the ARX transparent to users in an AD domain. The ARX authenticates a client once, using Kerberos, then uses the clients credentials to access any server that contains a requested file.
Kerberos authentication simplifies security management: all ACLs on all servers can remain the same, and all clients retain the same rights and restrictions that they had before inserting the ARX. This proxy mechanism, called delegation in Windows terminology, is possible with Kerberos but not with NTLM.
Special administrative privileges are required to join an F5 front-end CIFS server (F5 server) to an AD domain. The domain-join operation has two major steps: add the F5 server to the AD domain and raise the Trusted for Delegation flag for the server. Each of these steps requires a distinct administrative privilege:
Table 1.4 describes the basic features of each ARX. For more detailed hardware requirements, refer to System Specifications and Requirements or refer to the ARX Hardware Reference Guide.
Table 1.4 shows an overview of the features for each ARX.
The following table describes the ARX-4000 system specifications.
| Operating: 50 to 95 F (10 to 35 C) Storage: -40 to 149 F (-20 to 65 C) |
The following table lists the required cables and power cords for the ARX-500. All cables except the AC power cord and console cable are customer-supplied.
| 1100/1000BASE-T Category 5/6, unshielded twisted pair (UTP) cable; 24 AWG. |
Gigabit Ethernet ports support automatic MDI/MDIX cross-over. This feature automatically corrects the polarity of the attached CAT5 cable, regardless whether it is a cross-over or straight-through type. However, for this feature to work, the port speed must be set to auto (auto-negotiate) through the CLI. When the port speed/duplex is forced (auto-negotiate is disabled), automatic MDI/MDIX cross-over is disabled, and you must cable the port using standard cross-over or straight-through cabling.
The Following table lists the required cables and power cords for the switch. All cables except the AC power cord and console cable are customer-supplied.
| 1100/1000BASE-T Category 5/6, unshielded twisted pair (UTP) cable; 24 AWG. |
The following table lists the required cables and power cords for the switch. All cables except the AC power cord and console cable are customer-supplied.
| 1100/1000BASE-T Category 5/6, unshielded twisted pair (UTP) cable; 24 AWG. |
The following table lists the required cables and power cords for the switch. All cables except the AC power cord and console cable are customer-supplied.
| 1100/1000BASE-T Category 5/6, unshielded twisted pair (UTP) cable; 24 AWG. |
The following table lists the required power cords and cables. All cords are customer-supplied except the AC power cords and the console cable.
| Table 1.14 |
1100/1000BASE-T Category 5/6, unshielded twisted pair (UTP) cable; 24 AWG.
Gigabit Ethernet ports support automatic MDI/MDIX cross-over. This feature automatically corrects the polarity of the attached CAT5 cable, regardless of whether it is a cross-over or straight-through type. However, for this feature to work, the port speed must be set to auto (auto-negotiate) through the CLI. When the port speed/duplex is forced (auto-negotiate is disabled), automatic MDI/MDIX cross-over is disabled, and you must cable the port using standard cross-over or straight-through cabling.
Figure 1.13 RJ-45 Male Connector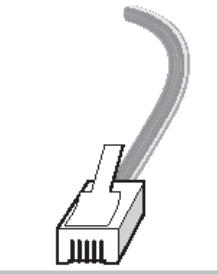
Figure 1.14 RJ-45 to Serial DB9 Adapter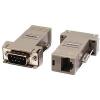
Figure 1.15 ARX-500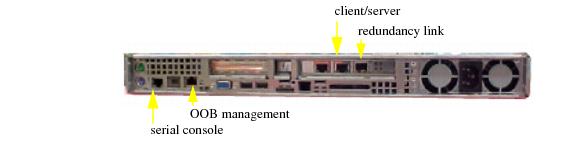 rear-panel ports.
rear-panel ports.| Table 1.17 |
Once you reach the installation initial interview, you can access the ARX through the serial console to configure a default administrator, a switch identifier, and out-of-band (OOB) management. Again, consult the hardware installation guides for each ARX model for the tasks involved.
ARX configuration definitions generated by Data Manager are intended for initial switch deployments. Do not merge these configurations with previously deployed configurations without thoroughly reviewing both existing and new configurations for naming collisions and hardware limitations. For further details on some of these issues, see Manually Preparing the Back-End File Servers.
After hardware installation, add the ARX to your network using the Quick Start: Network Setup Use Case.
Next, add CIFS and/or NFS services using the Quick Start: CIFS Storage Use Case or the Quick Start: NFS Storage Use Case. Use these documents to quickly aggregate your file server storage with the ARX Manager. Using the instructions in these quick starts, you can create a namespace, one managed volume, connect the volume to multiple file server shares, then offer the single volume (which aggregates your share storage) to clients as a single, virtual-service share.
After hardware installation, add the ARX to your network using the ARX CLI Network-Management Guide.
Next, you can configure your storage environment using the ARX CLI Storage-Management Guide. Consult the guide for the tasks involved in configuring the storage environment.
For detailed instructions on each of these commands, consult the ARX CLI Reference.
| 1. | From the left-hand navigation panel, expand Maintenance. |
| 2. | Click Configs. |
| 3. | On the Configs page, click Save Config. |
| 4. | On the Save Configuration page, click the Help button in the upper right-hand corner and follow the instructions. |


