Manual Chapter : Configuring Bandwidth Load Balancing

Applies To:

Show Versions Show Versions

BIG-IP Link Controller

  • 13.1.5, 13.1.4, 13.1.3, 13.1.1, 13.1.0, 13.0.1, 13.0.0, 12.1.6, 12.1.5, 12.1.4, 12.1.3, 12.1.2, 12.1.1, 12.1.0
Manual Chapter

Configuring Bandwidth Load Balancing

Overview: Configuring bandwidth load balancing

Important: This functionality is not currently available in the U.S.

You can configure BIG-IP® Link Controller™ to use bandwidth load balancing to manage the traffic flowing in and out of a network. In bandwidth load balancing, Link Controller uses a specific link until a traffic threshold has been met. After that threshold is met, the Link Controller shifts traffic to another link. When the traffic falls below the threshold, the Link Controller shifts traffic back to the first link.

The following illustration shows a network for configuring a bandwidth load balancing configuration.

Example of a network for configuring bandwidth load balancing

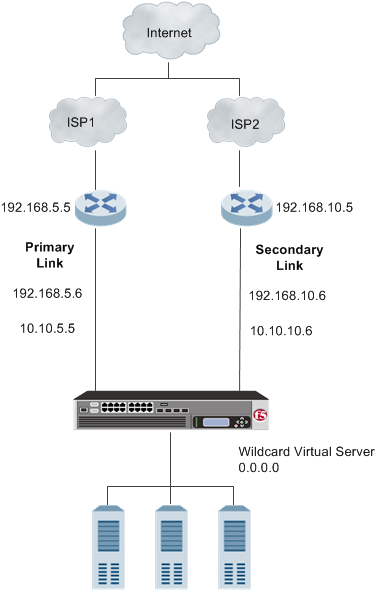
As the illustration shows, the most cost-efficient configuration is to have the Primary Link handle traffic until it reaches a certain level (for example, 50 Mbps), then send any traffic over a certain level (for example: 50 Mbps) to the Secondary Link. When the traffic decreases, the Link Controller must switch back to using only the Primary Link again.

Task summary

Important: This functionality is not currently available in the U.S.

Use the tasks in this implementation to create a bandwidth load balancing configuration to manage the traffic flowing in and out of a network.

Task list

Creating the first bandwidth link for load balancing

Gather the IP address of the router associated with the ISP and IP address that corresponds with the external Internet connections. For the link, determine the total bandwidth threshold you want to use.
Create and configure the first link on Link Controller™, which determines how traffic enters and leaves your network.
  1. On the Main tab, click Link Controller > Links .
    The Links List screen opens.
  2. Click Create.
    The New Link screen opens.
  3. In the Name field, type a name for the link.
    Important: Link names are limited to 63 characters.
  4. In the Router Address field, type the IP address of the router.
  5. In the Uplink Address field, type the IP address that corresponds with the external Internet connection.
  6. For the Service Provider field, type the name of the ISP provider.
  7. From the Configuration list, select Advanced.
    Additional controls display on the screen.
  8. From the Traffic Limits field, set the total bandwidth thresholds for the link.
  9. Click Create.

Creating the second bandwidth link for load balancing

Gather the IP address of the router associated with the ISP and IP address that corresponds with the external Internet connection. For the link, determine the total bandwidth threshold you want to use.
Create and configure the second link on Link Controller™, which determines how traffic enters and leaves your network.
  1. On the Main tab, click Link Controller > Links .
    The Links List screen opens.
  2. Click Create.
    The New Link screen opens.
  3. In the Name field, type a name for the link.
    Important: Link names are limited to 63 characters.
  4. In the Router Address field, type the IP address of the router.
  5. In the Uplink Address field, type the IP address that corresponds with the external Internet connection.
  6. For the Service Provider field, type the name of the ISP provider.
  7. From the Configuration list, select Advanced.
    Additional controls display on the screen.
  8. From the Traffic Limits field, set the total bandwidth thresholds for the link.
  9. Click Create.

Creating a default gateway pool

Gather the IP addresses associated with each link.
Create a default gateway pool to load balance the outbound traffic across the links.
  1. On the Main tab, click Local Traffic > Pools .
    The Pools list screen opens.
  2. Click Create.
  3. In the Name field, type a name for the pool.
    Names must begin with a letter, and can contain only letters, numbers, and the underscore (_) character.
    Important: The pool name is limited to 63 characters.
  4. In the New Members area, add the IP addresses associated with each link.
    1. In the Address field, type the IP address.
    2. Click Add.
  5. Click Finished.

Creating a default route to the Internet

Configure Link Controller™ to use the pool as the default gateway connection between the internal network and the Internet.
  1. On the Main tab, click Network > Routes .
  2. Click Add.
    The New Route screen opens.
  3. In the Name field, type a unique name.
  4. From the Resource list, select Use Pool.
  5. From the Pool list, select default_gateway_pool.
  6. Click Finished.

Creating virtual servers to load balance connections across servers

Gather the IP addresses you want to use for creating the virtual servers.
Create two virtual servers, one for each link, to load balance inbound connections across the servers on the network.
  1. On the Main tab, click Local Traffic > Virtual Servers .
    The Virtual Server List screen opens.
  2. Click the Create button.
    The New Virtual Server screen opens.
  3. In the Name field, type a unique name for the virtual server.
  4. In the Destination Address field, type the IP address you want to use for the virtual server.
  5. In the Service Port field, type 80, or select HTTP from the list.
  6. Click Finished.
  7. Repeat these steps to create the second virtual server.

Creating a wildcard virtual server

Create a wildcard server to load balance outbound connections across the routers.
  1. On the Main tab, click Local Traffic > Virtual Servers .
    The Virtual Server List screen opens.
  2. Click the Create button.
    The New Virtual Server screen opens.
  3. In the Name field, type a unique name for the virtual server.
  4. For the Destination setting, select Host, and type 0.0.0.0 in the Address field.
  5. In the Service Port field, type 0.
    Note: Port 0 defines a wildcard virtual server that handles all types of services. If you specify a port number, you create a port-specific wildcard virtual server. In that case, the wildcard virtual server handles traffic only for the specified port.
  6. Click Finished.

Creating a wide IP

Before you can create a wide IP, you need IP addresses from two previously created virtual servers.
Create a wide IP to which Link Controller™ load balances incoming DNS requests.
  1. On the Main tab, click Link Controller > Inbound Wide IPs .
    The Wide IP List screen opens.
  2. Click Create.
    The New Wide IP screen opens.
  3. In the Name field, type a name for the wide IP.
  4. From the Type list, select a record type for the wide IP.
  5. From the Load Balancing Method list, make selections from the Preferred, Alternate, and Fallback lists.
  6. For the Member List field, add the address of the appropriate virtual server.
    1. From the Virtual Server list, select a virtual server.
    2. Click Add.
  7. Click Create.

Implementation result

You now have Link Controller™ configured to use bandwidth load balancing to manage DNS traffic.