Applies To:
Show Versions
BIG-IP GTM
- 11.6.5, 11.6.4, 11.6.3, 11.6.2, 11.6.1
BIG-IP Link Controller
- 11.6.5, 11.6.4, 11.6.3, 11.6.2, 11.6.1
BIG-IP LTM
- 11.6.5, 11.6.4, 11.6.3, 11.6.2, 11.6.1
BIG-IP ASM
- 11.6.5, 11.6.4, 11.6.3, 11.6.2, 11.6.1
Overview: Upgrading BIG-IP active-active systems
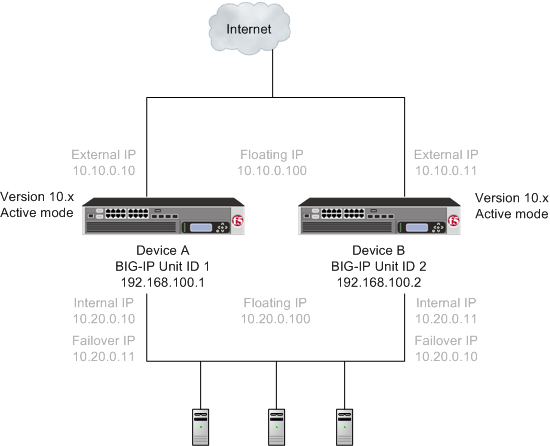 A version 10.x active-active pair
After preparing the devices for an upgrade to the new version software, you force Device B to offline mode, and then install the new version software onto Device B (the offline device).
 A version 10.x active-offline pair
When you finish the installation of the new version software onto Device B, it creates two traffic groups called traffic-group-1 and traffic-group-2. Each traffic group is in standby state on Device B, and Device A (the version 10.x device) is in active mode. You can then force Device A to offline mode, changing both the new version software traffic groups to active state on Device B. Note that the Unit ID that was used in version 10.x becomes obsolete in the new version software.
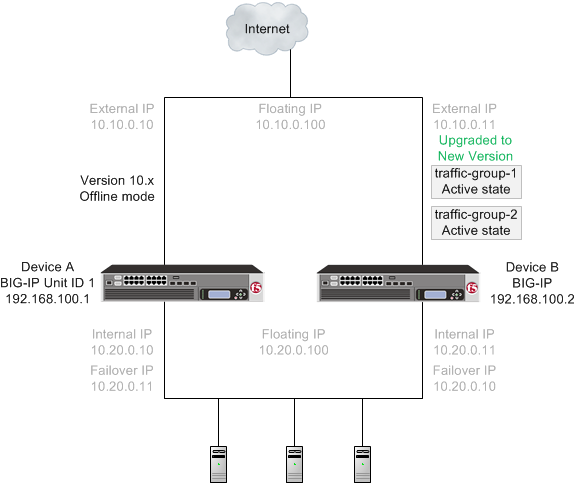 A version 10.x device in offline mode and the new version software traffic groups in
active state
A version 10.x device in offline mode and the new version software traffic groups in
active state
When you complete upgrading both devices to the new version software, the BIG-IP system configuration includes traffic-group-1 and traffic-group-2 in active state on Device B, a traffic-group-1 and traffic-group-2 in standby state on Device A, and a device group that includes both devices.
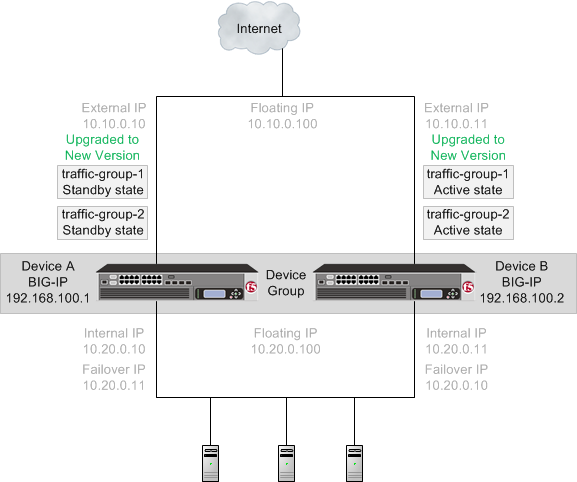 The new version software traffic groups in active state on an upgraded device
Once each device is upgraded to the new version software, you can reconfigure the traffic groups to become active on the devices that you want by forcing the active traffic group on a device to standby state. When forcing the traffic group to standby state, you can target the device upon which you want that traffic group to run in active state. For example, you can force traffic-group-1 on Device B into standby state, and into active state on Device A. Additionally, if you use HA groups, you can create a unique HA group for each traffic group on each device.
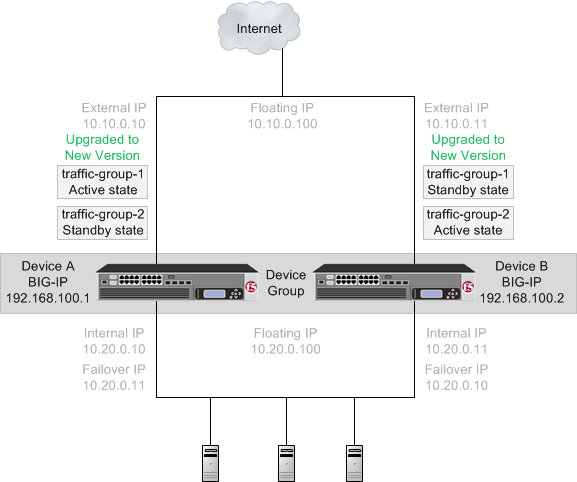 The new version software traffic groups in active state on two different devices
An upgrade of BIG-IP active-active systems to the new version software involves the following tasks.
| Task | Description |
|---|---|
| Preparing Device A (active mode on the BIG-IP 1 system) and Device B (active mode on the BIG-IP 2 system) | In preparing to upgrade the active-active BIG-IP systems to the new version software, you need to understand any specific configuration or functional changes from the previous version, and prepare the systems. You also download the new version of software from the AskF5 web site (www.askf5.com) and import the files onto each device. |
| Forcing Device B to offline mode | When you complete preparing the Device B, you can force Device B to offline mode. |
| Upgrading Device B (the offline mode BIG-IP 2 system) | Once Device B is in offline mode, you can upgrade the software on that device, and
reboot Device B to the location of the new version software image. Device B completes rebooting with
traffic-group1 and traffic-group-2 in standby
state.
Important: Once Device B reboots, if the BIG-IP system is configured to
use a network hardware security module (HSM), you must reinstall network HSM client software
on Device B before upgrading Device A, to ensure that traffic groups using the network HSM
function properly.
|
| Forcing Device A to offline mode | When Device B completes rebooting to the location of the new version software image, you can force Device A to offline mode, changing traffic-group-1 and traffic-group-2 on Device B to active state. |
| Upgrading Device A (the offline mode BIG-IP 1 system) | Once Device A is in offline mode, you can upgrade the software on Device A. When Device
A completes rebooting, traffic-group-1 and traffic-group-2 are in standby state on Device
A.
Important: Once Device A reboots, if the BIG-IP system is configured to use a
network HSM, you must reinstall network HSM client software on Device A to ensure that
traffic groups using the network HSM function properly.
|
| Changing states of traffic groups | When you finish upgrading all of the devices, you can restore the configuration of active traffic groups on each device. |
| Verifying the upgrade | Finally, you should verify that your active traffic groups on the BIG-IP systems are functioning properly. |
| Configuring HA groups | When you finish upgrading a device, the HA group on the device (in version 11.5, and later) applies to a traffic group, as opposed to the device. You can create a unique HA group for each traffic group on each device, as necessary. |
| Configuring module-specific settings | According to your understanding of the configuration and functional changes from the previous version, you can reconfigure any customized module settings. |
DSC components
Device service clustering (DSC) is based on a few key components.
- Devices
- A device is a physical or virtual BIG-IP system, as well as a member of a local trust domain and a device group. Each device member has a set of unique identification properties that the BIG-IP system generates.
- Device groups
- A device group is a collection of BIG-IP devices that trust each other and can synchronize, and sometimes fail over, their BIG-IP configuration data. You can create two types of devices groups: A Sync-Failover device group contains devices that synchronize configuration data and support traffic groups for failover purposes when a device becomes unavailable. A Sync-Only device group contains devices that synchronize configuration data, such as policy data, but do not synchronize failover objects.
- Traffic groups
- A traffic group is a collection of related configuration objects (such as a virtual IP address and a self IP address) that run on a BIG-IP device and process a particular type of application traffic. When a BIG-IP device becomes unavailable, a traffic group can float to another device in a device group to ensure that application traffic continues to be processed with little to no interruption in service.
- Device trust and trust domains
- Underlying the success of device groups and traffic groups is a feature known as device trust. Device trust establishes trust relationships between BIG-IP devices on the network, through mutual certificate-based authentication. A trust domain is a collection of BIG-IP devices that trust one another and can therefore synchronize and fail over their BIG-IP configuration data, as well as exchange status and failover messages on a regular basis. A local trust domain is a trust domain that includes the local device, that is, the device you are currently logged in to.
- Folders
- Folders are containers for the configuration objects on a BIG-IP device. For every administrative partition on the BIG-IP system, there is a high-level folder. At the highest level of the folder hierarchy is a folder named root. The BIG-IP system uses folders to affect the level of granularity to which it synchronizes configuration data to other devices in the device group.
About traffic groups
A traffic group is a collection of related configuration objects, such as a floating self IP address, a virtual IP address, and a SNAT translation address, that run on a BIG-IP device. Together, these objects process a particular type of application traffic on that device. When a BIG-IP device becomes unavailable, a traffic group floats (that is, fails over) to another device in a device group to ensure that application traffic continues to be processed with little to no interruption in service. In general, a traffic group ensures that when a device becomes unavailable, all of the failover objects in the traffic group fail over to any one of the available devices in the device group.
A traffic group is initially active on the device on which you create it, until the traffic group fails over to another device. For example, if you initially create three traffic groups on Device A, these traffic groups remain active on Device A until one or more traffic groups fail over to another device. If you want an active traffic group to become active on a different device in the device group when failover has not occurred, you can intentionally force the traffic group to switch to a standby state, thereby causing failover to another device.
Only objects with floating IP addresses can be members of a floating traffic group.
An example of a set of objects in a traffic group is an iApps application service. If a device with this traffic group is a member of a device group, and the device becomes unavailable, the traffic group floats to another member of the device group, and that member becomes the device that processes the application traffic.
Task summary
Preparing BIG-IP modules for an upgrade from version 10.x to the new version software
Access Policy Manager system preparation
Access Policy Manager is not supported in an Active-Active configuration.
Supported high availability configuration for Access Policy Manager
Access Policy Manager is supported in an Active-Standby configuration with two BIG-IP systems only.
Application Security Manager system preparation
The BIG-IP Application Security Manager (ASM) system does not require specific preparation when upgrading from version 10.x to the new version software. No additional configuration is required after completing the upgrade to the new software version.
What to expect after upgrading a redundant system
If you update two redundant systems that are running as an active-standby pair with BIG-IP Application Security Manager (ASM) and BIG-IP Local Traffic Manager (LTM) provisioned, the system maintains the active-standby status and automatically creates a Sync-Failover device group and a traffic group containing both systems. The device group is enabled for BIG-IP ASM (because both systems have ASM provisioned).
You can manually push or pull the updates (including BIG-IP LTM and ASM configurations and policies) from one system to the other (, click the name of a device, and choose Sync Device to Group or Sync Group to Device).
Global Traffic Manager system preparation and configuration
BIG-IP Global Traffic Manager systems require specific preparation tasks and changes to upgrade from version 10.x to the new version software.
Preparation Activities
Before you upgrade Global Traffic Manager systems that are in a synchronization group, from any software version to the new version software, you must install the software on an inactive volume on each device using Live Install. After you upgrade each device, you then switch all devices to the new volume at the same time. This is required because devices in a synchronization group that includes the new version software device, cannot effectively probe each other.
Post-upgrade changes
The following feature or functionality changes occur after you complete the upgrade process to the new version software:
| Feature or Functionality | Description |
|---|---|
| Assigning a BIG-IP system to probe a server to gather health and performance data | Assigning a single BIG-IP system to probe a server to gather health and performance data, in version 10.x, is replaced by a Prober pool in the new software version. |
Link Controller system preparation
The BIG-IP Link Controller (LC) system does not require specific preparation when upgrading from version 10.x to the new version software. No additional configuration is required after completing the upgrade to the new version software.
Local Traffic Manager system preparation
The BIG-IP Local Traffic Manager (LTM) system does not require specific preparation when upgrading from version 10.x to the new version software. No additional configuration is required after completing the upgrade to the new version software.
MAC masquerade addresses for VLANs
HTTP Class profiles
F5 Networks replaced the HTTP Class profile in BIG-IP version 11.4.0, and later, with the introduction of the Local Traffic Policies feature. During an upgrade to BIG-IP version 11.4.0, if your configuration contains an HTTP Class profile, the BIG-IP system attempts to migrate the HTTP Class profile to an equivalent local traffic policy. For additional support information regarding the change of HTTP Class profiles to Local Traffic Policies, refer to SOL14409 on www.askf5.com.WebAccelerator module preparation and configuration
BIG-IP WebAccelerator modules require specific preparation tasks and changes to upgrade from version 10.x to the new version software.
Preparation activities
Before you upgrade the BIG-IP WebAccelerator modules from version 10.x to an Application Acceleration Manager new software version, you need to prepare the systems, based on your configuration. The following table summarizes the applicable tasks that you need to complete.
| Feature or Functionality | Preparation Task |
|---|---|
| Symmetric deployment | You must reconfigure symmetric WebAccelerator modules as asymmetric systems before you upgrade them from version 10.x to the new version software. |
| Unpublished policies | You must publish any policies that you want to migrate to the new software version. Only published policies are migrated into the new version software. |
| Signed policies | Signed policies are not supported in the new version software. If you use signed policies, you must replace them with predefined or user-defined policies before upgrading. |
| Configuration files | Upgrading from version 10.x to the new version software does not include custom
changes to configuration files. After upgrading to the new version software, you
need to manually restore any customizations made to your configuration files by
using the Configuration utility or Traffic Management Shell
(tmsh). The following list includes examples of configuration
files that might have been customized:
|
| Debug Options | X-PV-Info response headers in version 10.x are changed to X-WA-Info response headers in the new software version. The default setting for X-WA-Info Headers is None (disabled). To use X-WA-Info response headers, you will need to change this setting, and update any associated iRules or scripts, accordingly. |
Post-upgrade activities
When you complete upgrading to the new version software, you should consider the following feature or functionality changes that occur for the Application Acceleration Manager modules. Depending upon your configuration, you might need to perform these changes after you upgrade the systems.
| Feature or Functionality | Description |
|---|---|
| Web acceleration | Web acceleration functionality requires configuration of the Web Acceleration
profile.
Important: You must enable an Application Acceleration Manager module
application in the Web Acceleration profile to enable the Application Acceleration Manager
module.
|
| Compression | Compression functionality requires configuration of the HTTP Compression profile in the new version software. |
| Request logging | Request logging does not migrate to the new version software. You must recreate the configuration after upgrading by using the Request Logging profile. |
| Policy logging | Policy logging does not migrate to the new version software. You must recreate the configuration after upgrading by using the Request Logging profile. |
| URL normalization | URL normalization is not supported in the new version software. |
| ESI functionality | Edge Side Include (ESI) functionality in the Application Acceleration Manager module is not supported in the new version software, with the exception of ESI invalidations. |
| iControl backward compatibility | Backward compatibility for iControl Compression and RAM Cache API settings in the HTTP profile is not supported in the new version software. These settings appear in the HTTP Compression and Web Acceleration profiles in the new software version. |
WAN Optimization Manager preparation
BIG-IP WAN Optimization Manager (WOM) systems do not require specific preparation when upgrading from version 10.x to the new version software. However, in a redundant system configuration, you must upgrade the standby system first (to avoid interrupting traffic on the active system), and then upgrade the other system. No additional configuration is required after completing the upgrade to the new version software.
Preparing BIG-IP active-active systems for an upgrade
- The BIG-IP systems (Device A and Device B) are configured as an active-active pair.
- Each BIG-IP device is running the same version of 10.x software.
- The BIG-IP active-active devices are the same model of hardware.
-
For each device, complete the following steps to prepare the configuration and
settings.
-
From the device that is running the latest configuration, synchronize the
configuration to the peer unit.
- For each device, click , and, from the Redundancy State Preference list, select None.
-
For each device, create a backup file.
- Access the tmsh command line utility.
- At the prompt, type save /sys ucs /shared/filename.ucs.
- Copy the backup file to a safe location on your network.
- Download the BIG-IP new version software .iso file, and, if available, latest hotfix .iso file from the AskF5 downloads web site (https://downloads.f5.com) to a preferred location.
- Using a tool or utility that computes an md5 checksum, verify the integrity of the BIG-IP new version software .iso file.
- Import either the latest BIG-IP system hotfix image file, if available, or the new version software image file to each device.
Upgrading the active BIG-IP 2 system
- Device A (the active BIG-IP 1 system) and Device B (the active BIG-IP 2 system) must be prepared to upgrade Device B with the new version software.
- Either the latest hotfix image file, if available, or the new version software image file is downloaded and accessible.
Upgrading the active BIG-IP 1 system
- Device A (the version 10.x BIG-IP 1 system) must be prepared to upgrade the software to the new version software.
- Device A is in active mode.
- Device B (the new version software BIG-IP device with traffic-group-1 and traffic-group-2 in standby state) is in standby state.
- Either the latest hotfix image file, if available, or the new version software image file is downloaded and accessible.
Changing states of the traffic groups
Manually configuring active state traffic groups across devices within a device group involves forcing an active state traffic group on a device to standby state, and retargeting that active state traffic group to a different device. Completing these tasks results in active state traffic groups on the appropriate devices in a device group.
Viewing a list of traffic groups for a device
- On the Main tab, click .
- In the Name column, view the names of the traffic groups on the local device.
Forcing a traffic group to a standby state
You perform this task when you want the selected traffic group on the local device to fail over to another device (that is, switch to a Standby state). Users typically perform this task when no automated method is configured for a traffic group, such as auto-failback or an HA group. By forcing the traffic group into a Standby state, the traffic group becomes active on another device in the device group. For device groups with more than two members, you can choose the specific device to which the traffic group fails over.
Verifying a BIG-IP system active-active upgrade
-
Verify the Platform configuration for each device.
- On the Main menu, click .
- For the Root Folder Device Group setting, verify that the device group is identical on the pair of devices.
- From the Root Folder Group list, verify that the correct traffic group (traffic-group-1) is selected.
-
Verify the configuration for each device.
-
Verify the traffic groups for each device.
- On the Main menu, click .
- Click traffic-group-1.
- If you configured MAC Masquerade addresses for VLANs on the version 10.x devices, verify that the traffic-group-1 includes an address in the MAC Masquerade Address field.
- Click traffic-group-2.
- If you configured MAC Masquerade addresses for VLANs on the version 10.x devices, verify that the traffic-group-2 includes an address in the MAC Masquerade Address field.
- Verify that the floating traffic group is correct.
- Verify that the failover objects are correct.
-
Verify the Current ConfigSync State for each device.
- On the Main menu, click .
- In the Devices area of the screen, in the Sync Status column, verify that each device shows a sync status of green.
Implementation result
Your upgrade of the BIG-IP active-active pair from version 10.x to the new version software is now complete. The new version software configuration includes a device group with two devices (Device A and Device B) and two traffic groups (traffic-group-1 and traffic-group-2), with the first traffic group (traffic-group-1) on one device (Device A) in active state and the second traffic group (traffic-group-2) on the other device (Device B) in active state.
The new version software device group and two traffic groups in active state on different
devices


