Applies To:
Show Versions
BIG-IP APM
- 12.0.0
Integrating APM with Citrix XML Brokers
Overview: Integrating APM with Citrix XML Brokers with SmartAccess support
In this implementation, you integrate Access Policy Manager® (APM®) with Citrix XML Brokers and present Citrix published applications on an APM dynamic webtop.
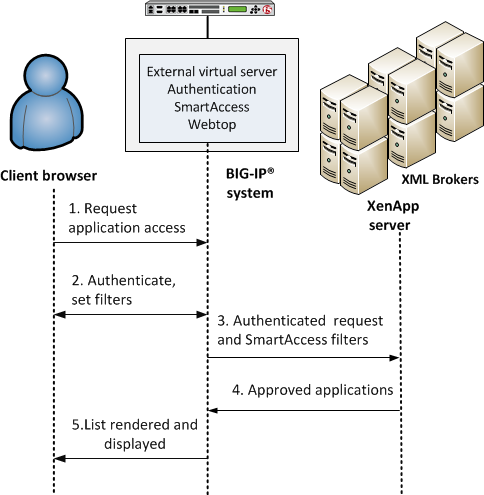
APM integration with Citrix XML Brokers
- A user (client browser or Citrix Receiver) requests access to applications.
- The virtual server starts an access policy that performs authentication and sets SmartAccess filters.
- The virtual server sends the authenticated request and filters to a Citrix XML Broker.
- An XML Broker returns a list of allowed applications to the external virtual server.
- The virtual server renders and displays the user interface to the client on an Access Policy Manager webtop.
Supported authentication
For Citrix Receiver Windows and Linux clients: only Active Directory authentication is supported.
For Citrix Receiver clients for iOS, Android, and Mac: Active Directory, or both RSA and Active Directory authentication is supported.
For web clients, you are not restricted in the type of authentication you use.
About APM dynamic webtop for Citrix XML Brokers
A dynamic webtop enables Access Policy Manager® (APM®) to act as a presentation layer for Citrix published resources. APM communicates directly with Citrix XML Brokers, retrieves a list of published resources, and displays them to the user on a dynamic webtop.
The addresses of XML Brokers are configured in pools on APM. A pool includes addresses from one Citrix farm. You specify a pool as a destination in a Citrix remote desktop resource. Each resource logically represents a Citrix farm. You can assign multiple resources to a user, enabling the user to access Citrix applications from multiple Citrix farms.
About Client Type
The Client Type action determines whether the client is using a full browser, the BIG-IP® Edge Client, or another client to access the Access Policy Manager® (APM®). This action makes it possible to specify different actions for different client types in one access policy and, as a result, to use one virtual server for traffic from different client types. This figure shows the Client Type action as it looks when first added to an access policy.
Client Type
By default, the Client Type action includes these branches:
- Edge Portal
- Indicates that the user is connecting with the BIG-IP® Edge Portal® mobile app.
- Edge Client
- Indicates that the user is connecting with the BIG-IP® Edge Client® or BIG-IP Edge Client app, supported on multiple devices and operating systems.
- Citrix Receiver
- Indicates that the user is connecting using a later Citrix Receiver client.
- Citrix Receiver (legacy)
- Indicates that the user is connecting using an earlier Citrix Receiver client (identified with PN Agent).
- VMware View
- Indicates that the user is connecting using a VMware Horizon View client.
- Full or Mobile Browser
- Indicates the user is connecting with a Windows web browser or a mobile browser.
- Windows Inbox F5 VPN Client
- Indicates the user is connecting using the Windows Inbox F5 VPN client.
- fallback
- Indicates the user is connecting with another method.
APM supports the client types on multiple operating systems. Refer to AskF5™ (support.f5.com) to look up the supported operating systems and versions in the compatibility matrix for your version of APM.
About Citrix client bundles in APM
A Citrix client bundle enables delivery of a Citrix Receiver client to a user's Windows computer when a client is not currently installed, or when a newer client is available. Access Policy Manager® (APM®) detects whether the Citrix Receiver client is present and redirects users to a download URL, or downloads a Citrix Receiver client that you have uploaded.
In Access Policy Manager, you specify the Citrix client bundle in a connectivity profile. By default, a connectivity profile includes the default Citrix bundle, /Common/default-citrix-client-bundle, which contains a download URL, receiver.citrix.com.
About APM SSO support for Citrix clients
Access Policy Manager® (APM®) supports two single sign-on options for Citrix that provide password-less authentication:
- Kerberos - Supports any kind of password-less authentication on APM: SmartCard, RSA PIN, client SSL certificate, and so on. Citrix supports Kerberos only for XenApp.
- SmartCard - Citrix supports SmartCard for XenDesktop. Citrix also supports SmartCard for
XenApp. Note: When using SmartCard with XenApp, a user is prompted for a SmartCard PIN twice: once when logging in to APM and again when starting a Citrix application.
These options work in APM only when:
- Citrix is configured to support SmartCard SSO (with Kerberos) or SmartCard.
- Citrix requirements for using SmartCard SSO or SmartCard are met.
About the iApp for Citrix integration with APM
An iApps® template is available for configuring Access Policy Manager® and Local Traffic Manager™ to integrate with Citrix applications. The template can be used on the BIG-IP® system to create an application service that is capable of performing complex configurations. You can download the template from the F5® DevCentral™ iApp Codeshare wiki at https://devcentral.f5.com/wiki/iApp.Citrix-Applications.ashx. A deployment guide is also available there.
Task summary for XML Broker integration with APM
Ensure that you configure the Citrix components in the Citrix environment, in addition to configuring the BIG-IP® system to integrate with Citrix XML Brokers.
Perform these tasks on the BIG-IP system so that Access Policy Manager® can present Citrix published resources on a dynamic webtop.
Task list
Creating a pool of Citrix XML Brokers
Configuring a Citrix remote desktop resource
Configuring a dynamic webtop
Creating an access policy for Citrix SSO (APM dynamic webtop)
- Configure the appropriate AAA servers to use for authentication.Note: An Active Directory AAA server must include the IP address of the domain controller and the FQDN of the Windows domain name. If anonymous binding to Active Directory is not allowed in your environment, you must provide the admin name and password for the Active Directory AAA server.
- Create an access profile using default settings.
-
To add RSA SecurID authentication, click the plus (+)
icon between Logon Page and
Deny:
-
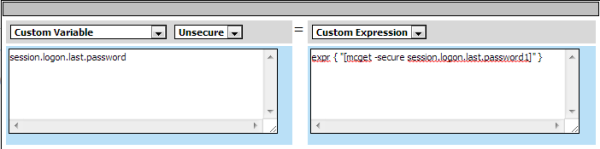
From the right-side list, retain the Custom
Expression setting, and type expr { "[mcget
-secure session.logon.last.password1]" }. For two-factor
authentication, type expr {[mcget
{session.logon.last.password1}]} .
-
From the right-side list, retain the Custom
Expression setting, and type expr { "[mcget
-secure session.logon.last.password1]" }. For two-factor
authentication, type expr {[mcget
{session.logon.last.password1}]} .
You should have an access policy that contains actions for both Citrix Receiver client types.
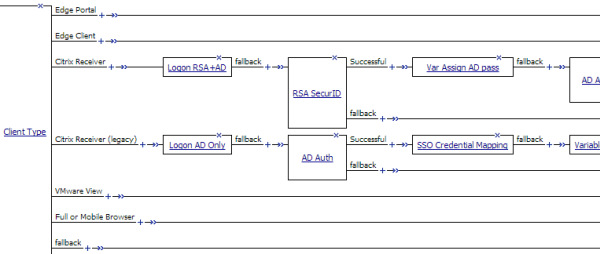
Example access policy for legacy Citrix Receiver clients and later Citrix Receiver clients
Assigning Citrix resources to an access policy for Citrix integration
Adding Citrix Smart Access actions to an access policy
Example access policy with Citrix SmartAccess filters
Here is a typical example access policy that uses Citrix SmartAccess filters to restrict access to published applications based on the result of client inspection. Client inspection can be as simple as IP Geolocation Match or Antivirus. The figure shows an access policy being configured with a Citrix Smart Access action to set a filter to antivirus after an antivirus check is successful.
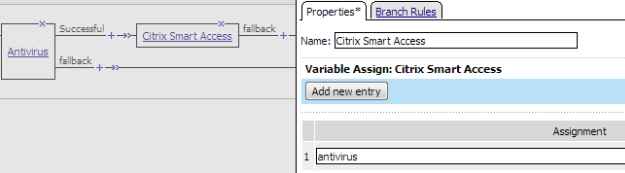
Example access policy with Citrix SmartAccess action and an antivirus check
Verifying log settings for the access profile
Adding a connectivity profile
Adding Citrix Receiver for HTML5 to a connectivity profile
- From the command line, type msiexec /a filepath to MSI file /qb TARGETDIR=filepath to target folder .
-
On the Main tab, click .
- In the Name field, type a name that includes html5.
- From the Source list, select Windows Package File.
- Click Choose File and upload the file ./Citrix/HTML5 Management/HTML5Client.zip.
-
On the Main tab, click .
-
On the Main tab, click .
- Click the checkbox next to the Access Profile that is associated with the Citrix Virtual Server.
- Click OK.
Creating a virtual server to support Citrix web and mobile clients
Overview: Giving APM users time to enter a Smart Card PIN
If you have configured Access Policy Manager® for smart card authentication and your users cannot enter a PIN before the SSL handshake times out, they can experience problems such as browser failure or errors because the BIG-IP® system sends a TCP reset after the SSL handshake times out. You can mitigate this problem by increasing the handshake timeout in the client SSL profile.
Updating the handshake timeout in a Client SSL profile
By default, a client SSL profile provides a 10-second SSL handshake timeout. You might need to modify the timeout to give users more or less time for the SSL handshake to complete.


