Manual Chapter :
Configuring Webtops for Portal Access
Applies To:
Show Versions
BIG-IP APM
- 11.6.5, 11.6.4, 11.6.3, 11.6.2, 11.6.1
About webtops
There are three webtop types you can define on Access Policy Manager® (APM®). You can define a network access as only a webtop, a portal access webtop, or a full webtop.
Important: Do not assign a webtop for a portal access connection configured for minimal patching
mode. This configuration does not work.
- A network access webtop provides a webtop for an access policy branch to which you assign only a network access resource.
- A portal access webtop provides a webtop for an access policy branch to which you assign only portal access resources.
- A full webtop provides an access policy ending for an access policy branch to which you can
optionally assign portal access resources, app tunnels, remote desktops, and webtop links, in
addition to network access tunnels. Then, the full webtop provides your clients with a web page
on which they can choose a network access connection to start.Note: If you add a network access resource with Auto launch enabled to the full webtop, the network access resource starts when the user reaches the webtop. You can add multiple network access resources to a webtop, but only one can have Auto launch enabled.
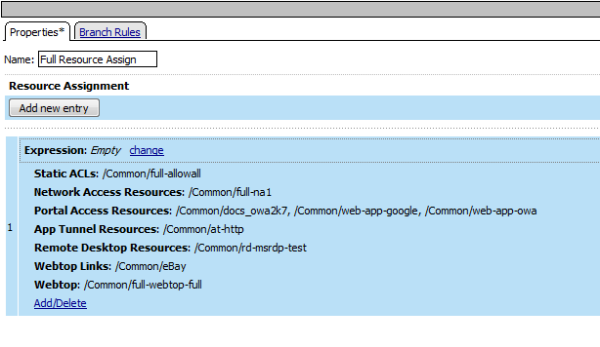 Resource assign action with resources and a webtop assigned
Configuring a webtop for portal access only
A webtop provides a screen for your users to connect and disconnect from the portal access
connection.
- On the Main tab, click .
- Click Create to create a new webtop.
- Type a name for the webtop you are creating.
- From the Type list, select Portal Access.
- In the Portal Access Start URI field, specify the URI that the webtop starts.
- Click Finished.
The webtop is now configured, and appears in the list. You can edit the webtop further, or
assign it to an access policy.
To use this webtop, it must be assigned to an access policy with an advanced resource assign
action or with a webtop and links assign action.
Important: Do not assign a webtop for
a portal access connection configured for minimal patching mode. This configuration does not
work.
Configuring a full webtop
A full webtop allows your users to connect and disconnect from a network access
connection, portal access resources, SAML resources, app tunnels, remote desktops, and
administrator-defined links.
- On the Main tab, click .
- Click Create to create a new webtop.
- Type a name for the webtop you are creating.
- From the Type list, select Full.
- Click Finished.
The webtop is now configured, and appears in the list. You can edit the webtop
further, or assign it to an access policy.
To use this webtop, it must be assigned to an access policy with an advanced
resource assign action or with a webtop and links assign action. All resources assigned
to the full webtop are displayed on the full webtop.
Creating a webtop link
You can create and customize links that you can assign to full webtops. In this context,
links are defined applications and websites that appear on a webtop, and can be
clicked to open a web page or application. You can customize these links with descriptions and
icons.
The webtop link is now configured, and appears in the list, and on a full webtop assigned with
the same action. You can edit the webtop link further, or assign it to an access policy.
Before you can use this webtop link, it must be assigned to an access policy with a full
webtop, using either an advanced resource assign action or a webtop and links assign action.
Webtop properties
Use these properties to configure a webtop.
| Property setting | Value | Description |
|---|---|---|
| Type | Network Access, Portal Access, or Full |
|
| Portal Access Start URI | URI. | Specifies the URI that the web application starts. For full webtops, portal access resources are published on the webtop with the associated URI you define when you select the Publish on Webtop option. |
| Minimize to Tray | Enable or Disable. | If this check box is selected, the webtop is minimized to the system tray automatically after the network access connection starts. With a network access webtop, the webtop automatically minimizes to the tray. With a full webtop, the webtop minimizes to the system tray only after the network access connection is started. |


