Manual Chapter : Using APM as a SAML IdP no SSO portal

Applies To:

Show Versions Show Versions

BIG-IP APM

  • 11.5.10, 11.5.9, 11.5.8, 11.5.7, 11.5.6, 11.5.5, 11.5.4, 11.5.3, 11.5.2
Manual Chapter

Overview: Configuring a BIG-IP system as IdP for SP-initiated connections only

Note: A configuration that allows users to initiate connection from service providers (SPs) only, works only when all service providers require the same assertion type, and value, and the same attributes from the IdP.

Configuration requirements for supporting SP-initiated connections only

For Access Policy Manager as a SAML identity provider (IdP) to support only connections that start at a service provider, you need to meet these configuration requirements:
  • SAML IdP services: One.
  • SAML SP connectors: One for each SAML service provider.
  • SSL certificate and key: One set for each SAML service provider, imported into the store on the BIG-IP system.
  • An access profile.
  • An access policy.
  • A virtual server that assigns the access profile.
Configuration requirements are summarized in this diagram.
Configuration requirements for supporting SP-initiated connections
Configuration to support SP-initiated connections on BIG-IG as IdP

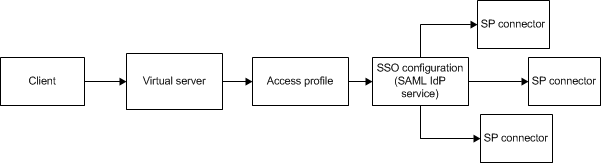
About local IdP service

A SAML IdP service is a type of single sign-on (SSO) authentication service in Access Policy Manager (APM). When you use a BIG-IP system as a SAML identity provider (IdP), a SAML IdP service provides SSO authentication for external SAML service providers (SPs). You must bind a SAML IdP service to SAML SP connectors, each of which specifies an external SP. APM responds to authentication requests from the service providers and produces assertions for them.

About SP connectors

A SAML service provider connector (an SP connector) specifies how a BIG-IP system, configured as a SAML Identity Provider (IdP), connects with an external service provider.

What are the available ways I can configure a SAML SP connector?

You can use one or more of these methods to configure SAML service provider (SP) connectors in Access Policy Manager.

  • From metadata - Obtain a metadata file from the vendor and import it into Access Policy Manager. The advantage to this method is that the vendor provides the majority of all required data, including certificates. You can complete the configuration by simply typing a unique name for the SP connector, a very few additional required fields, and browsing to and importing the file. Access Policy Manager then configures the SP connector.
  • From template - Use templates that Access Policy Manager provides for some vendors; for example, Google. The advantages to this method are that:
    • Most required data is included in the template
    • Additional required data is minimal. You can obtain it and certificates from the vendor
    After you select a template and type data into a few fields, Access Policy Manager configures the SP connector.
  • Custom - Obtain information from the vendor and type the settings into the Configuration utility. To use this method, you must also obtain certificates from the vendor and import them into the BIG-IP system. Use this method when a metadata file or a template for an SP connector is not available.

Task summary

Setting up a BIG-IP system as a SAML identity provider (IdP) system involves two major activities:

  • First, you set up connection from the BIG-IP system to the external SAML service providers (SPs)
  • Then, you set up connection from the external SAML SPs to the BIG-IP system

Task list

Flowchart: Configuration to support SP-initiated connections only

This flowchart illustrates the process for configuring a BIG-IP system as a SAML identity provider (IdP) without providing an SSO portal.

Configuring flowchart for BIG-IP as IdP without an SSO portal

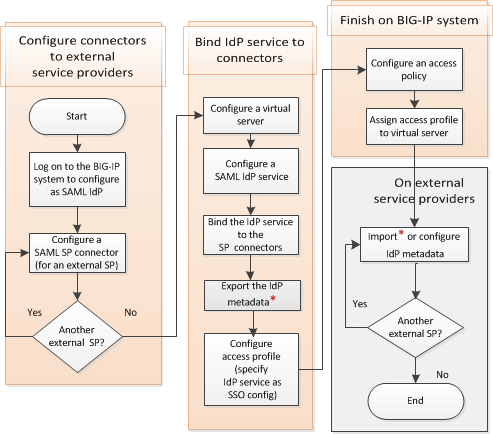
Creating a virtual server for a BIG-IP (as SAML IdP) system

Before you start this task, configure a client SSL profile and a server SSL profile if you are going to create an SSL virtual server.
Note: Access Policy Manager supports using a non-SSL virtual server for the BIG-IP system configured as a SAML Identity Provider (IdP). However, we recommend using an SSL virtual server for security reasons. The following procedures include steps that are required for configuring an SSL virtual server, such as selecting client and server SSL profiles, and setting the service port to HTTPS.
Specify a host virtual server to use as the SAML IdP.
  1. On the Main tab, click Local Traffic > Virtual Servers. The Virtual Server List screen opens.
  2. Click the Create button. The New Virtual Server screen opens.
  3. In the Name field, type a unique name for the virtual server.
  4. For the Destination setting, select Host and in the Address field, type the IP address for the virtual server.
  5. In the Service Port field, type 443 or select HTTPS from the list.
  6. For the HTTP Profile setting, verify that the default HTTP profile, http, is selected.
  7. For the SSL Profile (Client) setting, from the Available list, select the name of the Client SSL profile you previously created, and using the Move button, move the name to the Selected list.
  8. For the SSL Profile (Server) setting, from the Available list, select the name of the Server SSL profile you previously created, and using the Move button, move the name to the Selected list.
  9. Click Finished.
The virtual server for the BIG-IP system configured as an IdP now appears on the Virtual Server List. The virtual server destination is available for use in one or more SAML IdP service configurations.

Configuring SAML SP connectors

Obtain an SSL certificate from the SAML service provider (SP) and import it into the certificate store on the BIG-IP system.
Configure information about a SAML service provider so that Access Policy Manager (APM) can act as a SAML Identity Provider (IdP) for it.
Note: Configure one SAML SP connector for each external SAML service provider for which this BIG-IP system provides SSO authentication service.
  1. On the Main tab, click Access Policy > SAML > BIG-IP as IdP. The BIG-IP as IdP screen displays a list of SAML IdP services.
  2. On the menu bar, click External SP Connectors. A list of SAML SP connectors displays.
  3. Click Create. The Create New SP Connector screen opens.
  4. In the Service Provider Name field, type a unique name for the SAML SP connector.
  5. In the SP Entity ID field, type a unique identifier for the service provider. This is usually a unique URI that represents the service provider. You should obtain this value from the service provider.
  6. Select Endpoint Settings from the left pane. The appropriate settings are displayed.
    1. In the Assertion Consumer Service URL field, type the URL where the IdP can send an assertion to this service provider. APM supports HTTP-POST binding to this service.
    2. Optional: In the Relay State field, type a value. The relay state can be an absolute path, such as /hr/index.html; it can be a URL, such as https://www.abc.com/index.html; or, it can be anything that the service provider understands. The service provider uses this information to redirect users after they are authenticated. APM sends this value back to the service provider as part of the assertion response in the RelayState parameter.

      When the RelayState parameter is already part of the authentication request to the BIG-IP system, APM returns the value that was sent in the request. Otherwise, APM uses the value from this configuration.

  7. Select Security Settings from the left pane.
    1. Optional: In the Authentication Request sent by this device to IdP Settings area, select a setting from the Will be signed list. The default setting is No. The setting indicates whether this service provider signs the authentication requests it sends to the SAML IdP (this BIG-IP system).
    2. In the Assertion sent to SP by this device area, select Must be signed (default setting). When this setting is selected, APM signs the assertion that it sends to this service provider. Clearing this setting is not recommended.
    3. If this service provider requires an encrypted assertion from the IdP (this BIG-IP system), select Must be encrypted and select an Encryption Type. APM supports AES128, AES192, and AES256 encryption types.
    4. In the Certificate Settings area, select a certificate from the SP's Certificate list. This device (BIG-IP system as IdP) uses the certificate to verify the signature of the authentication request from the SP. It also uses it to encrypt the assertion sent to the SP from this device.
  8. Select SLO Service Settings from the left pane. SLO stands for Single Logout.
    1. Optional: In the Single Logout Request URL field, type a URL where APM should send a logout request to this service provider when the BIG-IP system initiates a logout request.
    2. In the Single Logout Response URL field, type a URL to which the SP should send a logout response to the BIG-IP system to indicate that single logout is complete.
    Note: APM supports HTTP-POST binding for the SLO service. For SLO to work, all entities (SPs and IdPs), must support SLO.
APM creates a SAML SP connector. It is available to bind to a SAML IdP service.

Configuring a SAML IdP service

Configure a SAML Identity Provider (IdP) service for the BIG-IP system, configured as a SAML IdP, to provide authentication service for SAML service providers (SPs).
Note: Configure this IdP service to meet the requirements of all SAML service providers that you bind with it.
  1. On the Main tab, click Access Policy > SAML > BIG-IP as IdP. The BIG-IP as IdP screen displays a list of SAML IdP services.
  2. Click Create. The Create New IdP Service popup screen displays.
  3. In the IdP Service Name field, type a unique name for the SAML IdP service.
  4. In the IdP Entity ID field, type a unique identifier for the IdP (this BIG-IP system). Include the URI that points to the virtual server with the BIG-IP system and a unique path. For example, if you type https://bigip-idp/idp, https://bigip-idp should point to the virtual server you use for the BIG-IP system as a SAML IdP and /idp is a string that distinguishes one IdP from another when this BIG-IP system supports multiple SAML IdP services. The path portion on the IdP Entity ID is not a physical location on the BIG-IP system.
  5. Click Assertion Settings from the left pane. The applicable settings display.
    1. From the Assertion Subject Type list, select the type of subject for the IdP to authenticate.
    2. From the Assertion Subject Value list, select the name of a session variable. This variable, %{session.logon.last.username}, is generally applicable. Some session variables are applicable depending on the type of authentication that you use for your site.
    3. Select the Enable encryption of Subject check box to encrypt the subject. The Encryption Strength list becomes available.
    4. From the Encryption Strength list, select a value. Supported values are AES128, AES192, and AES256.
  6. Click SAML Attributes from the left pane. The SAML Attributes list displays. For each attribute that you want to include in the attribute statement, repeat these substeps.
    1. Click Add.
    2. Type a name and a value in the new row. Usually, the name is a fixed string; it can be a session variable. You can use a session variable for the value. This example shows using a fixed string for the name and a session variable for the value. Name: user_telephonenumber and value: %{session.ad.last.attr.telephoneNumber}.
    3. Select the Encrypt check box and select a value from the Type list. Select the check box to encrypt the attribute. Supported values for type are AES128, AES192, and AES256.
    4. Click Update.
  7. Click Security Settings from the left pane.
    1. From the This device's Assertion Signing Key list, select the key from the BIG-IP system store. None is selected by default.
    2. From the This device's Public Certificate list, select the certificate from the BIG-IP system store. When selected, the IdP (the BIG-IP system) publishes this certificate to the service provider so that the service provider can verify the assertion. None is selected by default.
  8. Click OK. The popup screen closes. The new IdP service appears on the list.
APM creates a SAML IdP service. It is available to bind to SAML SP connectors. This service works with external service providers that share the same requirements for assertion settings and SAML attribute settings.

Binding a SAML IdP service to multiple SP connectors

Select a SAML Identity Provider (IdP) service and the SAML service provider (SP) connectors that use the service so that this BIG-IP system can provide authentication (SAML IdP service) to external SAML service providers.
  1. On the Main tab, click Access Policy > SAML > BIG-IP as IdP. The BIG-IP as IdP screen displays a list of SAML IdP services.
  2. Select a SAML IdP service from the list. A SAML IdP service provides authentication service.
  3. Click Bind/Unbind SP Connectors. The screen displays a list of available SAML SP connectors.
  4. Select only the SAML SP connectors that you want to use this service.
  5. Click OK. The screen closes.
The SAML IdP service is bound to the SAML service providers specified in the SAML SP connectors.

Exporting SAML IdP metadata from APM

You need to convey the SAML Identity Provider (IdP) metadata from APM to the external service providers that use the SAML IdP service. Exporting the IdP metadata for a SAML IdP service to a file provides you with the information that you need to do this.
  1. On the Main tab, click Access Policy > SAML > BIG-IP as IdP. The BIG-IP as IdP screen displays a list of SAML IdP services.
  2. Select a SAML IdP service from the table and click Export Metadata. A popup screen opens, with No selected on the Sign Metadata list.
  3. For APM to sign the metadata, perform these steps:
    1. Select Yes from the Sign Metadata list.
    2. Select a key from the Signing Key list. APM uses the key to sign the metadata.
    3. Select a certificate from the Signature Verification Certificate list. APM exports the certificate to the metadata file. The system on which you import the metadata file can use the certificate to verify the metadata signature.
  4. Select OK. APM downloads an XML file.
An XML file that contains IdP metadata is available.

Creating an access profile associated with the SAML IdP service

Use this procedure when this BIG-IP system, as a SAML Identity Provider (IdP), supports service provider-initiated connections only.
  1. On the Main tab, click Access Policy > Access Profiles. The Access Profiles List screen opens.
  2. Click Create. The New Profile screen opens.
  3. Type a name for the access profile.
  4. In the SSO Across Authentication Domains (Single Domain mode) area, from the SSO Configuration list, select the name of the local SAML IdP service.
  5. In the Language Settings area, add and remove accepted languages, and set the default language. A browser uses the highest priority accepted language. If no browser language matches the accepted languages list, the browser uses the default language.
  6. Click Finished.
The access profile now shows up in the Access Profiles List.

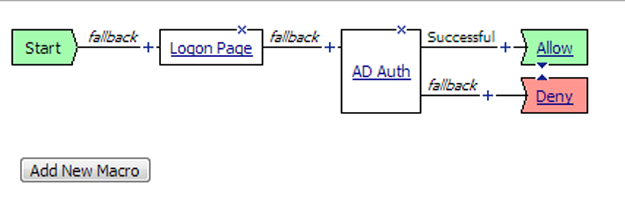
Configuring an access policy to provide authentication from the local IdP

Configure an access policy so that this BIG-IP system, as a SAML Identity Provider (IdP) can provide authentication for SAML service providers.
  1. On the Main tab, click Access Policy > Access Profiles. The Access Profiles List screen opens.
  2. In the Access Policy column, click the Edit link for the access profile you want to configure. The visual policy editor opens the access policy in a separate screen.
  3. Click the (+) icon anywhere in the access policy to add a new action item. A popup screen opens, listing predefined actions on tabs such as General Purpose, Authentication, and so on.
  4. On the Logon tab, select Logon Page and click the Add Item button. The Logon Page Agent properties screen opens.
  5. Make any changes that you require to the logon page properties and click Save. The properties screen closes and the visual policy editor displays.
  6. Add one or more authentication checks on the fallback branch after the Logon Page action. Select the authentication checks that are appropriate for application access at your site.
  7. Optional: Add any other branches and actions that you need to complete the access policy.
  8. Change the Successful rule branch from Deny to Allow and click the Save button.
  9. Click the Apply Access Policy link to apply and activate the changes to the access policy.
  10. Click the Close button to close the visual policy editor.
You have an access policy that presents a logon page and authenticates the user..

Access policy to provide authentication for SAML service providers when this BIG-IP system is the IdP

Example access policy for SAML IdP-initiated connection
To put the access policy into effect, you must attach it to a virtual server.

Adding the access profile to the virtual server

You associate the access profile with the virtual server so that Access Policy Manager can apply the profile to incoming traffic.

  1. On the Main tab, click Local Traffic > Virtual Servers. The Virtual Server List screen opens.
  2. Click the name of the virtual server you want to modify.
  3. In the Access Policy area, from the Access Profile list, select the access profile.
  4. Click Update to save the changes.
Your access policy is now associated with the virtual server.

Adding IdP metadata from APM to external SAML SPs

To complete the agreement between Access Policy Manager as the SAML IdP and a SAML service provider, you must configure IdP metadata at the service provider.
Note: Complete this step on each SAML service provider for which an SP connector is bound to the SAML IdP service in APM.
Using the method that the vendor provides, either:
  • Import the SAML IdP metadata file that you exported from APM for the SAML IdP service that this service provider uses.
  • Or take information from the SAML IdP metadata file that you exported from APM for the SAML IdP service and add it to the service provider using the vendor's interface. Pay particular attention to the values for entityID, AssertionConsumerService, SingleSignOnService, and the certificate.
    Note: Regardless of the value of entityID in the metadata file, type an SSO URI that consists of the virtual server host and /saml/idp/profile/redirectorpost/sso. For example, if the host virtual server is https://Bigip-idp, type: https://Bigip-idp/saml/idp/profile/redirectorpost/sso